Reading crochet patterns can be totally daunting for beginners, what with all those letters and numbers looking like hieroglyphics. But if you know how to break your pattern down, it’s much easier to decipher. These are the tips to get you started — keep ’em handy and soon you’ll be able to read any pattern like a pro.
Choosing a Crochet Pattern

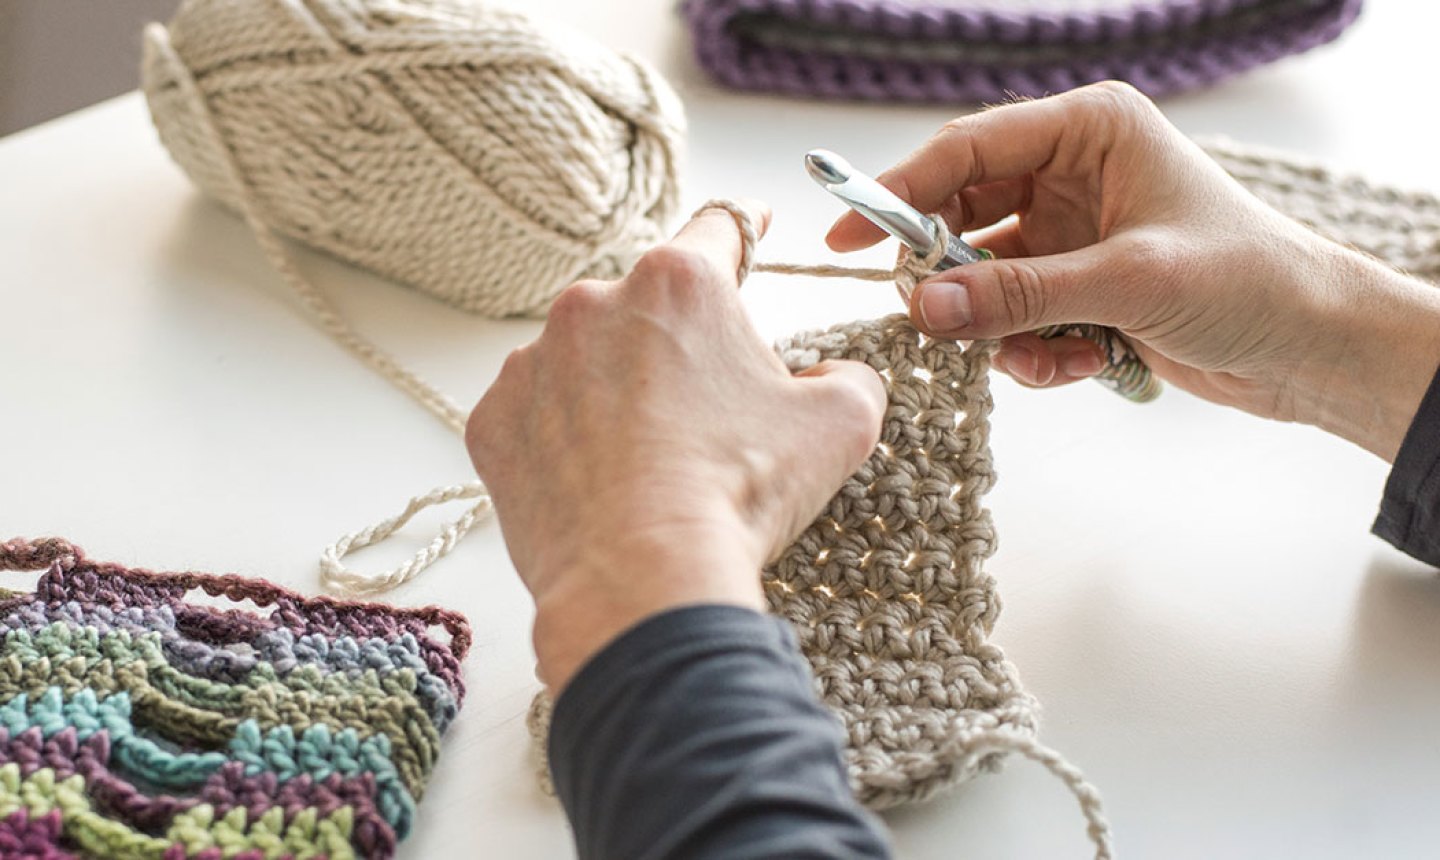
Usually when you pick a pattern, you’d simply find a design you like and start stitching. But if you’re a beginner, it’s better to find a project with a tutorial element over a text-based pattern. The crochet cowl pictured above has a step-by-step video tutorial that’s easy to follow, making it easier if you get stuck and aren’t sure how to continue.
You also want to keep crochet’s four skill levels in mind: beginner, easy, intermediate and advanced/experienced. Newbies should start with a beginner pattern — these use only basic stitches and minimal shaping techniques — before moving on to easy patterns, which require a wider range of skills.
Reading a Crochet Pattern
Once you’ve chosen your pattern, sit down and look it over to make sure you fully understand what the project demands. Most crochet patterns have the following sections:
- An “about” section that has pattern notes
- Yarn, materials and notions needed
- Information on gauge, tension and/or sizing
- Abbreviations used
- Any special stitches used
These all provide useful (and often crucial) details you need to know before you begin. Let’s dig into them a little more.
The About Section
Pay attention to which crochet terms are used in this section, as there are international differences between terms used in the U.S. and the U.K. You want your pattern to be written in the terminology you’re used to.
Yarn, Materials and Notions
Double check you have all the yarn and other materials you need. If you’re using multiple skeins of yarn that have different dye lot numbers, you should know how manipulate them to avoid awkward and unintentional color variations.
Gauge and Tension
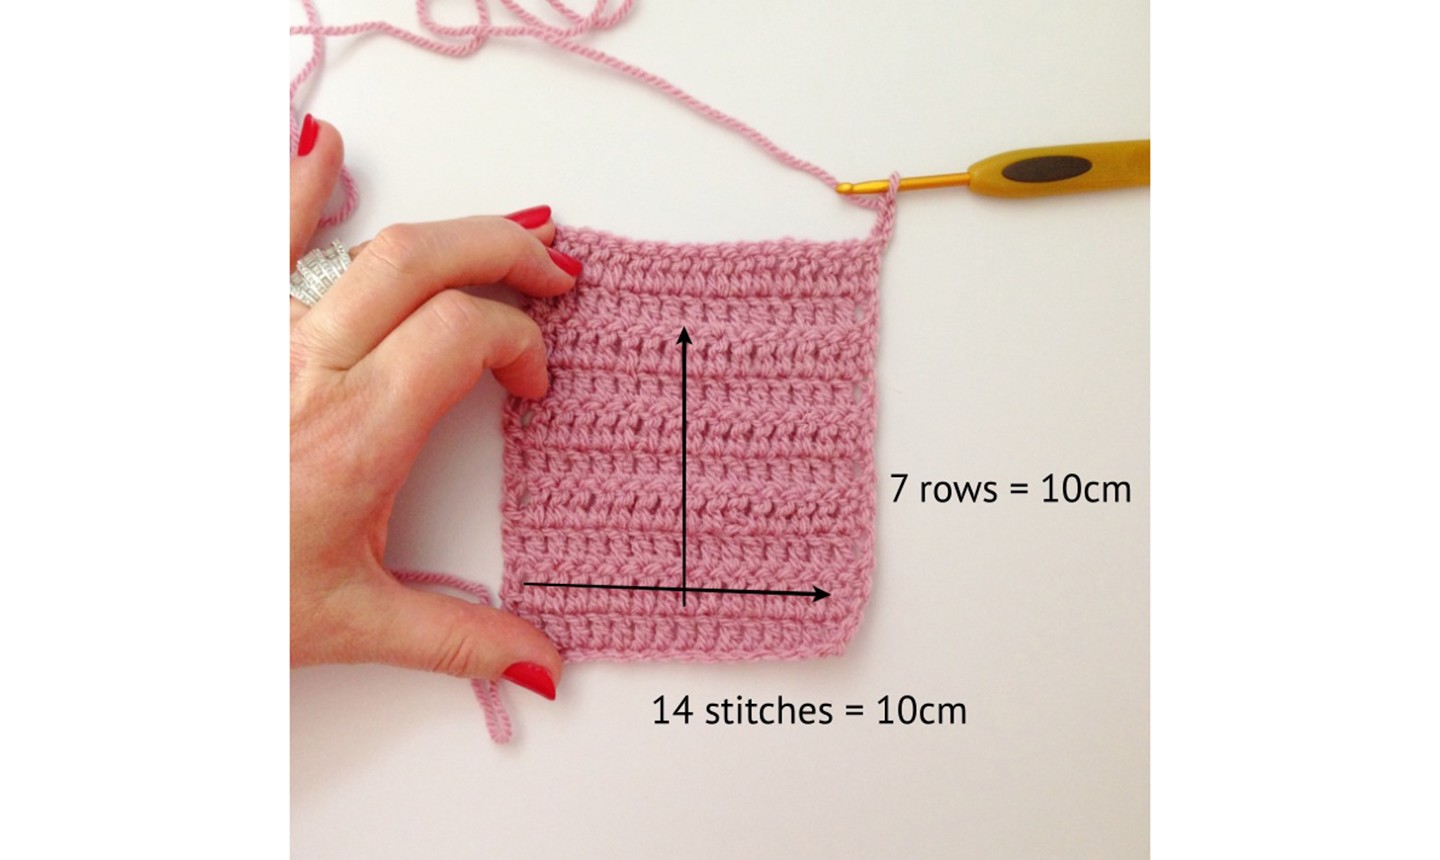
Unless you’re making a scarf or blanket, always, always, always make a gauge swatch before you begin your project. It might seem like extra work (especially if you’re itchin’ to jump right in), but gauge ensures your project will be the correct size. Usually a pattern will say something like:
14 sts = 10 cm (4″); 7 rows = 10 cm (4″) in double crochet using a size G hook (4mm)
Let’s decode this: to make a gauge swatch, you’ll use your G hook and the yarn you intend to use for the project. Chain your first row, making a few more chains than what’s listed. In this case, the pattern requires 14 stitches, so make about 20. Then work at least 10 rows of double crochet to finish the swatch.
Now you need to check your gauge . First, use a ruler to check how many stitches across fit into 4″ (you should have 14). Then, check how many rows fit into 4″ (this should be 7). If your numbers are correct, you have the correct gauge.
If your gauge is off, there are two ways you can fix it . If you have more stitches and rows than the gauge calls for, go up a hook size or half a size. This will help you crochet more loosely to meet the gauge. If you have fewer stitches and rows than needed, go down a hook size or half a size.
Abbreviations Used
Reading crochet patterns is a bit like reading another language — one that has a lot of abbreviations. It might be tricky at first, but soon the shorthand will become second nature. It’s helpful to get familiar with a crochet stitch glossary, but here’s a brief overview of abbreviations beginners are likely to see:
- beg = beginning
- ch = chain stitch
- ch sp = chain space
- dc = double crochet
- dec = decrease
- inc = increase
- mc = main color
- rep = repeat
- rs = right side
- sc = single crochet
- sl st = slip stitch
- st = stitch
- tr = treble crochet
- ws = wrong side
Note that some designers phrase patterns slightly differently. One might write “4ch” to indicate making four foundation chains, while another might write “Ch 4.” Once you know the abbreviations, the pattern should be easy to follow despite these slight differences.
Special Stitches Used
If the pattern mentions a stitch you haven’t done before, check the pattern instructions and practice on some spare yarn first. If it feels difficult to execute, find a tutorial to practice with until you are confident with the new technique.
Decoding a Pattern
Now that you know what to expect from each section of a pattern, let’s walk through a simple granny square so you can decode the pattern language. It will look something like this:
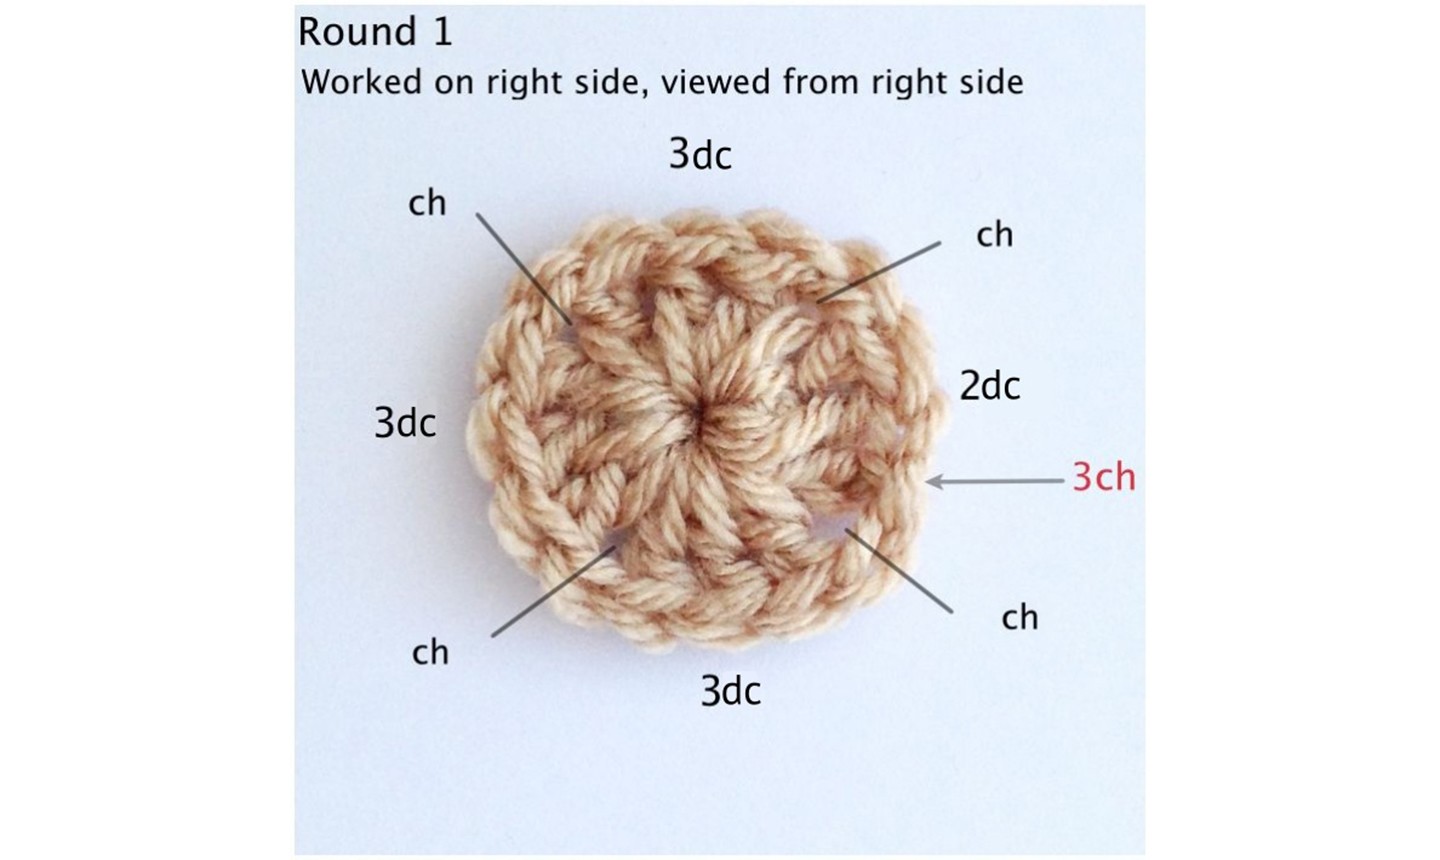
Round 1 RS: Start with yarn A. 4ch then join with sl st to form a ring. 3ch (counts as a dc). 2dc into the ring, then 1ch. *3dc into ring, 1ch* rep 2 more times. Sl st to join. Fasten off yarn A.
Here’s the line broken down:
1. This round is worked on the right side (RS).
2. Using yarn A (your first yarn color), make a foundation chain with four chains, then make a slip stitch in the first chain to form a ring.
3. Make 3 chains, which count as a double crochet stitch.
4. Work 2 more double crochet stitches into the ring. Then make a chain.
5. *Make 3 more double crochet stitches into the ring, followed by a chain.* Repeat this last step (the steps noted between the asterisks) two more times.
6. Fasten off your yarn.
Phew! Now onto round two:
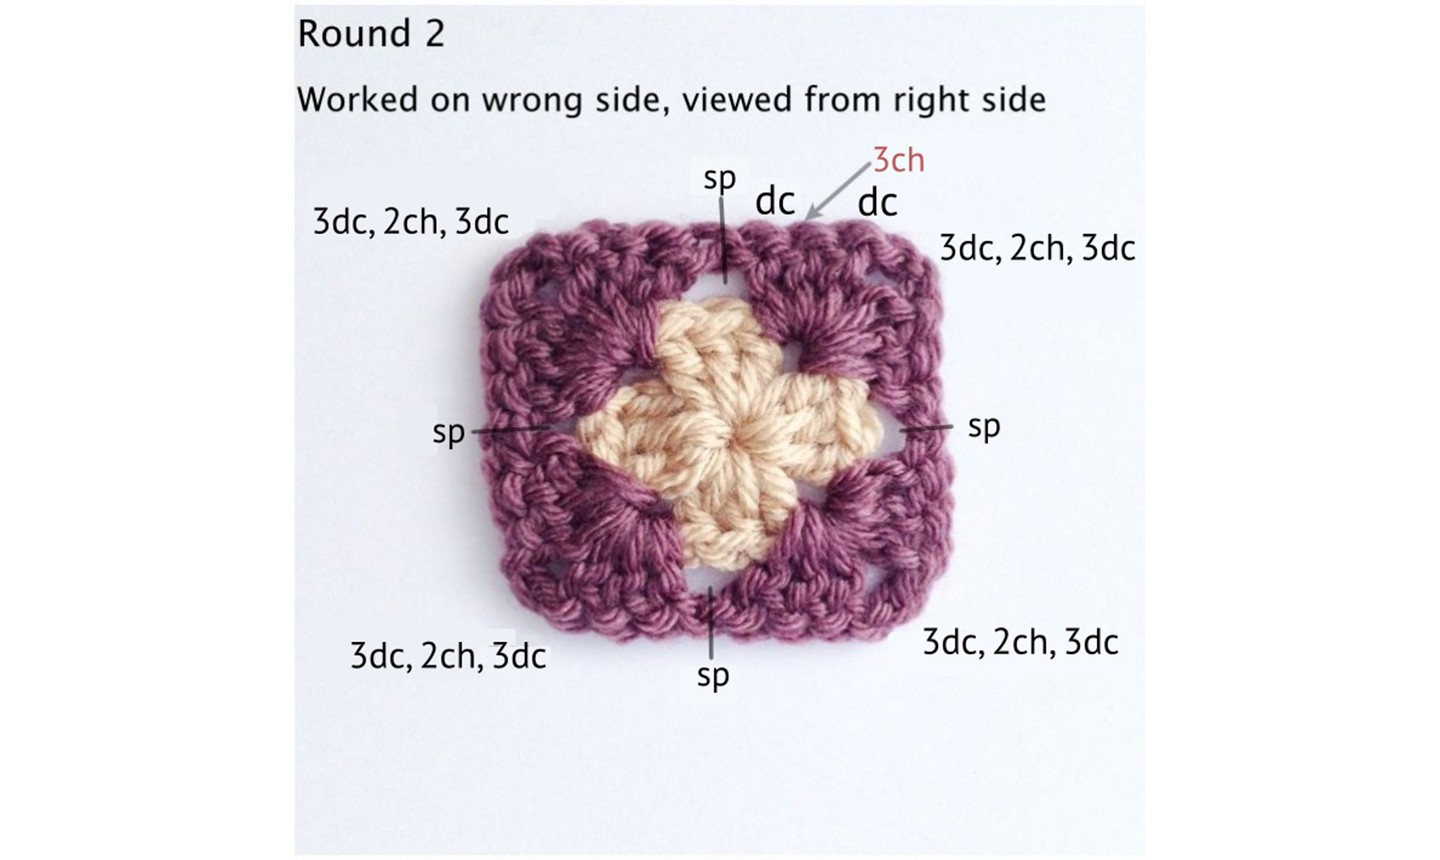
Round 2: Turn and work on the WS. Join yarn B into any ch sp, 3ch. 1dc, 1ch. *In next ch sp: 3dc, 2ch, 3dc, 1ch.* Rep 2 times. 3dc, 2 ch, 1dc in first space then sl st to join, fasten off yarn B.
1. Flip your work over so that you’re working Round 2 on the wrong side.
2. Join your second color of yarn into any chain space. Make 3 chains, 1 double crochet stitch and 1 chain.
3. *Move onto the next chain space and work 3 double crochet stitches, 2 chains and 3 more double crochet stitches, and then 1 chain.* Repeat that last step (the steps between the asterisks) into each of the next 2 chain spaces.
4. When you reach the first chain space, work 3 double crochet stitches, 2 chains and 1 double crochet to complete the first corner.
5. Close the round with a slip stitch into the top of your 3 starting chains. Fasten off your yarn.
Then begin round 3:
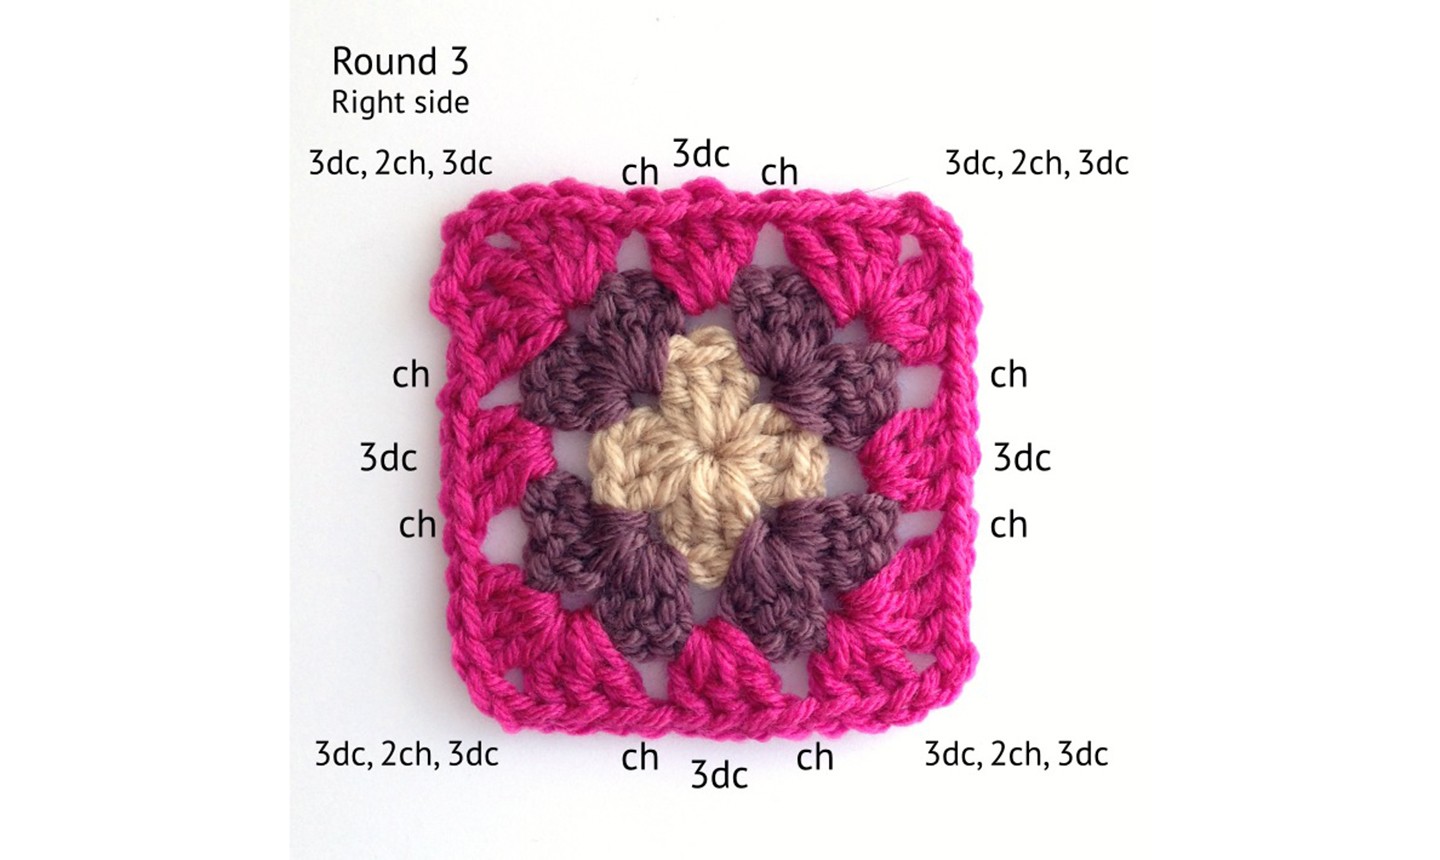
Round 3: Turn to work on RS. Join yarn C into any corner space. 3ch, 1dc, 1ch. *3dc into the next ch sp, 1 ch. 3dc, 2ch, 3dc, ch into next corner sp.* Rep from * to * twice. 3dc into next ch sp, 1ch. 3dc, 2ch, 1dc into first corner sp. Sl st to join. Fasten off yarn C.
1. Turn your work so you are working on the right side again.
2. Join your third color of yarn into any corner space.
3. Make 3 chains, 1 double crochet and 1 chain.
4. *Then in the next chain space, make 3 double crochets followed by 1 chain. At the corner, work 3 double crochets, 2 chains and 3 double crochets, followed by a chain.* Repeat the instructions in between the asterisks two times.
5. Complete the final side by making 3 double crochets into the next chain space. Chain 1.
6. Complete the final corner by making 3 double crochets, 2 chains and 1 more double crochet. Join the round to the top of your starting chains with a slip stitch. Fasten off your yarn.
Got the hang of it yet? Here’s the rest of the pattern and photos — see if you can decode these steps on your own!
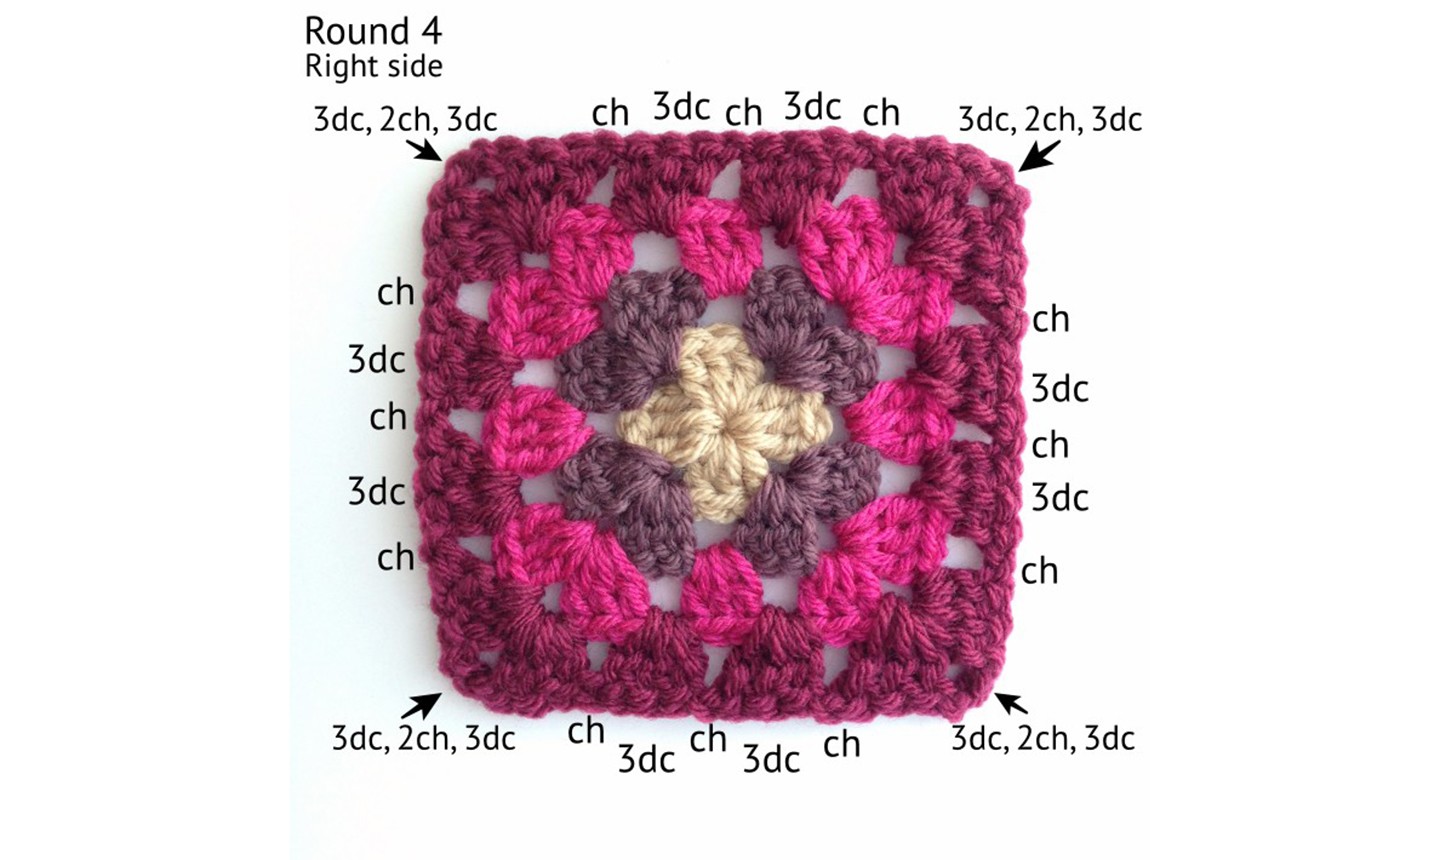
Round 4: Turn and work on WS. Join Yarn D into any corner sp, 3ch, 1dc, 1ch. *3dc, 1ch into next 2 ch sp. 3dc, 2ch, 3dc, ch into the next corner sp.* Rep. from * to ** twice. 3dc, 1ch into next 2 ch sp, 3dc, 2ch, 1dc into the first corner sp. Sl st to join, fasten off.
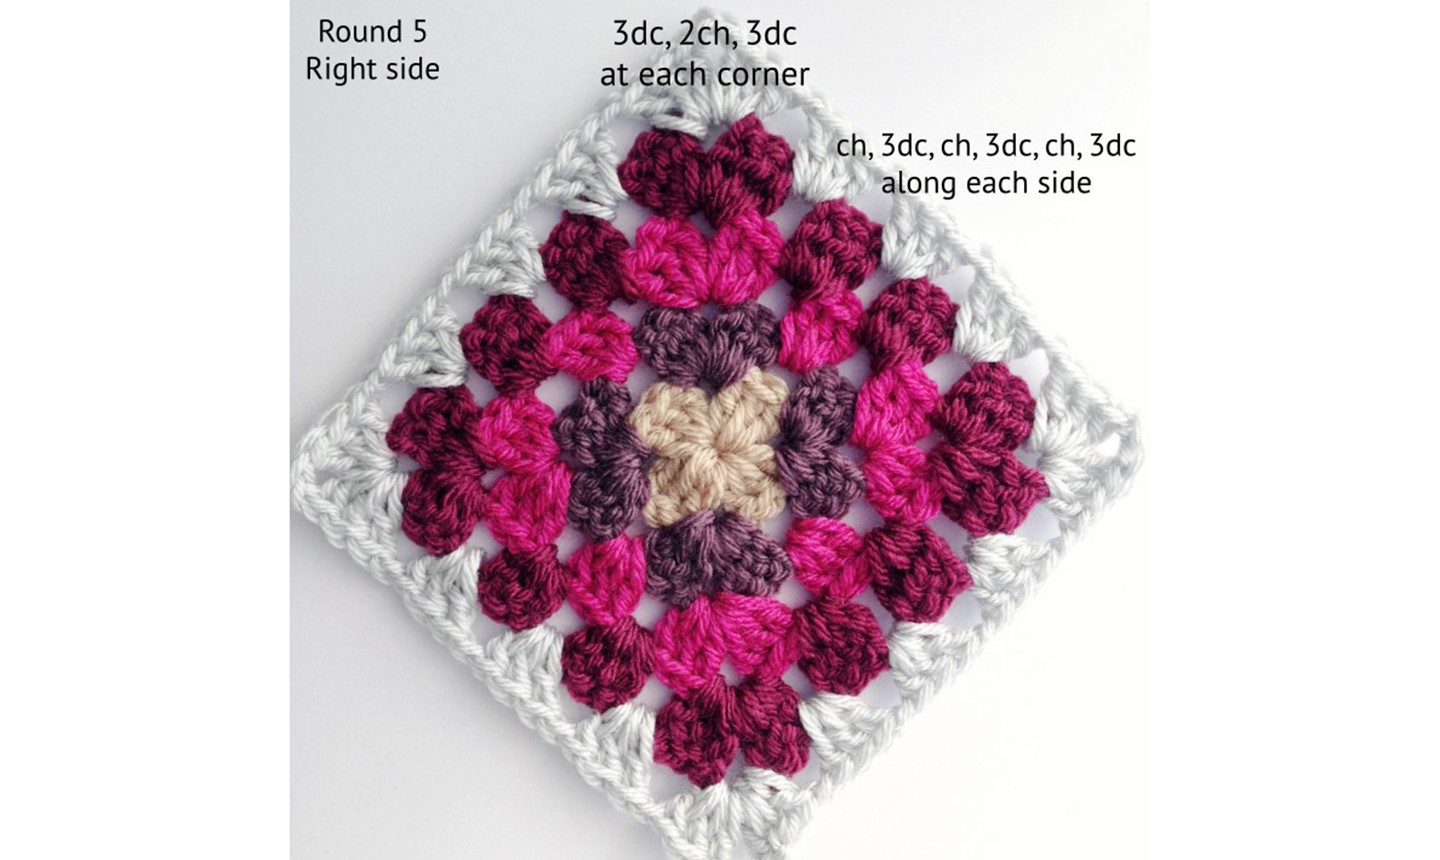
Round 5: Turn and work on the RS. Join yarn E into any corner sp, 3ch, 1dc, 1ch. *3dc, 1ch into next 3 ch sp. 3dc, 2ch, 3dc, ch into the next corner sp.* Rep. from * to ** twice. 3dc, 1ch into next 3 ch sp, 3dc, 2ch, 1dc into the first corner sp. Sl st to join, fasten off.
Once you’ve got the hang of reading pattern language, you’re ready to get started on your very first project!
I’m stuck on a Row 2: [Sc in next 7 (18, 10) sc, inc] 6(3, 6) times. This is how the pattern is written.
Do beginner written patterns assume that the crocheter knows how to join a new color? Thank you.
I am trying to decode a row in a crochet pattern. This is in the pattern: *Ch 4. [1 tr. (Ch 1. 1 tr) 3 times] all in next ch-5 sp. Ch 4**. 1 sc in next ch-5 sp. Rep from * 4 times more, then from * to **once. Join with sl st in first dc.
Great
I need help I can’t image this is correct the way I am reading it. Have ripped out several times!🤪 Pattern states sl st in next ch2 sp. (Beg cluster. Ch 2. Cluster) 5 times I’m confused
Very helpful, thankyou.