In sewing, ease is a total necessity. Without it, you wouldn’t be able to bend, reach, sit or walk in your clothes, as it’s the extra space built into a garment to make it easy, fun and flattering to wear.
That’s why it’s important to factor ease into the fit of a garment. Yes, how much ease depends on the style you’re creating, the fabric being used and personal preference. But these are the things you need to know each and every time, so you can create clothes that look, feel and fit just right.
What Is Ease?
Technically, ease refers to the difference between the finished measurement of the garment and the measurements of the wearer’s body. But there are two measurements you need: wearing ease and design ease.
Also know as movement ease, wearing ease is a small amount of extra room added to a person’s three basic body measurements — bust, waist and hip — to allow for movement. It’s a must unless you plan on staying perfectly still while wearing your garment.
Design ease, sometimes referred to as style ease or fashion ease, is any extra space that is purposely added to a garment by the designer to achieve a certain look or style. Design ease is what determine a garment’s silhouette. A body-con jumpsuit, for instance, would have little to no design ease added in, while a slouchy boyfriend jacket would have quite a bit factored in.
How Much Ease Do You Need?
How much wearing ease you need to add to basic body measurements depends on overall body size (the larger the size, the more ease you need to add), fabric choice (a stretchy knit needs less than a woven), and personal taste. But there are some basic guidelines to keep in mind:
Bust: Add 2-4″
Waist: Add ½-1½”
Hips: Add 2-4″
If you’re drafting a pattern from scratch based on your measurements, simply add in the amounts indicated above to allow for ease of movement. Then, consider the style of the garment you’re creating in order to determine how much design ease to build in to create the look you’re going for.
Working With Patterns
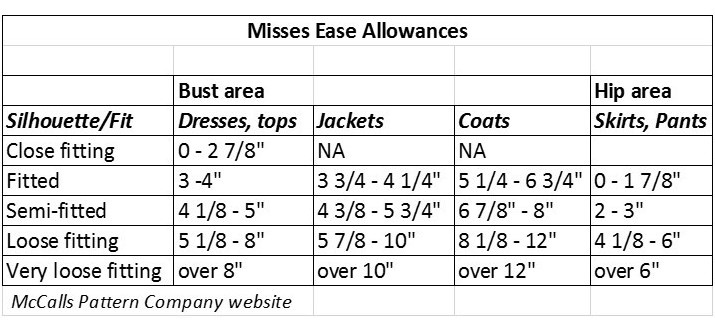
Both wearing and design ease can be adjusted to your personal preference, even if you’re working with a commercial pattern — you can find ease charts for most of the major pattern companies online. Just remember, they typically don’t break it down into wearing ease and design ease, but instead list total ease based on how the garment is supposed to fit (think “semi-fitted” or “loose”). These terms are usually listed on a pattern’s envelope.

You can also calculate how much ease has been added to a pattern yourself. If a pattern gives you both the body measurements of the pattern size and finished garment measurements, the difference between the two numbers is the ease. If the pattern doesn’t give you the finished garment measurements, you can measure the pattern itself, subtract the seam allowances and use that number to determine how much ease has been added.
Once you know how much ease has been figured into the fit of a pattern, you can decide whether you want to make alterations to the pattern, or perhaps even choose a different size.
Lastly, you also need to factor in ease if you need to make a size adjustment to a pattern. For example, let’s say you want to make a basic A-line skirt in a size 14, but the pattern only goes up to size 12. If the total amount of ease added at the hipline is 3¼”, add that to your actual hip measurement to determine your finished garment hip measurement. Next, determine the difference between that number and the finished garment measurement of the size 12. Divide this difference by 4 to figure out how much needs to be added to each pattern section to size up to the 14.
With these tips in mind, you should be able to nail the fit of your garment with — wait for it — total ease.

Share tips, start a discussion or ask other students a question. If you have a question for an expert, please click here.
Already a member? Sign in
No Responses to “How Ease Helps You Nail the Fit of Every Garment”