For many, Halloween candy is something you buy — not make. But homemade mellowcreme pumpkins, aka candy corn, are too good not to make. Their thicker shape gives them a chewy, unique texture that sets them apart from the aisles of store-bought candies, and DIYing them means they’ll be fresher, creamier and have a more well-rounded, deeper flavor. Oh, and not only are these little pumpkins cute and tasty, but they just so happen to work perfectly as toppers on any Halloween cake.
Mellowcreme Pumpkins
Yield: At least 50 pumpkins
What You Need
Ingredients
Tools
Pro Tip: Before you begin, take note: this isn’t a difficult recipe, but you don’t have any room for fudging. Follow the measurements exactly or your candy corn likely won’t come out as planned.
Instructions
1. Combine the Ingredients and Heat
In a medium-sized bowl, whisk the sifted confectioners’ sugar and powdered milk together. Set aside.
In a medium saucepan, combine the granulated sugar, corn syrup and butter over high heat, stirring frequently until it comes to a boil. Reduce heat to medium, stir in the vanilla, and continue stirring frequently for 5 minutes. The mixture will begin to reduce and thicken.
Remove from heat. Stir in the confectioners’ sugar bit by bit, stirring after each addition, until it’s all been incorporated into the wet mixture.
Pro Tip: You can either leave the dough in the saucepan, or turn it out into a bowl sprinkled with confectioners’ sugar, just until it is cool enough to be handled. You don’t want to let the dough sit too long, as it will become hard.
2. Color the Pumpkins
Divide the dough into two bowls so that you have 90 percent of the dough in one bowl and 10 percent in another bowl. Add 2 drops of red food coloring and about 5 drops of yellow food coloring to the larger mound of dough. Using gloves (so you don’t dye your hands), work the dough until it’s orange and streak-free, adding in more color if needed. Note: Because the dough is thick with a consistency like marzipan, it may need some good elbow grease to get the dye incorporated.
3. Color the Stems
Put on a fresh pair of gloves. Add 1 to 2 drops of green food coloring to the smaller mound of dough, mixing until it’s streak-free.
Cover both bowls with plastic, and re-cover between use to keep the dough as moist as possible.
Pro Tip: You want to work quickly after you’ve formed and colored the candy dough. It will begin to firm rapidly as it cools, and will not be as easy to shape.
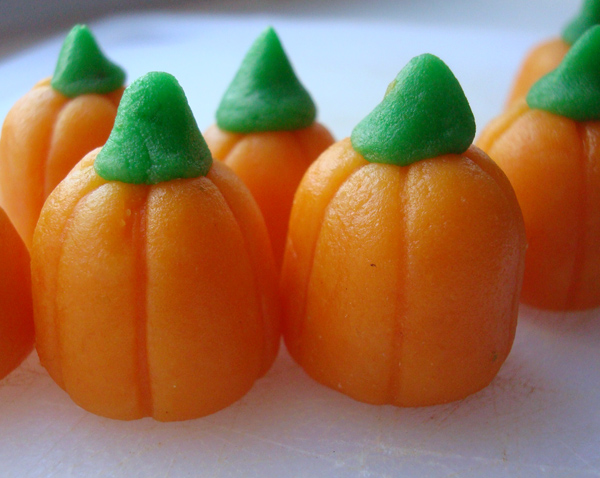
4. Shape the Pumpkins
Break off a piece of the orange dough, and shape it into a small ball (about the size of a large marble). Roll it so it’s slightly elongated, but still rounded on either end.
Press one end onto your work surface to flatten it, taking care to maintain a dome shape. The orange dough will look like a gumdrop at this point.
5. Add the Details
Draw lines down the sides to make the pumpkin grooves. You can do this with a toothpick or by gently drawing the flat side of a butter knife along the edge.
Pinch off a small piece of green dough and mold it into a small cone. Place it on top of the pumpkin, and finesse the stem into a point.
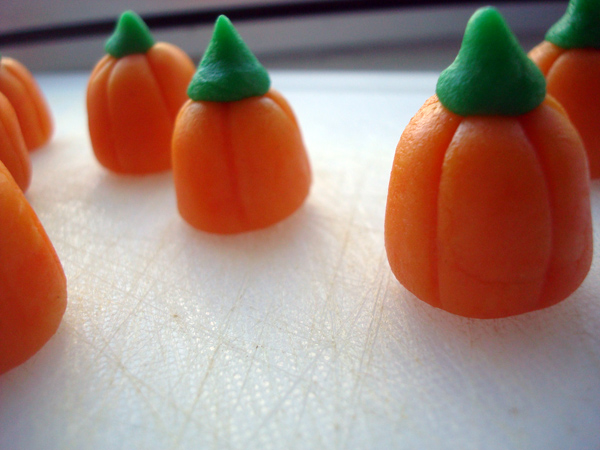
Repeat with the remaining dough until you’ve made an entire pumpkin patch! Let the candies set for about 2 hours to harden. Store them in an airtight container at room temperature and they’ll last for at least a few weeks.
What About Homemade Candy Corn?
If your loyalty is to traditional candy corn, the same recipe can be used. However, you’ll assemble the candies a little differently.
1. Color
Once you’ve baked your candy, divide the dough into as many sections as you’d like to create colored segments for your finished candy, and place each of them in small bowls. Wearing a fresh pair of gloves for each bowl, mix each mound of dough with food coloring until the color is consistent and streak-free.
2. Roll
On a sheet of wax or parchment paper, roll out each color into a long, thin rope. The thinner the rope, the smaller that segment of color will be in your finished candy. An easy-to-handle size is three ropes, about 12″ long for each color.
3. Shape
Press together your dough ropes in whatever color combination you like. To ensure each segment sticks together, press a second sheet of waxed or parchment paper on top and press very gently with a rolling pin or your hands.
4. Cut
Using a very sharp knife, cut dough into triangle segments. Keep a damp, clean cloth nearby to wipe off the knife should it get sticky. Let the finished kernels set for an hour or two before serving.
they're ok. the dough is extremely hot, almost too hot to touch to knead color in, even wearing gloves.. but it cools so fast that it becomes extremely hard to make 50 pumpkins with stems before its rock hard. luckily microwaving for 10 second makes it pliable again. they're quite hard to eat, not a ton of flavor but they're ok. a slight gum flavor. they remain quite buttery even when dry.
is it good