Pattern grading is an easy way to replicate a pattern to scale, saving you from having to draft the whole thing. It can be your go-to if you need to size an entire pattern up a smidge. (Though you shouldn’t try to go more than two sizes up or down, as that would disrupt the balance of the pattern.) There are a couple different ways to pattern grade, but let’s focus on two of the most common methods.
Good to Know: Pattern grading is not the same as making alterations, so it isn’t ideal if you need to adjust only one aspect of the pattern, like the bust.
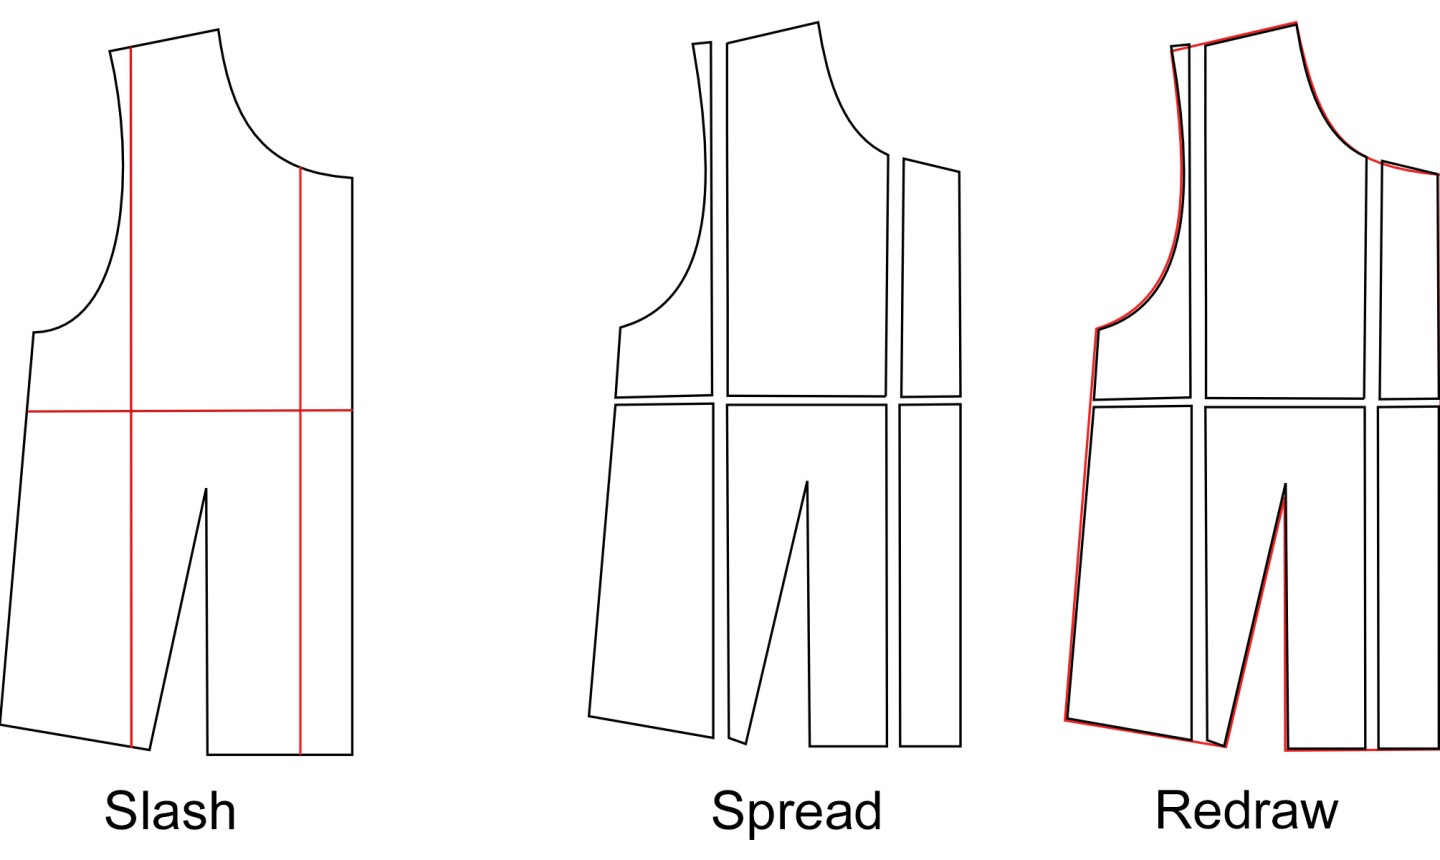
The Slash and Spread Method
Imagine you’ve found the perfect vintage pattern, but it only comes in bust size 30 — and you’re a 34. Don’t let this size difference stop you! The slash and spread method is the easiest method for resizing a pattern, and will be your go-to in this situation.
Make horizontal and vertical lines on your pattern piece, placed where you want the pattern to increase or decrease. Cut along those lines and spread to create the new pattern piece.
To determine how much you need to add, let’s use our example from above: the pattern is a 30″ bust size, and you have a 34″ bust. There’s a difference of 4″, so you’ll need to split that increase between the front and back (2″ for each), then break it down again as the pattern pieces are placed on the fold (so 1″ to each piece). If you make two vertical cuts, add ½” between the pieces.
As for the horizontal lines, you’ll need to add ⅜” (this is the common rule). Redraw and blend the new lines of the pattern, then you’re done!
Good to Know: If you want to go down a size, slash your pattern piece in the same way and, instead of spreading the pieces, overlap them following the same calculations.
The Shift Method
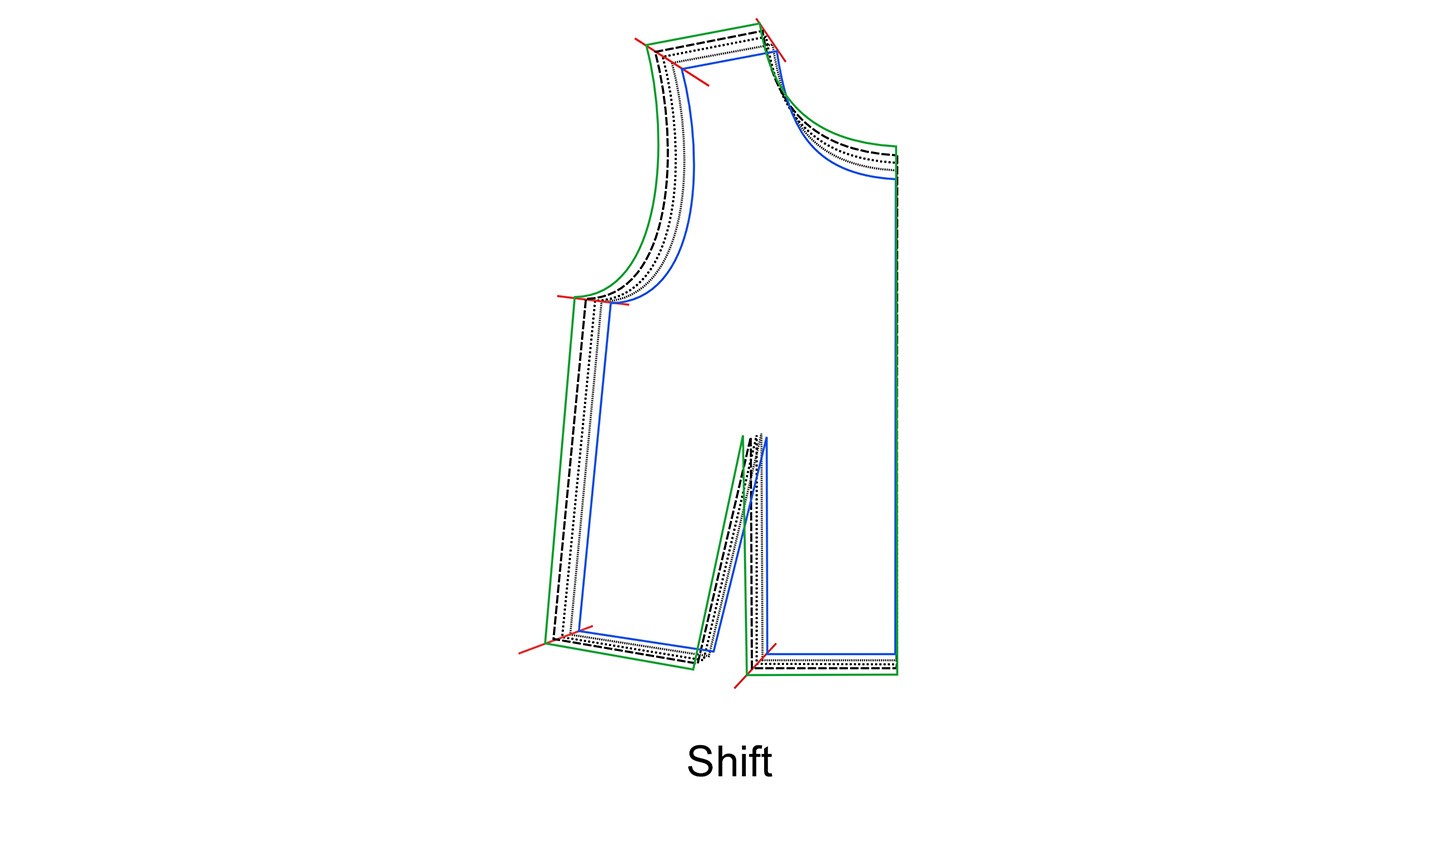
If you want to increase or decrease a multi-size pattern, the shifting method is quite handy. This is also helpful for adjusting a pattern to meet measurements outside the measurement chart.
For example, look at the photo above. Say the three sizes offered in the pattern are outlined in black, and indicate sizes 6, 8 and 10. Draw straight lines at each corner, connecting the three pattern sizes and extending beyond them. Draw the new pattern piece, shifting the pattern to meet the red line at the corners toward the inside for size 4 (in blue here) or toward the exterior for size 12 (in green). That’s it!
Pro Tip: No matter which method you use, be sure to make a muslin of the altered pattern before you cut any fabric.

Hi, I'm looking at the shifting method. Is there a specific angle in which the red line has to be at first? The neck-shoulder line has me boggled.
Most useful. How do I use this technique with pants. Thanks
Will try this out.
Hi, how easy is it to make a pair of womans long pants bigger. Thanks.
Hi There. Need to upsize a pattern from an 18 to a 24. Please can you help . thanks.
How do you factor in ease? If I look at a pattern, it appears that I have the correct size, but then ease makes it too big. I am small and have trouble ble with finding an appropriate-sized pattern. I am 5’0” and weigh 100 pounds
So helpful
My problem is I am an Australian size 16 neck shoulder that fits well then pear shape size 18/20 hips and thigh..suggestions please..thank you
Thank you!
So, probably a dumb question, if you resize the bodice do you then need to resize connecting patter pieces such as sleeves?