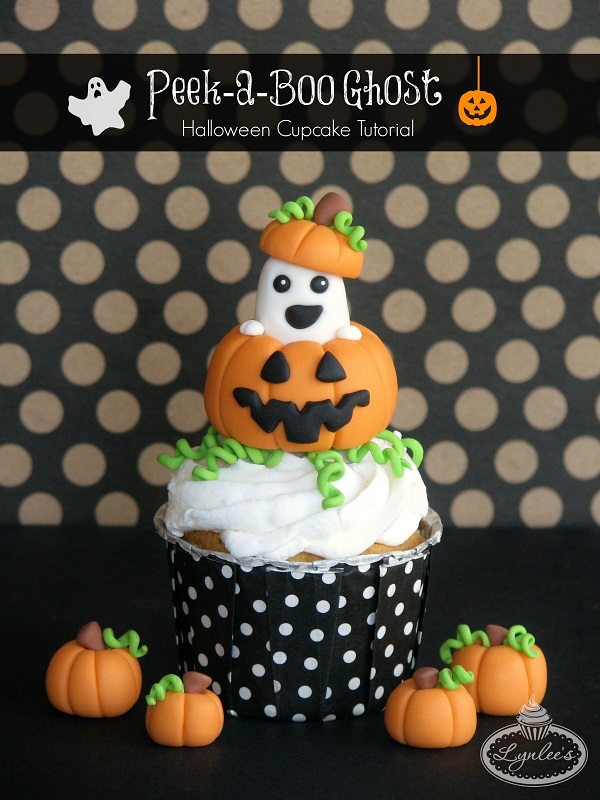
Halloween is one of my absolute favorite times of the year! Not only is it fun to get dressed up in costumes, it's even more so when it comes to getting creative with confections for your spooky parties. Last year, I shared a black cat fondant tutorial for the season and this time around I am focusing on decorating halloween cupcakes with a different traditional character — a ghost!
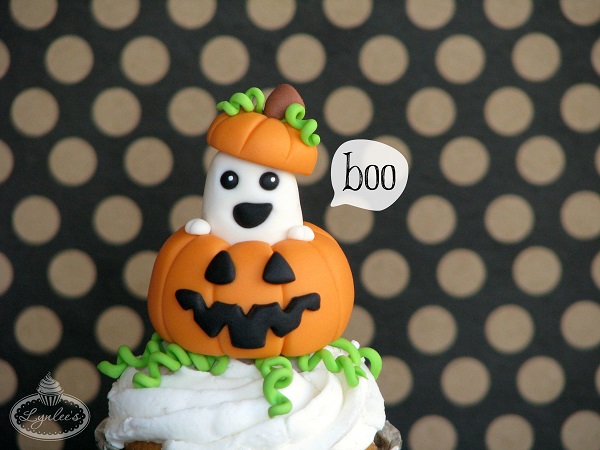
Here’s how to make a delightful ghost peeking out of a pumpkin.

Materials needed:
- Orange, black, white, brown and green fondant
- Fondant rolling pin with 1/8" guide rings
- 1/4" wooden dowels
- Water/edible glue and brush
- 7/8" circle cutter
- Round decorating tips #7, #10 and #12
- Small, medium and large round ball tools
- Knife tool
- Precision knife
- Teardrop or triangle miniature cutter
- Vegetable shortening
- Raw spaghetti
- Optional: tylose powder
- Optional: white soft gel paste and toothpick

Step 1:
Roll orange fondant into a large ball, approximately 1 1/2", then form it into an oval shape with your fingers. I like to mix in a pinch of tylose powder in my orange fondant for the pumpkin so that it dries quicker and doesn't lose it's shape quickly.
Step 2:
With the large ball tool, begin to make a hole in the top center of the orange oval and slowly making it bigger to create the opening for the pumpkin. As you do, the pumpkin will begin to take on a more circular shape. Feel free to utilize a bit of vegetable shortening on your fingers to shape the pumpkin as desired.
Step 3:
Then, utilize the knife tool to make vertical indentations around the perimeter of the pumpkin, beginning from underneath the bottom, all the way to the top (up and over).
Step 4:
Make any adjustments to the pumpkin's shape once you have made the indentations and you can utilize the ball tool to shape the inside top of the pumpkin so that it curves in a bit.

Step 5:
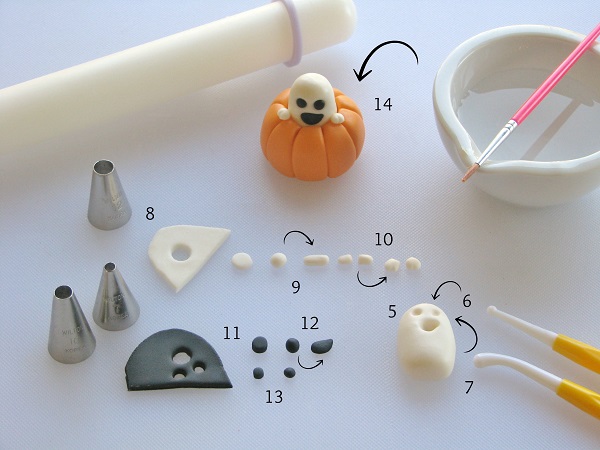
Roll a piece of white fondant into a ball (approximately 1"), then shape it into an oval to form the ghost.
Step 6:
Utilize the small ball tool to make two indentations for the ghost's eyes.
Step 7:
Utilize the medium ball tool to make a larger indentation for the mouth in the shape desired. I curved mine up to one side a bit to make it look a bit friendlier.
Step 8:
Roll out white fondant with the rolling pin and 1/8" guide rings. Cut out a circle with round decorating tip #12.
Step 9:
Roll the circle into a ball, then into a tiny sausage shape.
Step 10:
Utilize the precision knife to split the white sausage shape in half. With the knife tool, make a little indentation on the rounded side of each half to create the hands. Set them aside.
Step 11:
Roll out black fondant with the rolling pin and 1/8" guide rings. Cut out one circle with round decorating tip #10 and two circles with round decorating tip #7.
Step 12:
Roll the larger black circle into a ball, then mold it to the shape of the ghost's mouth.
Step 13:
Roll the smaller black circles into balls for the eyes.
Step 14:
Insert the eyes and mouth in the previously made cavities and glue them in place. When the ghost is sufficiently dry and holding up its shape, glue it inside the pumpkin. Then glue the two hands in place on the pumpkin and attached to the sides of the ghost.

Step 15:
Roll out black fondant with the rolling pin and 1/8" guide rings. Cut out one large circle with the bigger end of round decorating tip #10 and two smaller circles with its smaller end.
Step 16:
Roll the smaller circles into balls, then shape them into triangles for the jack o'lantern's eyes.
Step 17:
Roll the larger black circle into a ball, then shape it into a smiling mouth shape with your fingers and, if necessary, some vegetable shortening.
Step 18:
With the small tip of your miniature teardrop or triangle cutter, cut out pieces off the top and bottom of the mouth to create a jagged smile.
Step 19:
Glue the jack o'lanterns eyes and mouth to the pumpkin.

Step 20:
Roll out orange fondant thick with the rolling pin and wooden dowels as guides.
Step 21:
Cut out a circle with the 7/8" round cutter. With a little bit of shortening on your fingers, smooth out the edges of the circle, rounding it out a bit and beginning to create the pumpkin's top.
Step 22:
With the knife tool, create vertical indentations as you did with the bottom of the pumpkin. When complete, utilize the medium ball tool to indent the top center.
Step 23:
Roll out brown fondant thick with the rolling pin and wooden dowels as guides, then cut out a small circle with round decorating tip #12.
Step 24:
Roll the circle into a ball, then shape it into a teardrop shape with your fingers. Flatten out the larger end to make the pumpkin's stem.
Step 25:
Roll out green fondant with the rolling pin and 1/8" guide rings. Cut out two small circles with round decorating tip #10.
Step 26:
Roll each circle into balls, then into longer worm-like shapes on your work surface.
Step 27:
Take one of the green "worms" and wrap it around the raw spaghetti and repeat with the other. Let it sit for just a bit to dry enough to maintain its shape, but still be pliable.
Step 28:
Glue the brown stem to the center of the top of the pumpkin, then each of the green curly fondant pieces to the sides of the stem. Glue the entire top to the ghost's head.
Optional: If desired, dip a toothpick in white soft gel paste and add little "glimmer" dots on the ghost's eyes (depending on whether you want your ghost to be cute or spooky!).


Share tips, start a discussion or ask other students a question. If you have a question for an expert, please click here.
Already a member?
No Responses to “Decorating Halloween Cupcakes: Make This Ghoulish Peek-a-Boo Ghost!”