 Good to Know: Just to be clear, we're talking edgings here — the kind you work directly on a piece of crochet — not trims, which are worked separately, then attached.
5 Crochet Edges You've Gotta Try
You might want to memorize these (seriously!). That way, when you get to the end of a project, you already have a few ideas about how to finish it off. Pro Tip: Crocheting a row of single crochet is best before you start an edge pattern so you can work on an even line, especially if you're working a side.Crab Stitch
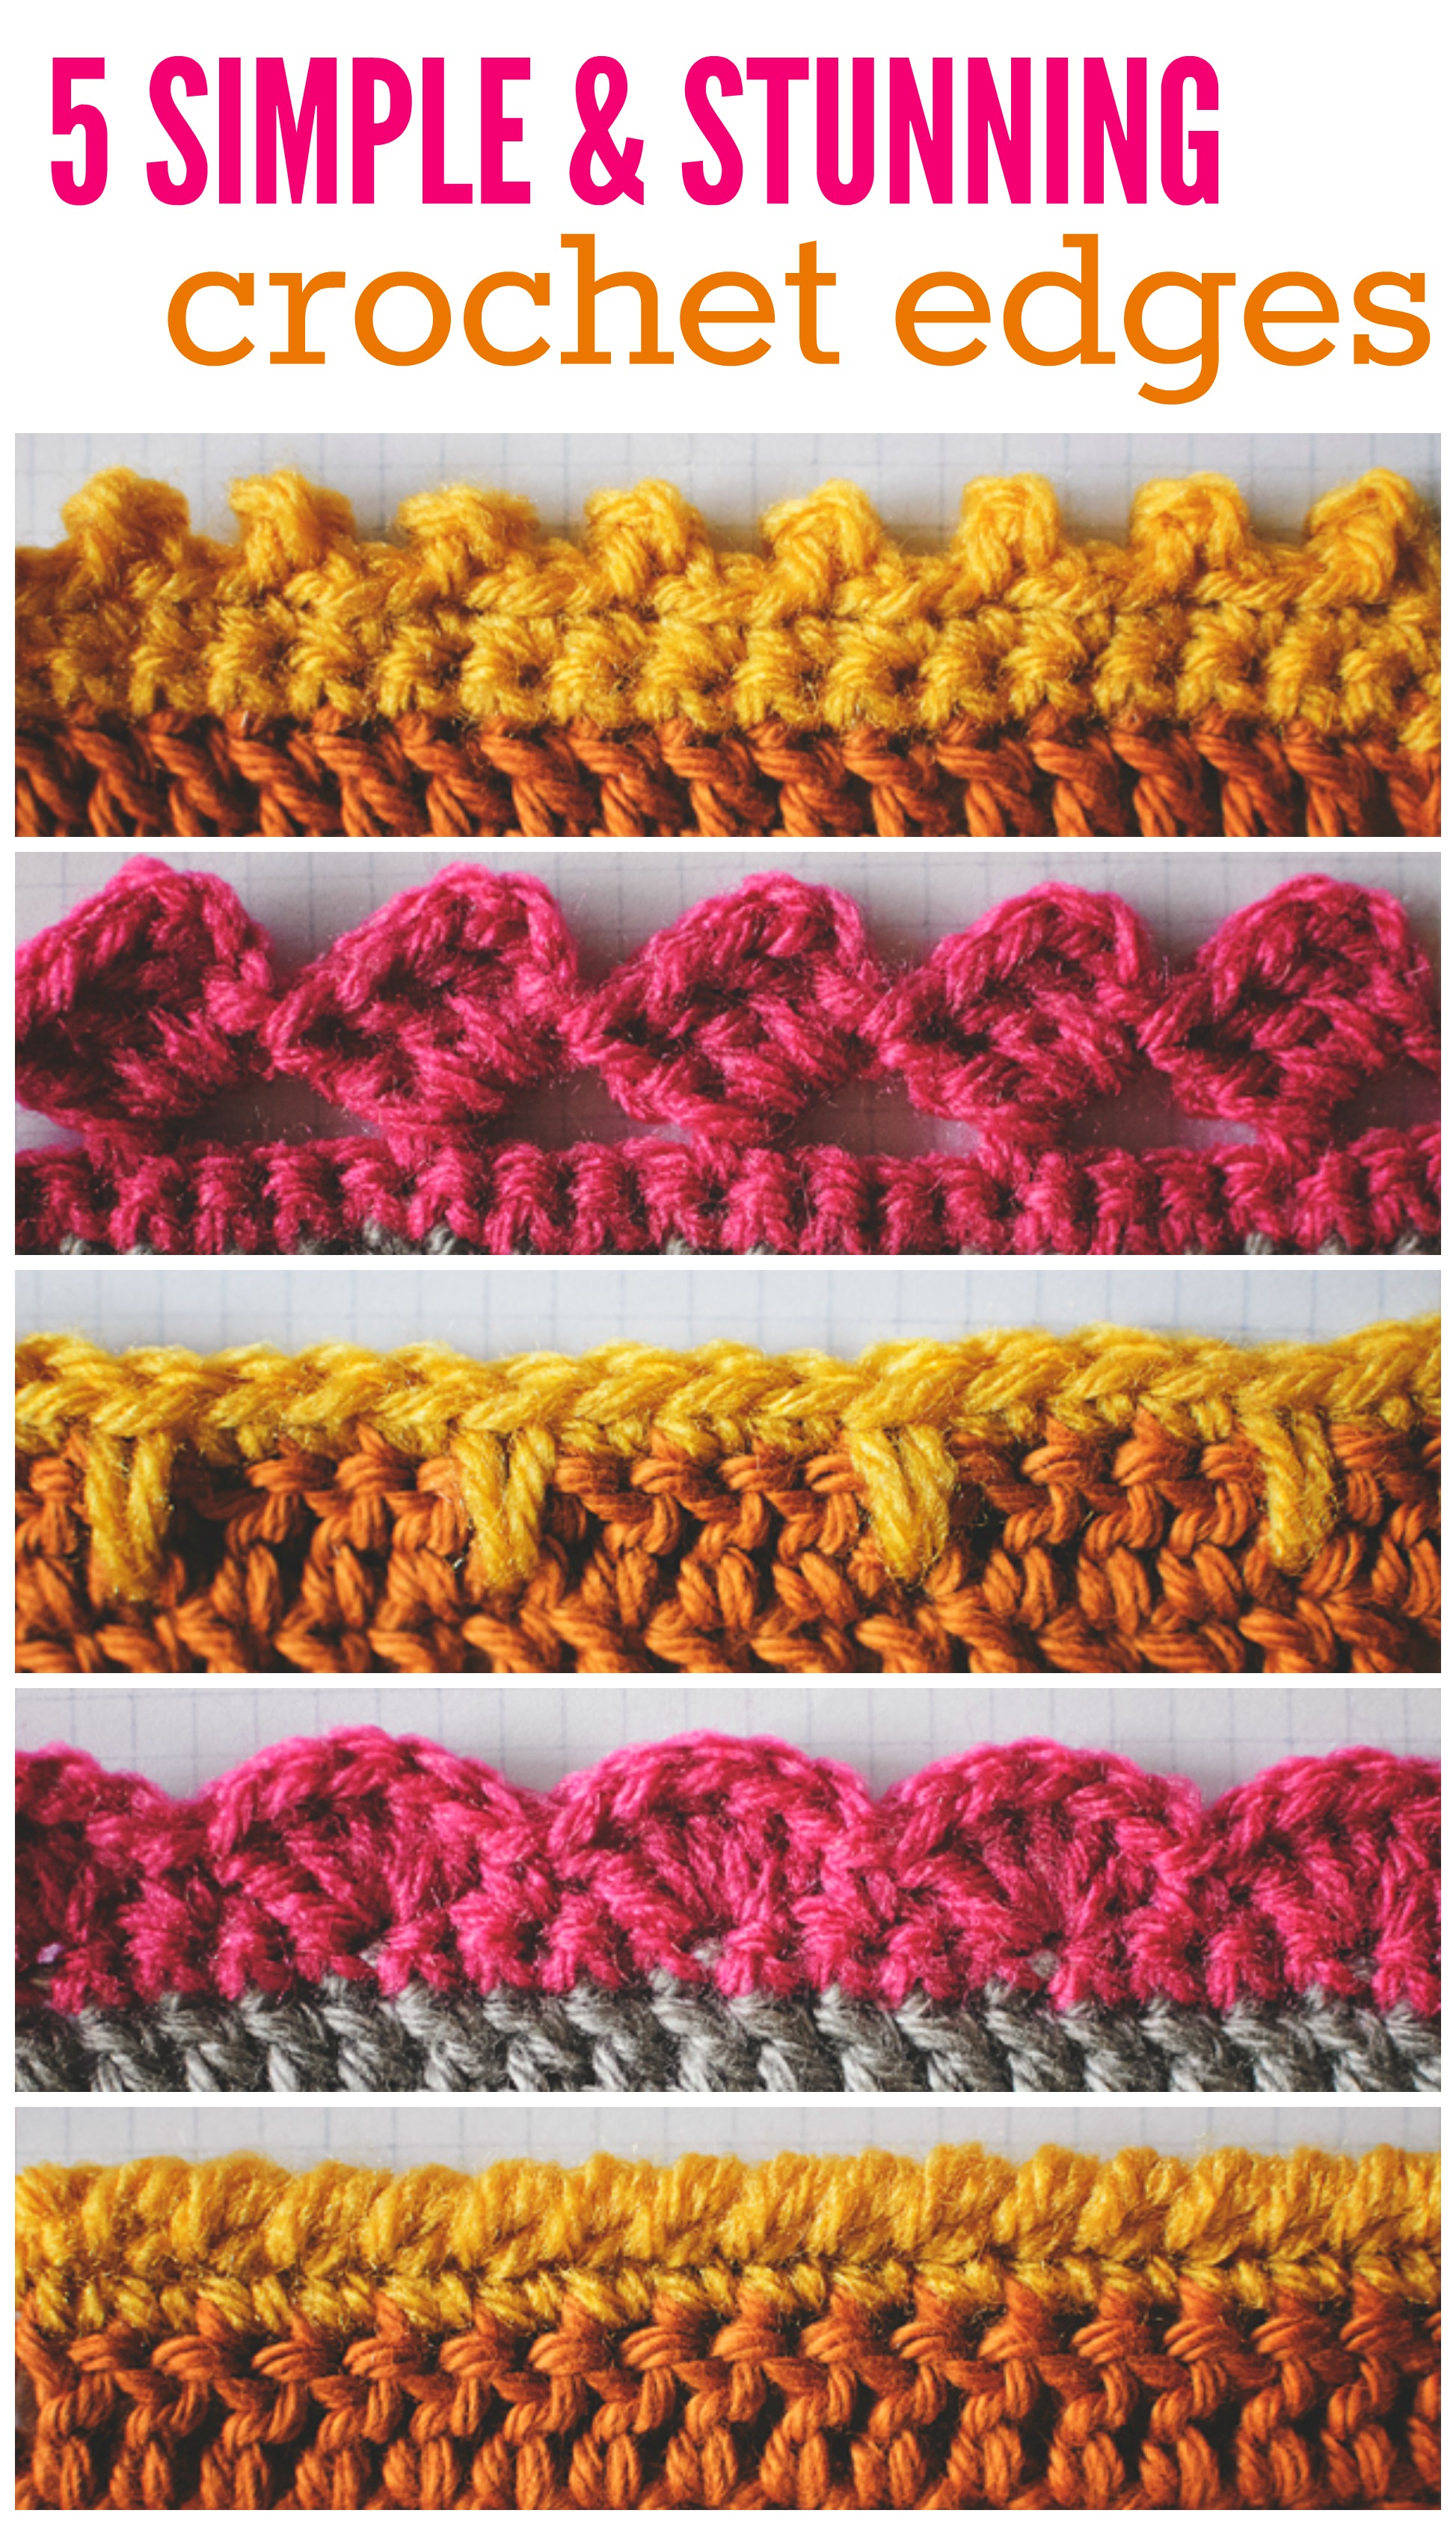
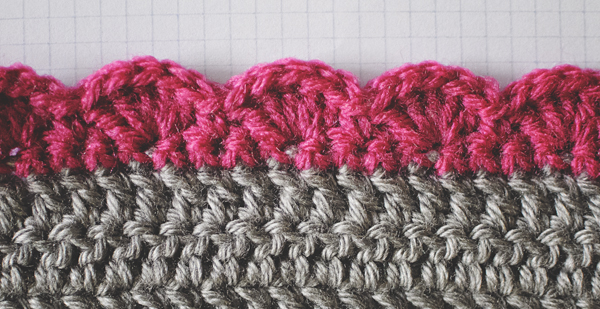
 The crab stitch makes for a great corded edging. It's a subtle and sophisticated finish that'll be the easiest to memorize and use, so make friends with it now!
Worked over: any number of stitches
Finish it: Work an odd number of rows (at least one) of single crochet. At the end, do not turn — CH 1, skip the stitch directly to the RIGHT and reverse single crochet (rev SC*) into each SC, ending with a sl st in the turning chain of the previous row. Fasten off.
Worked in the round: sl st into first SC, Ch 1, then continue as for working flat, ending with a sl st into first rev SC.
*rev SC (worked from left to right): Insert hook in next stitch to the right, yarn over, pull loop through, yarn over, pull through both loops on hook.
The crab stitch is also one of designer Myra Wood's favorite stitches for use in her class Freeform Crochet.
The crab stitch makes for a great corded edging. It's a subtle and sophisticated finish that'll be the easiest to memorize and use, so make friends with it now!
Worked over: any number of stitches
Finish it: Work an odd number of rows (at least one) of single crochet. At the end, do not turn — CH 1, skip the stitch directly to the RIGHT and reverse single crochet (rev SC*) into each SC, ending with a sl st in the turning chain of the previous row. Fasten off.
Worked in the round: sl st into first SC, Ch 1, then continue as for working flat, ending with a sl st into first rev SC.
*rev SC (worked from left to right): Insert hook in next stitch to the right, yarn over, pull loop through, yarn over, pull through both loops on hook.
The crab stitch is also one of designer Myra Wood's favorite stitches for use in her class Freeform Crochet.
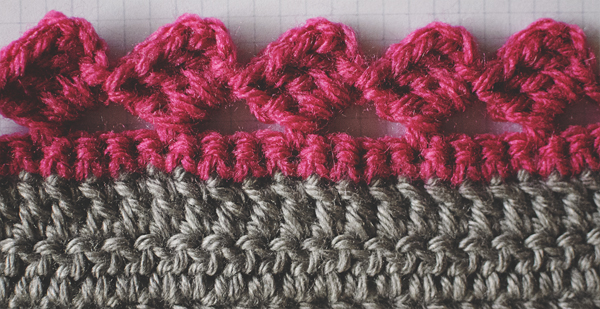
Shell Edging
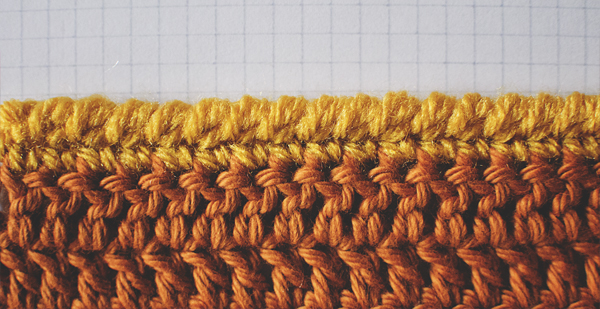
 Shell edging: worked after one row of contrasting SC.
Shells give you a more dainty-looking finish, perfect for blankets and garments. You can even use this edging on non-crocheted items such as pillowcases to give them an extra flourish.
Worked over: multiple of 4 stitches + 1
Finish it: Ch 1, SC in first st, *skip 1 st, 5 DC in next st, skip 1 st, 1 SC in next st; Rep from * to end, SC in last st (or turning ch, if you work in the turning chains). Fasten off.
Shell edging: worked after one row of contrasting SC.
Shells give you a more dainty-looking finish, perfect for blankets and garments. You can even use this edging on non-crocheted items such as pillowcases to give them an extra flourish.
Worked over: multiple of 4 stitches + 1
Finish it: Ch 1, SC in first st, *skip 1 st, 5 DC in next st, skip 1 st, 1 SC in next st; Rep from * to end, SC in last st (or turning ch, if you work in the turning chains). Fasten off.
Picot Edging
 Picot edging: 3 chain picots with two stitches between each.
Use picots for a decorative edge that's not going to outshine the pattern. This really simple edge uses only single crochet and chains.
Worked over: Any number of stitches, depending on how you want to space the bumps (picots).
Finish it: Treat this like a row of SC. After the first stitch, Ch 3, 4, or 5 and slst into first ch (picot made!). Work two, three, or four stitches, then make another picot. Continue working as such, ending with a picot over the second to last SC.
Picot edging: 3 chain picots with two stitches between each.
Use picots for a decorative edge that's not going to outshine the pattern. This really simple edge uses only single crochet and chains.
Worked over: Any number of stitches, depending on how you want to space the bumps (picots).
Finish it: Treat this like a row of SC. After the first stitch, Ch 3, 4, or 5 and slst into first ch (picot made!). Work two, three, or four stitches, then make another picot. Continue working as such, ending with a picot over the second to last SC.
Block Edging
 These stitches are basically "leaning DC groups," and make a pretty interesting edge. If you want to put them in a pattern, your next row can be made by crocheting into the corners of each little block and chaining to get to the next.
Worked over: Multiple of 4 stitches + 3
Finish it: Ch 3, skip first 3 stitches, *1 DC in next st, Ch 3, 3 DC around the post of the DC, skip next 3 stitches; Rep from * to last 3 stitches, Ch 3, slst in last stitch or turning chain of previous row.
Worked in the round: Ch 6, DC in 4th ch from hook, DC in next ch, 2 DC in first ch, skip next 3 stitches, * 1 DC in next st, Ch 3, 4 DC around the post of the DC, skip next 3 stitches; Rep from * around, sl st into third chain of beg-ch.
These stitches are basically "leaning DC groups," and make a pretty interesting edge. If you want to put them in a pattern, your next row can be made by crocheting into the corners of each little block and chaining to get to the next.
Worked over: Multiple of 4 stitches + 3
Finish it: Ch 3, skip first 3 stitches, *1 DC in next st, Ch 3, 3 DC around the post of the DC, skip next 3 stitches; Rep from * to last 3 stitches, Ch 3, slst in last stitch or turning chain of previous row.
Worked in the round: Ch 6, DC in 4th ch from hook, DC in next ch, 2 DC in first ch, skip next 3 stitches, * 1 DC in next st, Ch 3, 4 DC around the post of the DC, skip next 3 stitches; Rep from * around, sl st into third chain of beg-ch.
Blanket Edging
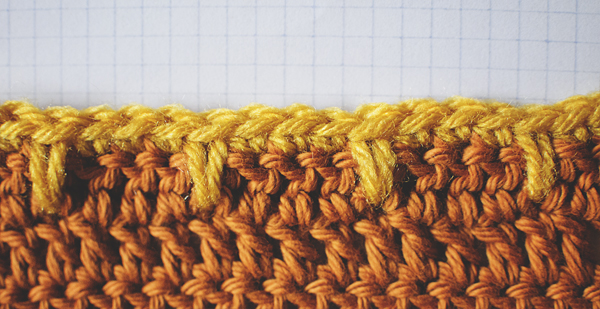 Blanket edging, sometimes called the spike stitch, gets its name because it resembles the blanket stitch in embroidery. It's a simple stitch that looks best in a contrasting color.
Worked over: Any number of stitches.
Finish it: This stitch utilizes the spike SC. Space them to suit the number of stitches you have in the row or round.
For example (multiple of 4 stitches + 3):
Ch 1, SC in first 3 stitches, *1 SC in next stitch by inserting your hook about 1⁄4" below the edge, 1 SC in each of the next 3 stitches; Rep from * to end. Fasten off. You can make the spikes longer by inserting your hook lower in the main piece.
Blanket edging, sometimes called the spike stitch, gets its name because it resembles the blanket stitch in embroidery. It's a simple stitch that looks best in a contrasting color.
Worked over: Any number of stitches.
Finish it: This stitch utilizes the spike SC. Space them to suit the number of stitches you have in the row or round.
For example (multiple of 4 stitches + 3):
Ch 1, SC in first 3 stitches, *1 SC in next stitch by inserting your hook about 1⁄4" below the edge, 1 SC in each of the next 3 stitches; Rep from * to end. Fasten off. You can make the spikes longer by inserting your hook lower in the main piece.


I like receiving update’s about crochet stitches to add to my knowledge. Keep sending informative information.
Like these edgings...great for finishing!!
Looking for the right crochet edge to finish a blanket
I like the crochet edges its looks beautiful
I'm so excited to start using these beautiful Eddings on the blankets I make for my Family. Thank you.
Thank you for the different edges to make
I love love love crochet edges.
Yes would like the information
I want to learn
I will have to try these in my learning process.