For centuries, nature has been a great source of inspiration for artists. Its pure beauty and splendor doesn’t leave anyone indifferent. However, an artist’s goal is not only to depict the landscape, but also to capture the mood and atmosphere of the scene. Keep reading for tips on how to create a watercolor landscape painting.

Learn to create a watercolor landscape painting with this tutorial.
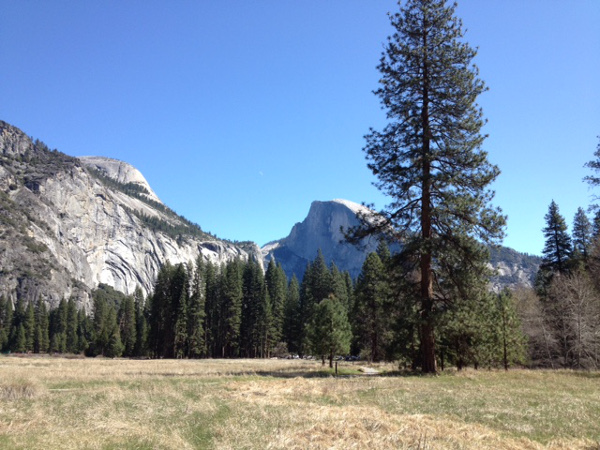
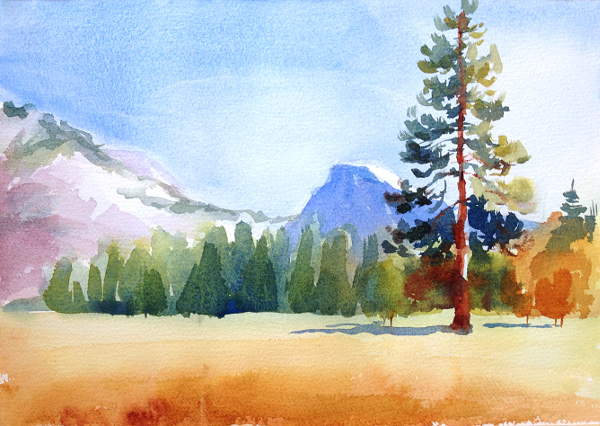
As a reference, I will use this picture that I took during my visit to Yosemite National Park. The mountain behind the big tree is the famous Half Dome. The picture was taken in spring, but I preferred to do an autumn scene instead.
You can follow along with this tutorial to get the hang of things. By the time you finish, you’ll have a better understanding of how to apply the same principles to any landscape photo you’re working with.
Tip: When painting from a photograph, do not copy it. Rather, paint your personal interpretation of reality and show how it makes you feel. Also, don’t rely too much upon reference photos, for they may lack the depth, value and color.
What you’ll need:
- A sheet of your favorite watercolor paper
- A big flat or oval brush for large washes (I used 1″ wide oval brush)
- A round brush (#12)
- A smaller brush for detail work (#6)
Note: The size of the brushes you choose depends on your personal preferences and the size of your painting. My painting is about 9″ x 13″.
Colors:
- Cobalt blue
- French ultramarine
- Winsor violet
- Yellow ochre
- Burnt sienna
- Quinacridone gold
- Perylene maroon
Wow With Watercolors!

Learn how to paint your best watercolor works.
Step 1:
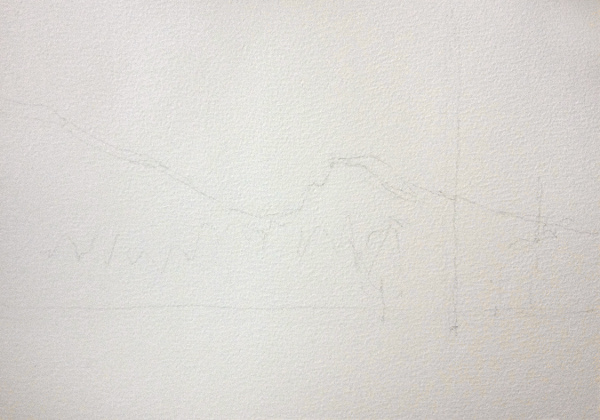
Do a quick, loose drawing of the landscape. There’s no need to draw all the details — just mark the locations of key objects.
Step 2:
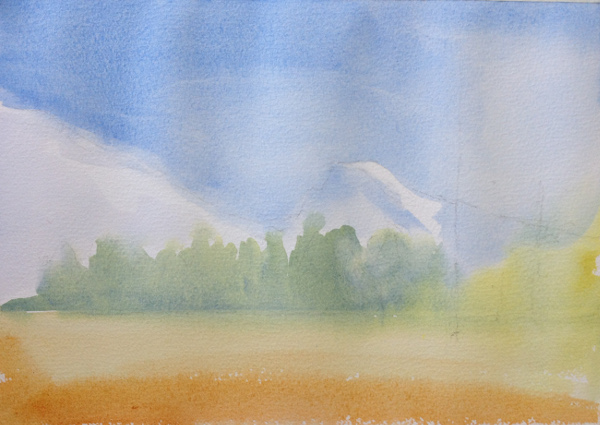
Using a big brush, paint the sky wet-on-dry with cobalt blue. Leave a spot of light on the top of Half Dome untouched. Remember that the sky appears warmer and lighter as it approaches the horizon, so add a tiny drop of yellow ochre to the bottom of the blue wash. Also note that in this landscape, the sun is located on the right-hand side, so the sky should be lighter there.
Then, Apply a few brushstrokes defining the trees in the background, using the light mixture of cobalt blue and yellow ochre.
Right after that, load the big brush with ochre and paint the ground with quick, large brushstrokes. Add a drop of burnt sienna on the foreground, to bring it forward.
The reason I’ve combine all these actions into one step is so that the initial washes can blend with each other a bit.
Step 3:
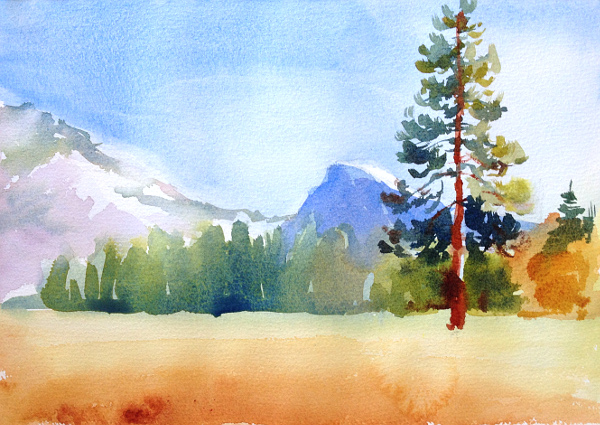
With a medium brush, loosely paint the distant trees using the mixtures of ultramarine, ochre, quinacridone gold and burnt sienna. Alternate the colors to give the trees some variety and form.
Paint the mountains using cobalt blue, winsor violet and burnt sienna in various combinations. Note that with this position of the sun, the Half Dome has a large form shadow due to its vertical wall.
With a smaller brush, paint the trunk of the big tree, using the mixture of perylene maroon and burnt sienna. Don’t work too hard on the branches — let the brush describe their shapes. Use the side of the brush to create textural marks.
Add more burnt sienna on the foreground to make it warmer.
Step 4:
Add some more definition to the mountains and trees. Paint the cast shadows with ultramarine. Note that the cast shadows are transparent and colorful, not gray.
Step 5:
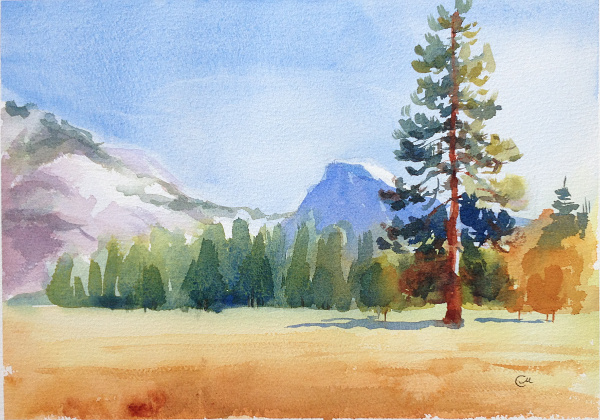
At this stage, it’s time for final touch-ups and minor corrections. Add a few tree trunks and slightly correct the shape of distant trees, if needed, by lifting some color.
Also, if needed, you can add a couple of quick horizontal strokes on the ground (so that it doesn’t look too smooth), and slightly darken the form shadow of the mountain near the left edge of the painting.
Now you can pick a photo of any place you’ve been to, and express yourself in your own watercolor landscape painting!
<!–Wow With Watercolors!
Learn how to paint your best watercolor works.
Thank you for the reference photo and step by step tutorial. Im going to try this with gouache where I'll be able to add whites after each layer dries.
Thanks. I'm trying to get back into watercolor painting again!
I think I will really enjoy learning and using these tips for my picture when i do it thankyou
Read this - now want to come back and paint
Very interested in your perception advice thank you
Can't wait to try this! Your instructions are spot on! Thank you
Nice tutorial thanks for sharing. I like learning more about how to's with art
Good instructions
Very informational, easy to understand for beginners, and a wonderful hint! Don't try to copy the photo, make it your own, indeed!
A good tutorial. Thanks!