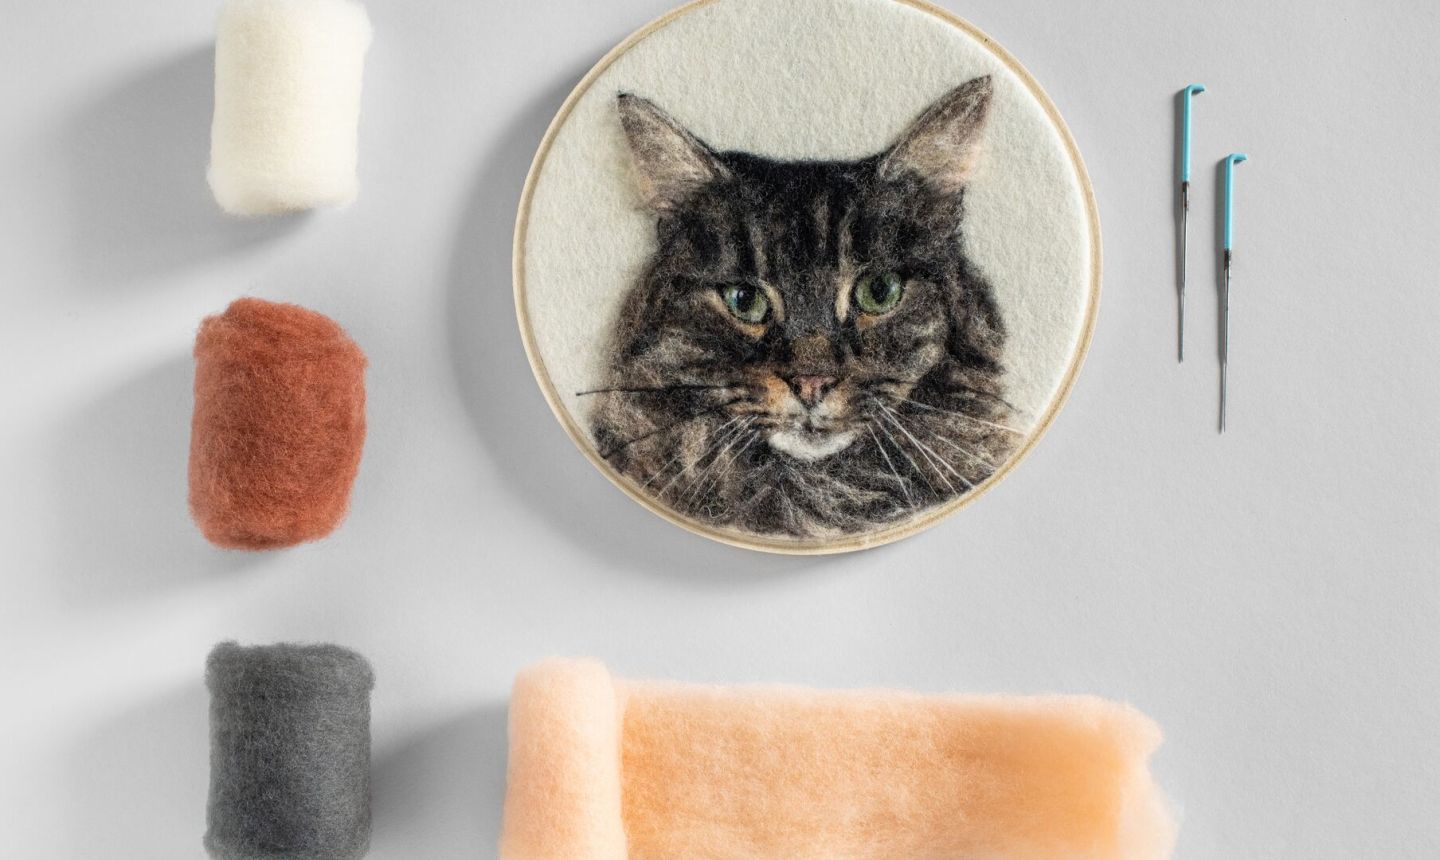
If you know the basics of needle felting, you can create almost anything — including your fur baby. This fiber craft can be used to make 3D and 2D works of art, and when worked onto a piece of fabric (like in this portrait), it’s a lot like painting. But instead of a brush and paints, you use a barbed needle and wool. This must-make is a great gift for animal lovers or those who may have lost a beloved pet, not to mention it’s a fun way to capture your own furry friend’s likeness.
Good to Know: We’re needle felting a tabby cat for this tutorial, but the same method can be applied for your own pet regardless of species.
Needle Felted Pet
Level: Intermediate
What You Need
Pro Tip: If you have an iPad or Chromebook, transfer your reference photo onto it. You might find it useful to zoom in on details throughout your picture, especially if your animal is extra fluffy.
Instructions
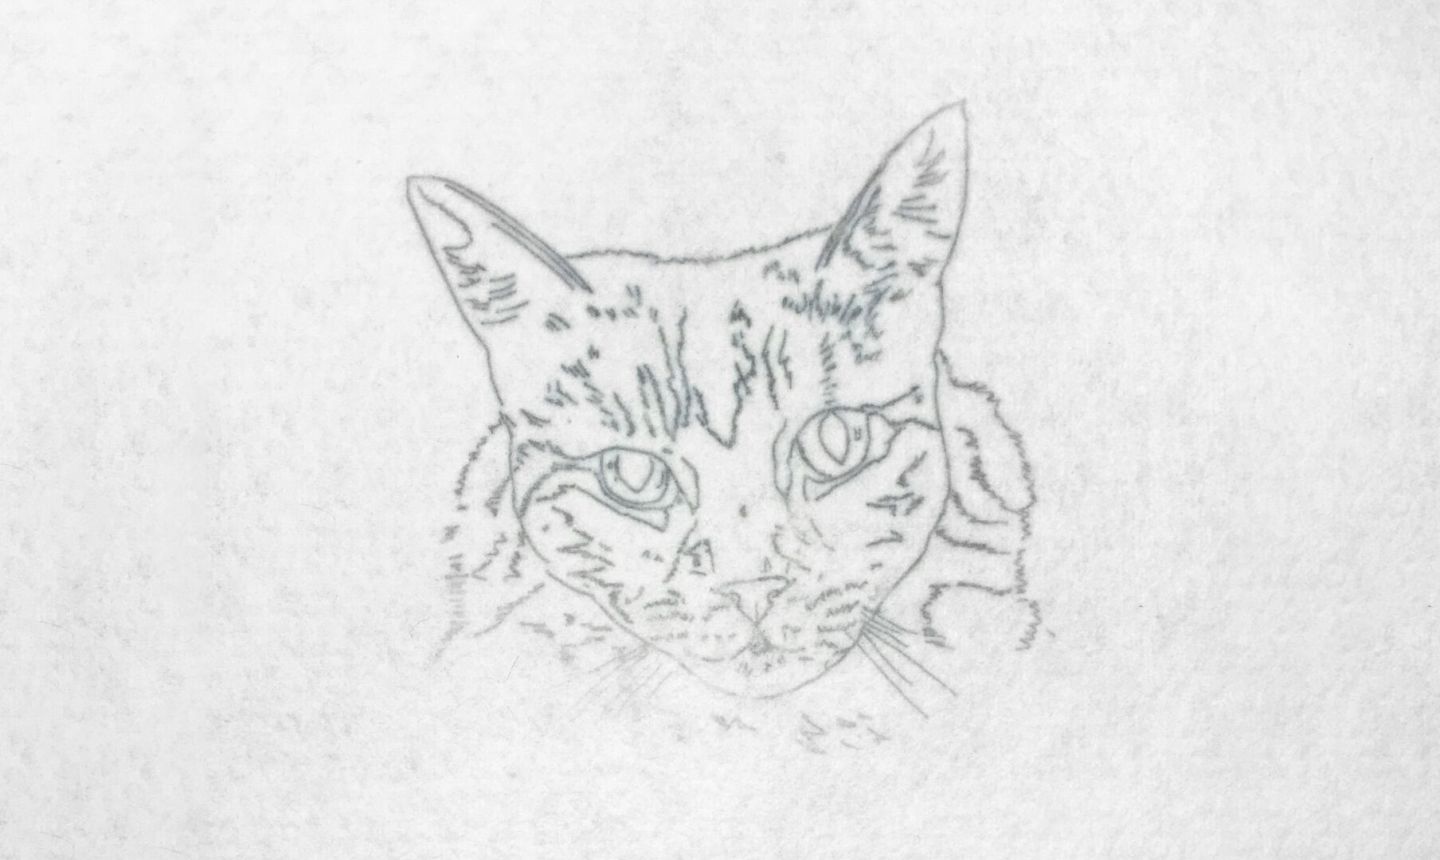
1. Trace Your Template
Trace your pet’s picture with a pencil onto tracing paper. Be sure to trace all distinguishing features, including stripes, spots and the fine details around the nose and eyes.Pro Tip: Make sure you’ve sized your image correctly for the hoop you’re using. We used a 6″ hoop, but any size works as long as you have fabric that fits inside with at least 1″ excess on all sides. (This is important for finishing.) It might help to trace your hoop onto your tracing paper first, then trace the template inside that border.
To make sure the image isn’t mirrored, trace the image again on the other side of your tracing paper using an iron-on transfer pen. A lightbox is super helpful for this step, but if you don’t have one you can use a sunny window.
Pro Tip: For wispy pieces like whiskers or ear fur, keep your lines within the outline of the animal. If these extend further out, the marker lines might not be fully covered with wool when felted. You can eyeball these details in later.
2. Transfer the Image
Place the tracing paper on top of your wool felt sheet, iron-on pen side facing down. With your iron set on low heat, iron the image on a hard surface for about five seconds, making sure to cover all parts of the image.
Pro Tip: Resist the urge to peek at the image before you’re done. Once the tracing paper is removed, it’s tricky to line back up precisely and the image can become skewed.
The image will now be transferred to the wool felt sheet.
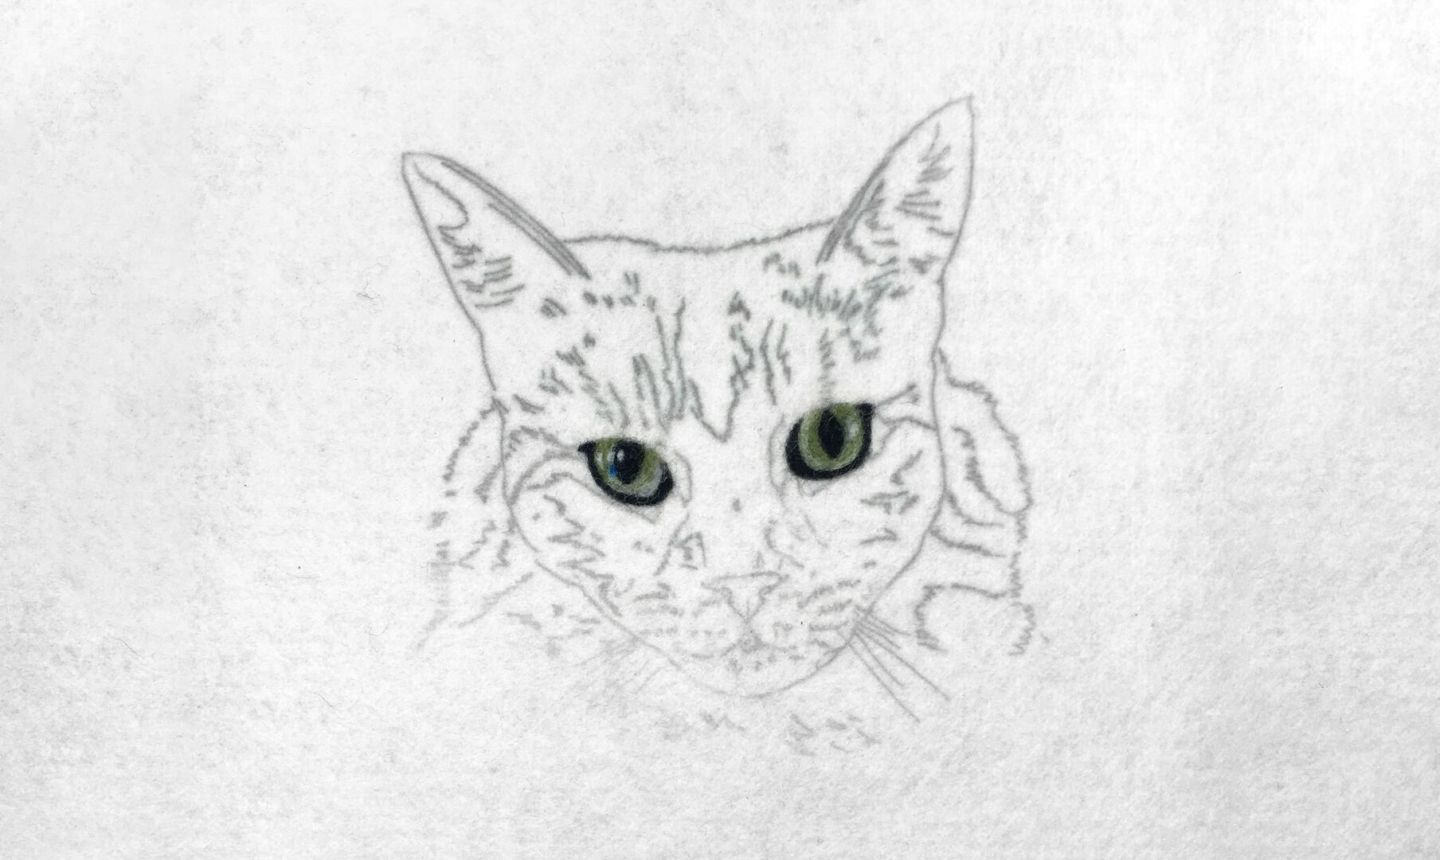
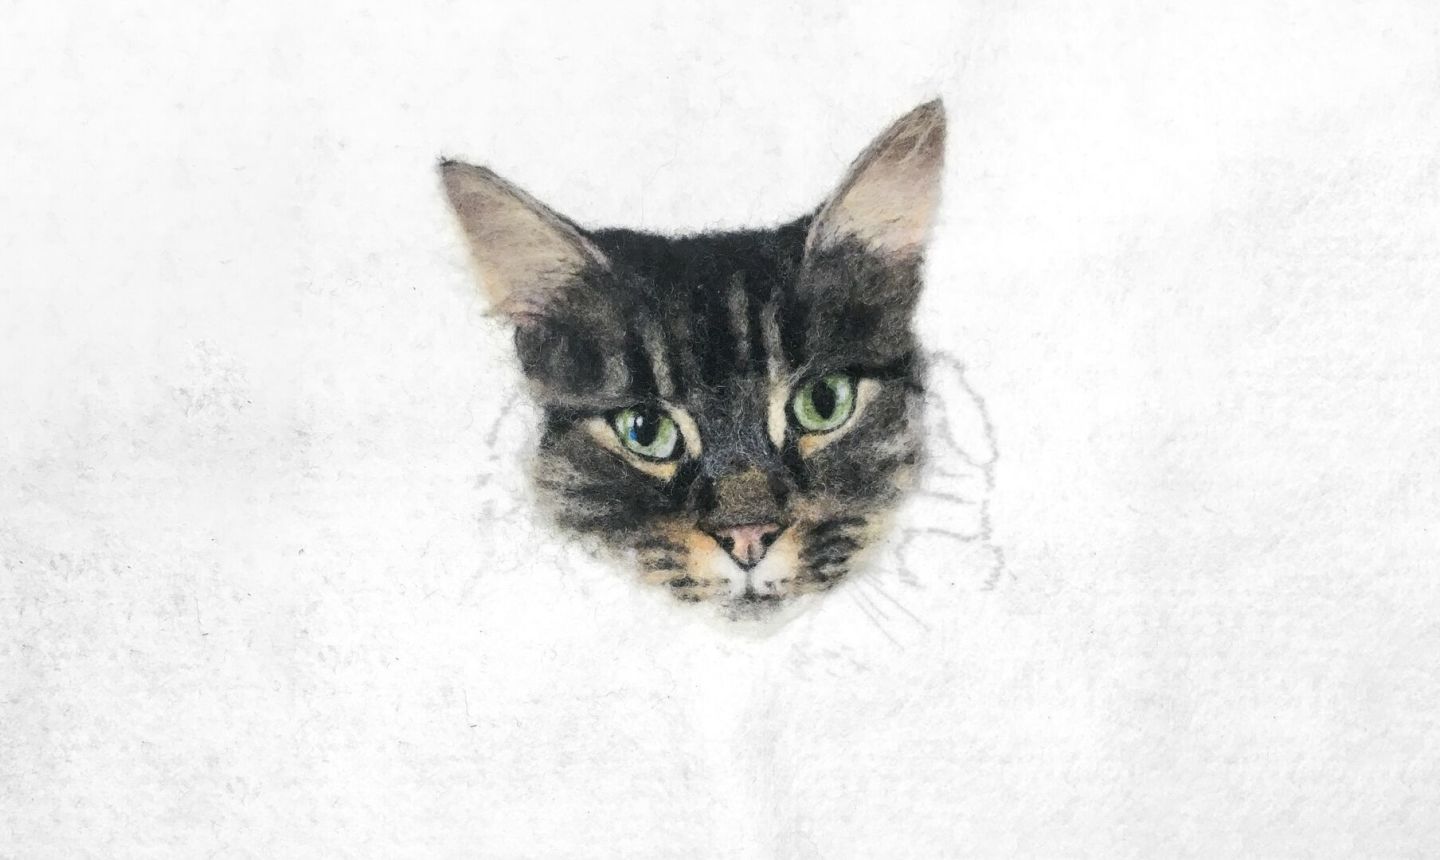
3. Begin With the Eyes
Place the wool sheet, image side up, on your foam block. Now you’re ready to start needle felting!
Good to Know: A felting needle is different from tapestry, embroidery and sewing needles. This needle has sharp, barbed blades designed to agitate the wool fibers. Be extra careful when working with it — if you accidentally prick your finger, there will be blood.
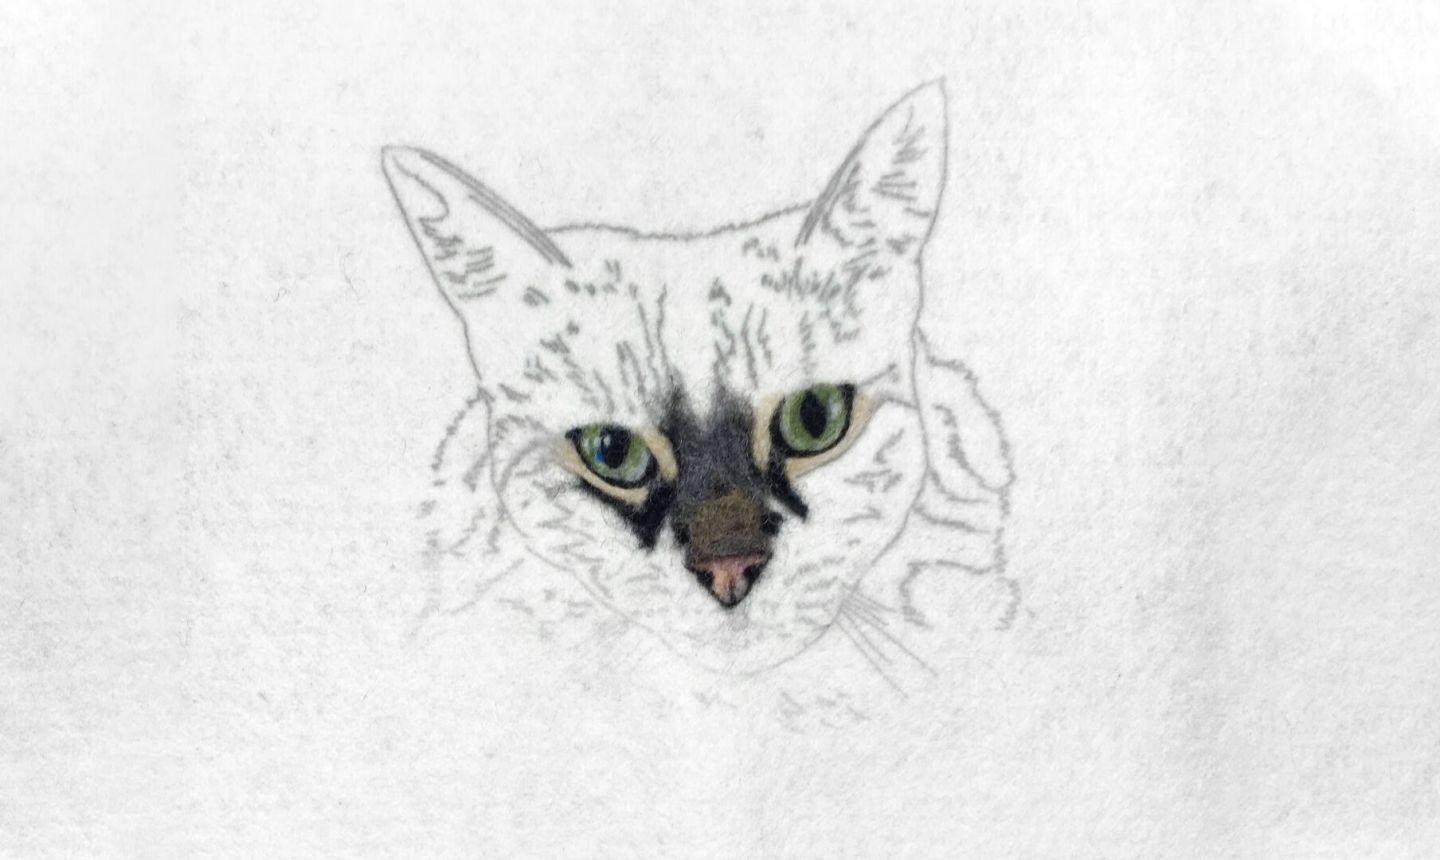
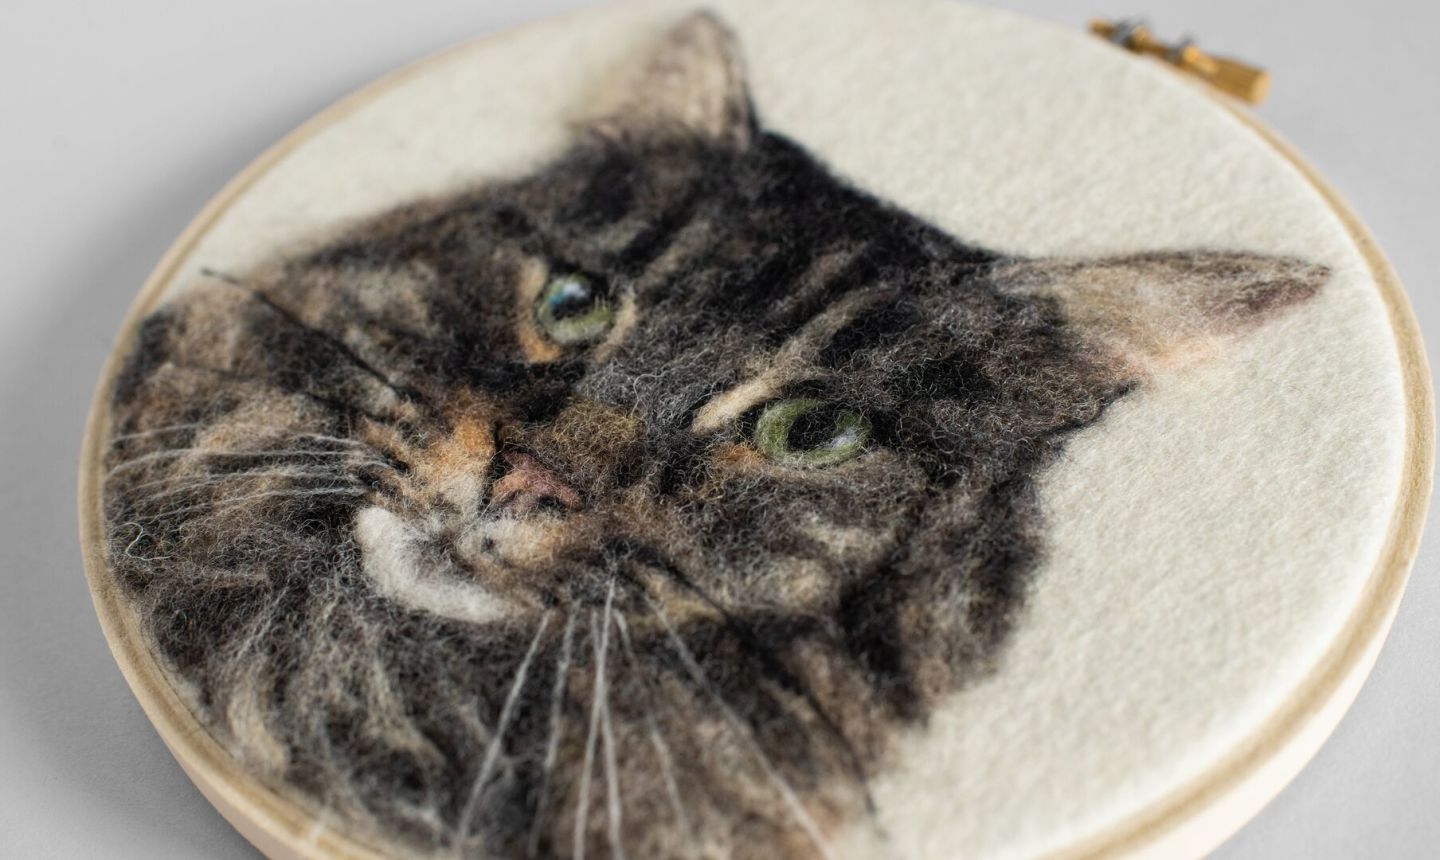
Begin by felting the eyes. Pay close attention to all the different colors — eyes aren’t just a flat brown or black — and fill in any parts that are solid black first (usually the pupils and the outline around each eye). Then felt the iris colors, beginning with a flat layer of the dominant color. Take note of the color changes from shadows and highlights and, using very small amounts of wool, gently layer these on top of the base color.
Pro Tip: You won’t need a lot of wool for this part, so it’s best to start with a very, very small amount. If you jump in with too much wool, your piece will be bulky and you’ll have a hard time adding the tiny details.
4. Move on to the Nose
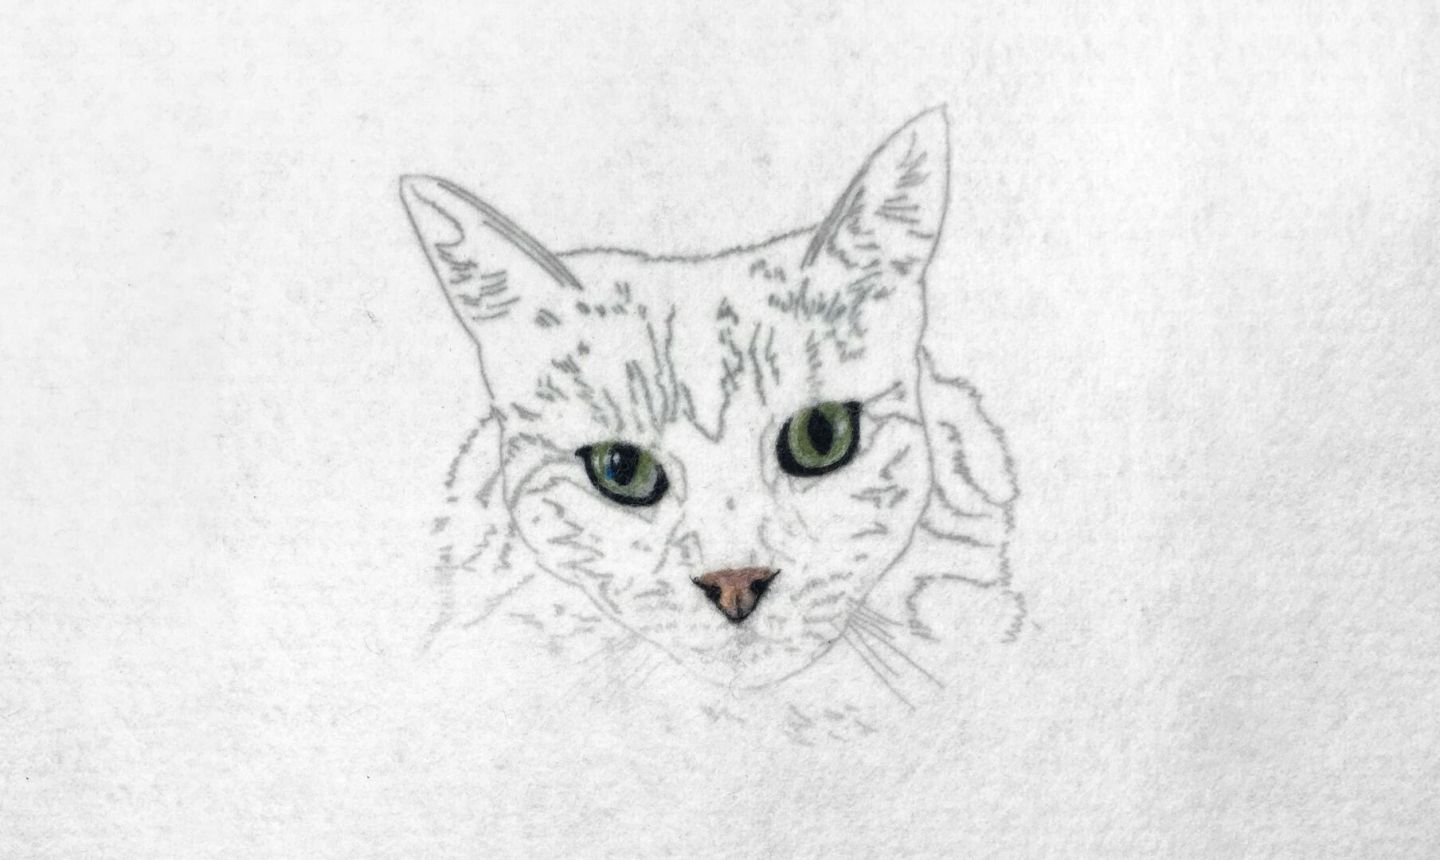
Fill in the basic outline of the nose with the dominant color, then add black for the nostrils and to define the outline. Once again, look for little variations and add those details to capture realism and dimension.
With the eyes and nose finished, your fine details are complete and anchoring your face. Now you can begin moving outward.
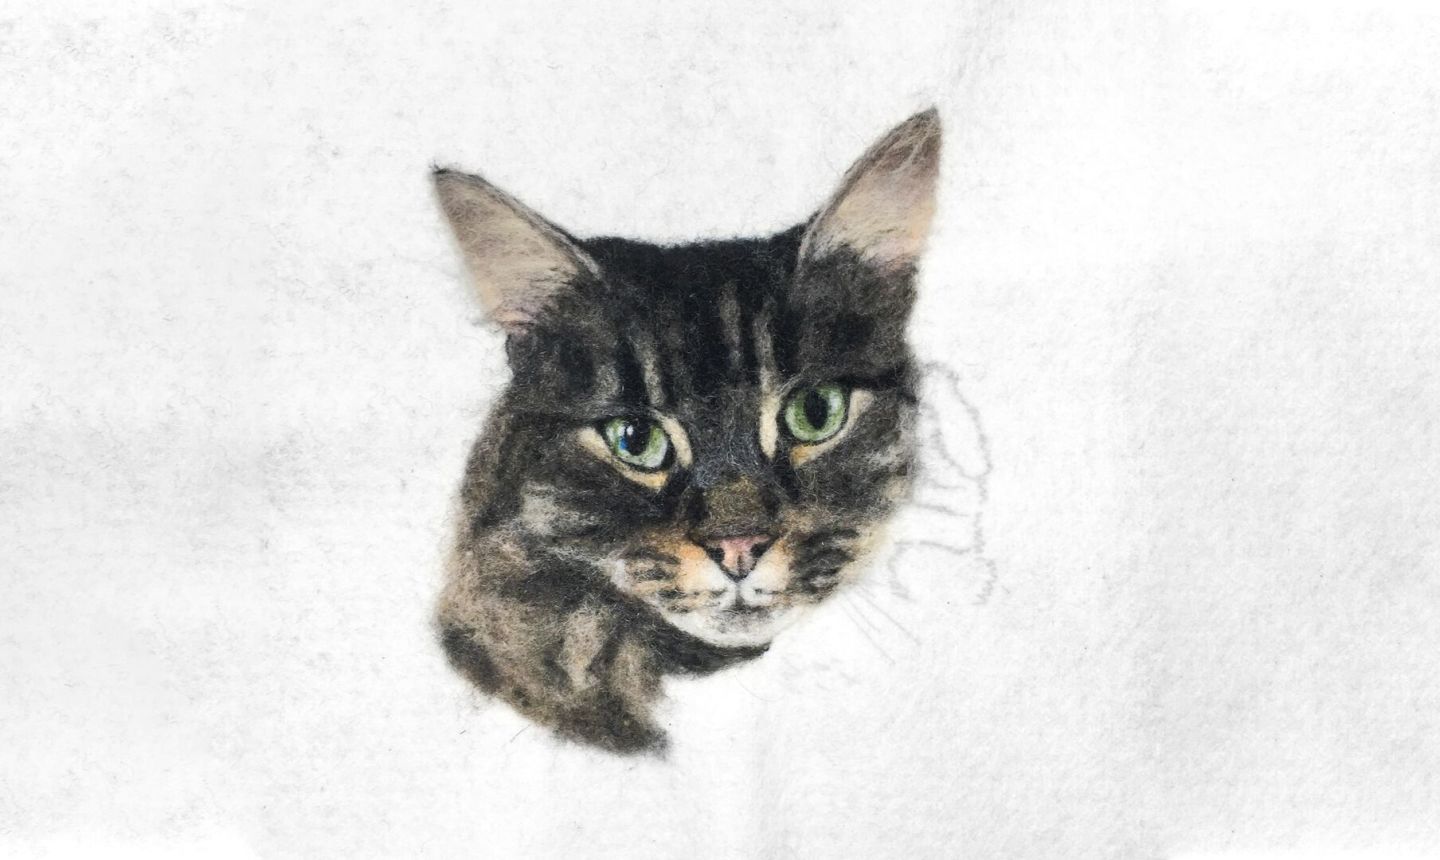
5. Felt the Fur
Working from the center out, felt the fur around the eyes and nose. Work in little sections, once again starting with a base color and layering on others for shading and blending.
For areas that need more blending, take the two colors (for example, brown and black) and mix them together by pulling each color of wool apart over and over again. When they’re separated enough, intertwine them with each other so the colors form something new.
Pro Tip: It can be tricky to get the shading correct so the nose’s definition stands out, so be patient, look closely at your reference photo and notice all the different variations in color. Don’t be afraid to add a color that might seem like an odd choice; if you see it, felt it.
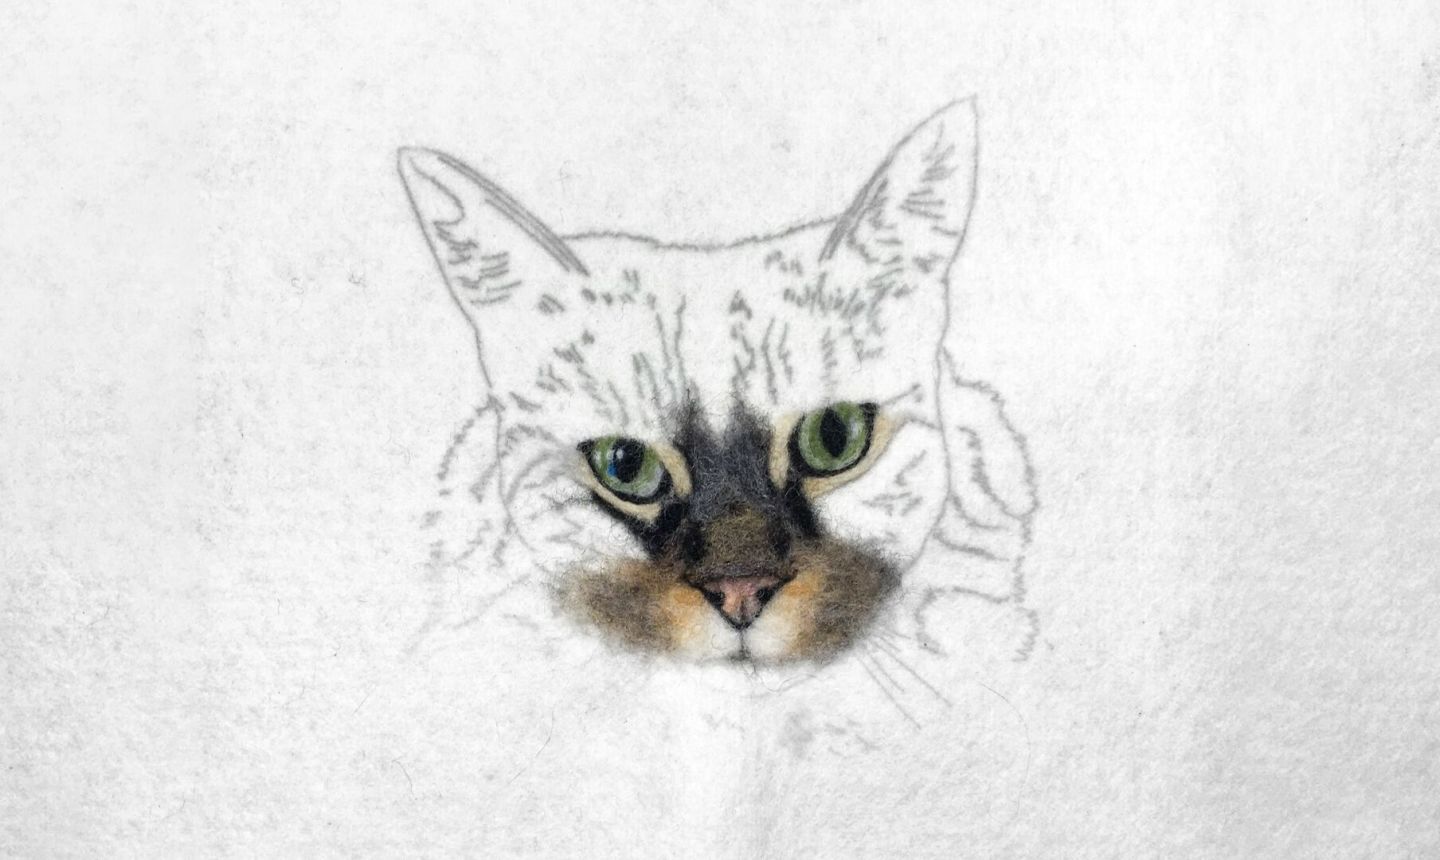
Move down to the mouth, felting the base color first and then adding layers.
6. Tackle the Defining Markings
After working the fine details around the mouth, nose and eyes, move on to any defining markings on the face. We felted the black tabby stripes of our cat first because those markings stand out.
Pro Tip: If your pet has markings like this, don’t worry if they look a little too defined right now. The next step is to fill in the colors around them, which will make everything look more cohesive.
If you’re felting an animal that doesn’t have any drastic markings (like a Labrador), felt the top of the head after finishing the mouth, nose and eyes.
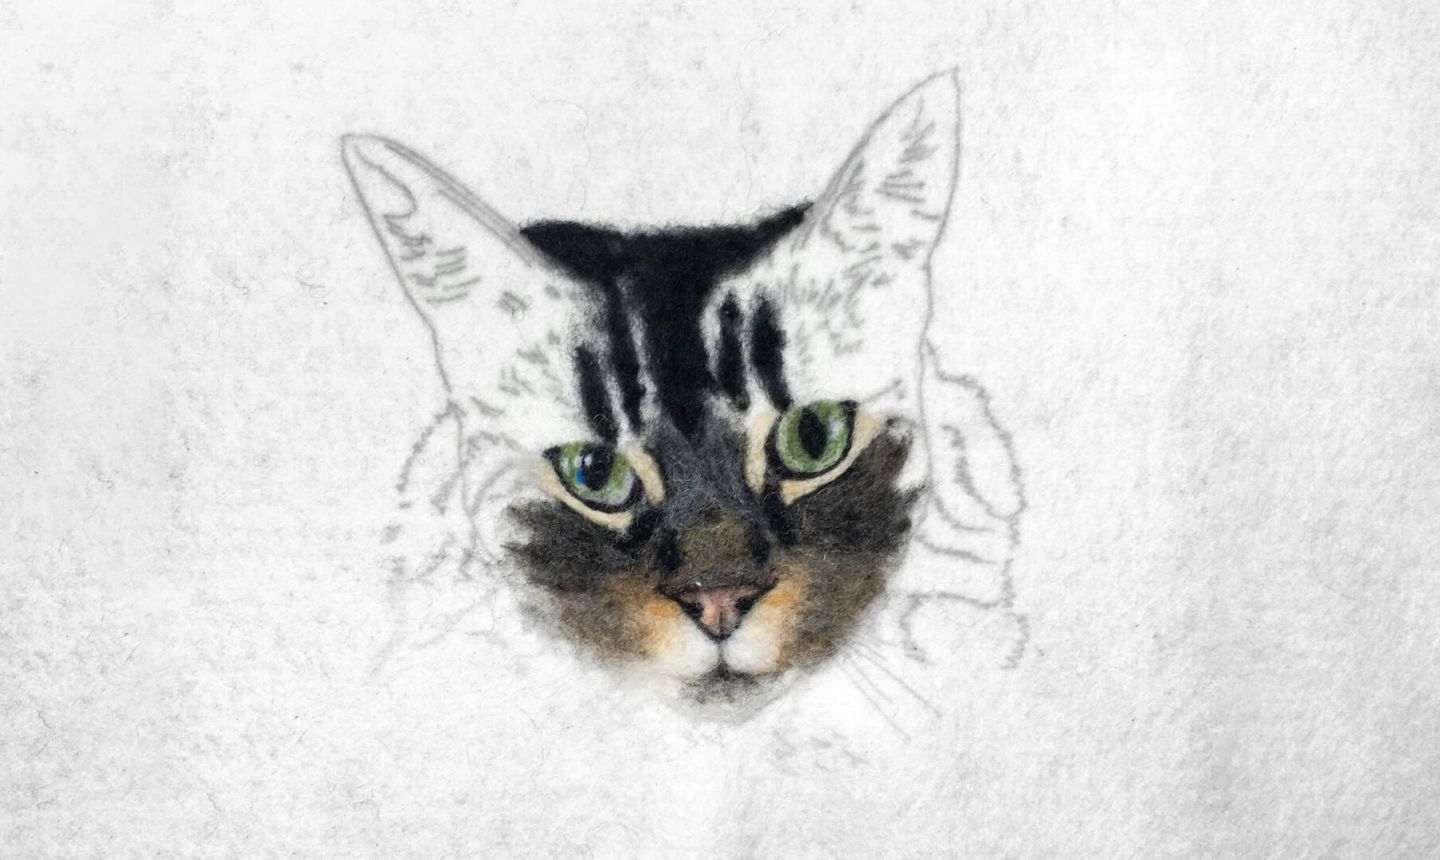
7. Add the Ears
A lot of animal ears have a pinkish-gray hue to them, so fill in this base layer with a pink-gray blend. Some ears have a thin line of dark or light fur around them. To add one, twirl a small piece of wool batting in your fingers while stretching it out — this will form a long, rope-like piece of wool — and felt the line in place.
Pro Tip: Remember: the finer the wool batting, the better. It’s easier to add more than to take away.
For the fur inside the ears, take thin, long pieces of the wool and felt them one at a time — this part takes patience — where the fur grows. Once the wool is attached to the head, pull as you felt, shaping the ear fur into a curved or straight line (depending on your animal).
Pro Tip: If you’ve made the fur too long, gently pull the wool batting off at the end (but not so hard that it comes off the fabric).
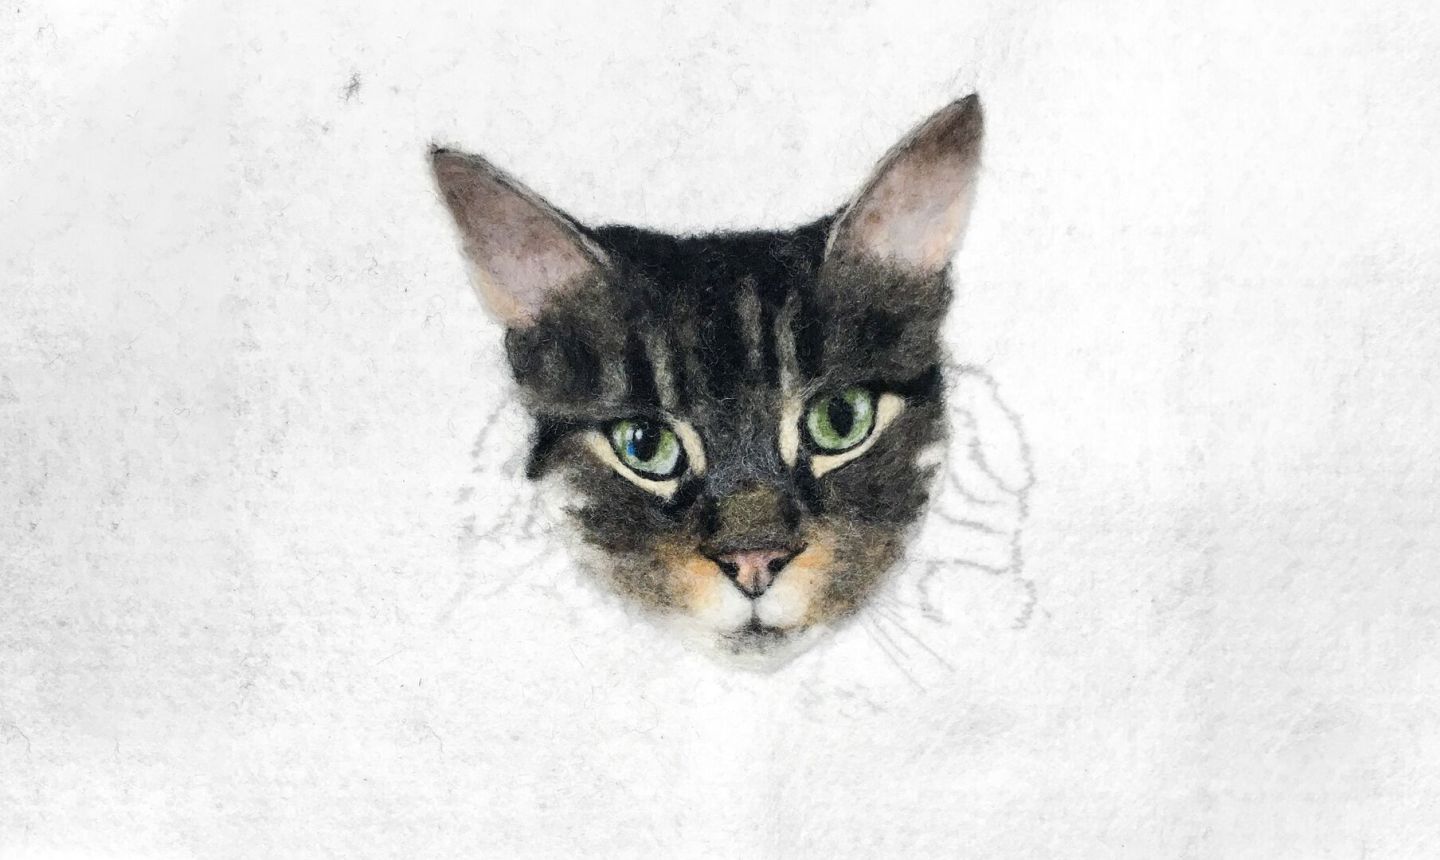
8. Finish the Head
When the ears are complete, go back and fill in the rest of the head with texture and details, making adjustments to earlier felting as needed.
9. Felt the Neck
When you move to your pet’s neck, there will often be a shadow under the chin. Fill this in first, then work the lighter colors around it. The small variations of color are super important here, as they will define the jawline and make the head look like it’s protruding from the neck.
10. Finish With the Whiskers
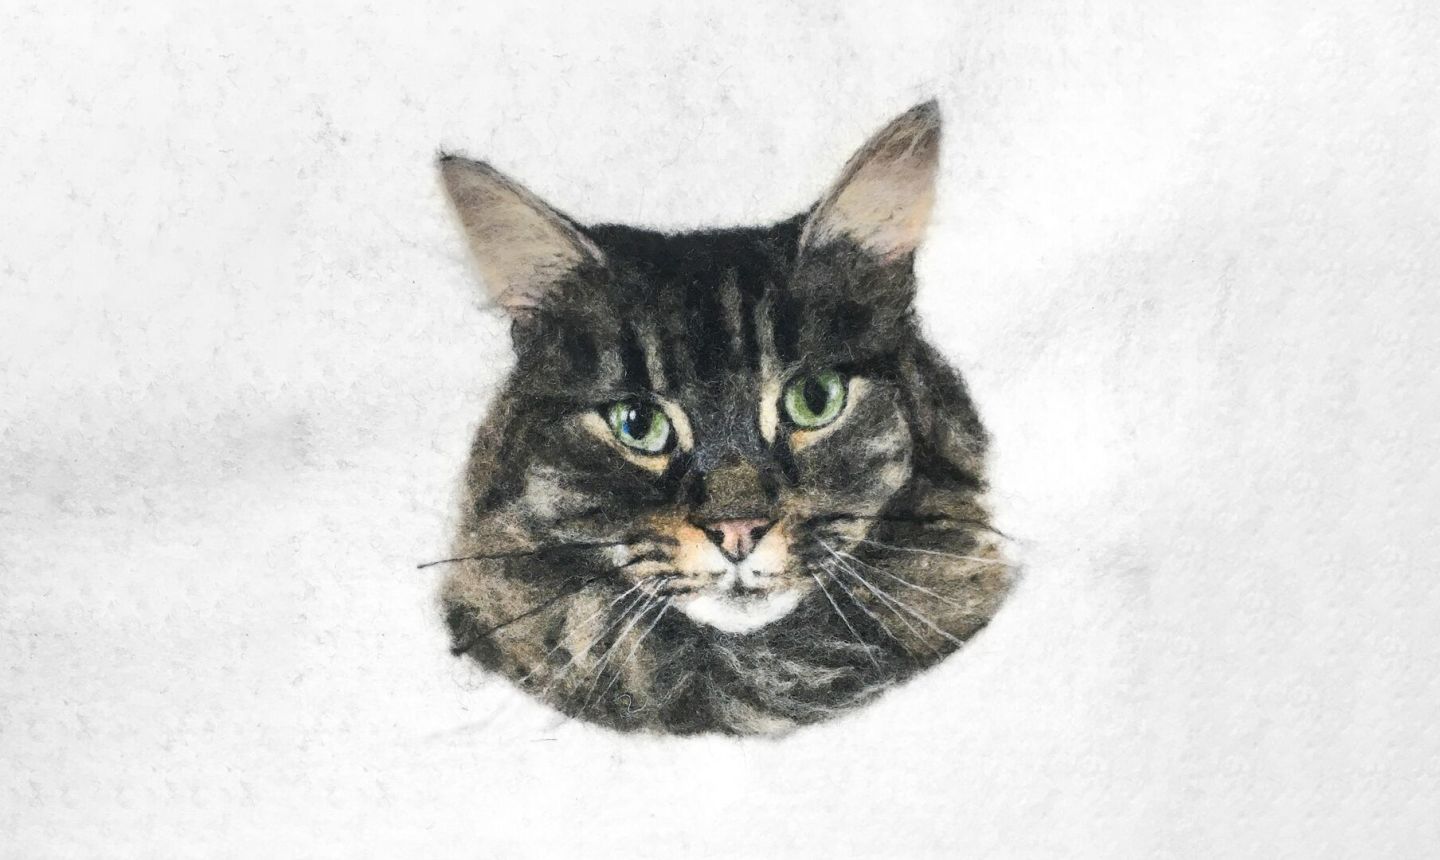
Stretch and twirl a long strand of wool in your fingers to make a thin, long piece. If there’s a thicker end, secure it where the whisker is attached to the face. Pull and stretch it where you want it to lie, then felt along the whisker. Do this gently so it stays in place, but don’t poke it too much or it’ll look indented.
Pro Tip: Whiskers can be tricky, so don’t feel like you have to add every single one you see in your photo. Just add enough so your portrait looks natural.
Take a step back and assess your portrait. If something doesn’t look quite right, you can change a lot with just a little wool, so don’t be shy about revisiting spots that need more detail. Once you have everything how you like it, you’re done felting!
11. Pull Off the Mat
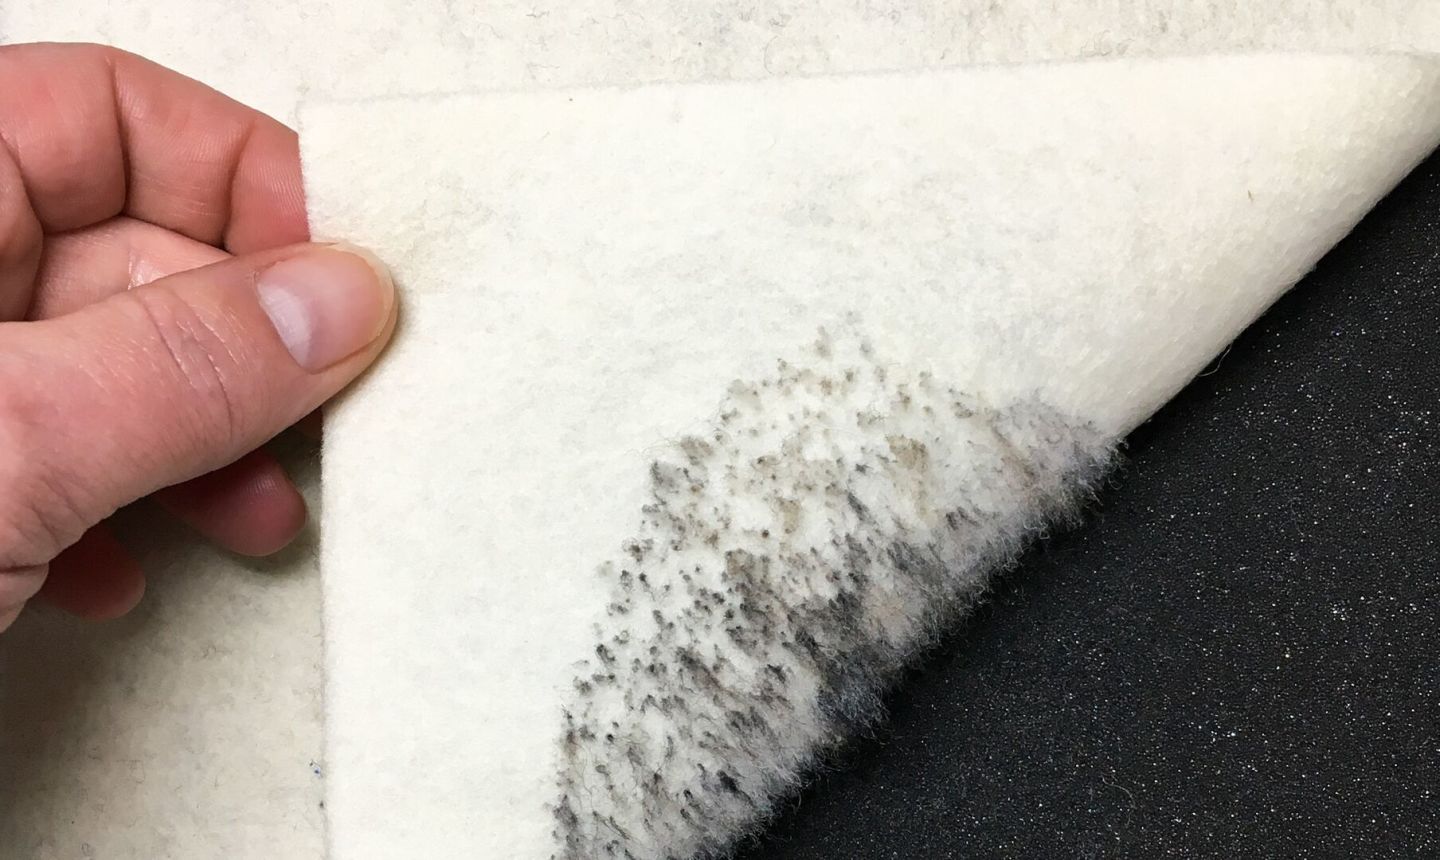
Start at one corner of the wool sheet and slowly pull it back. All the work on the front should stay in place — if any spots stick to the mat, pull gently from different directions until it budges.
12. Hoop Up
Hoop up your fabric with the 8″ x 8″ cotton fabric as a backing and finish the hoop with your preferred method.
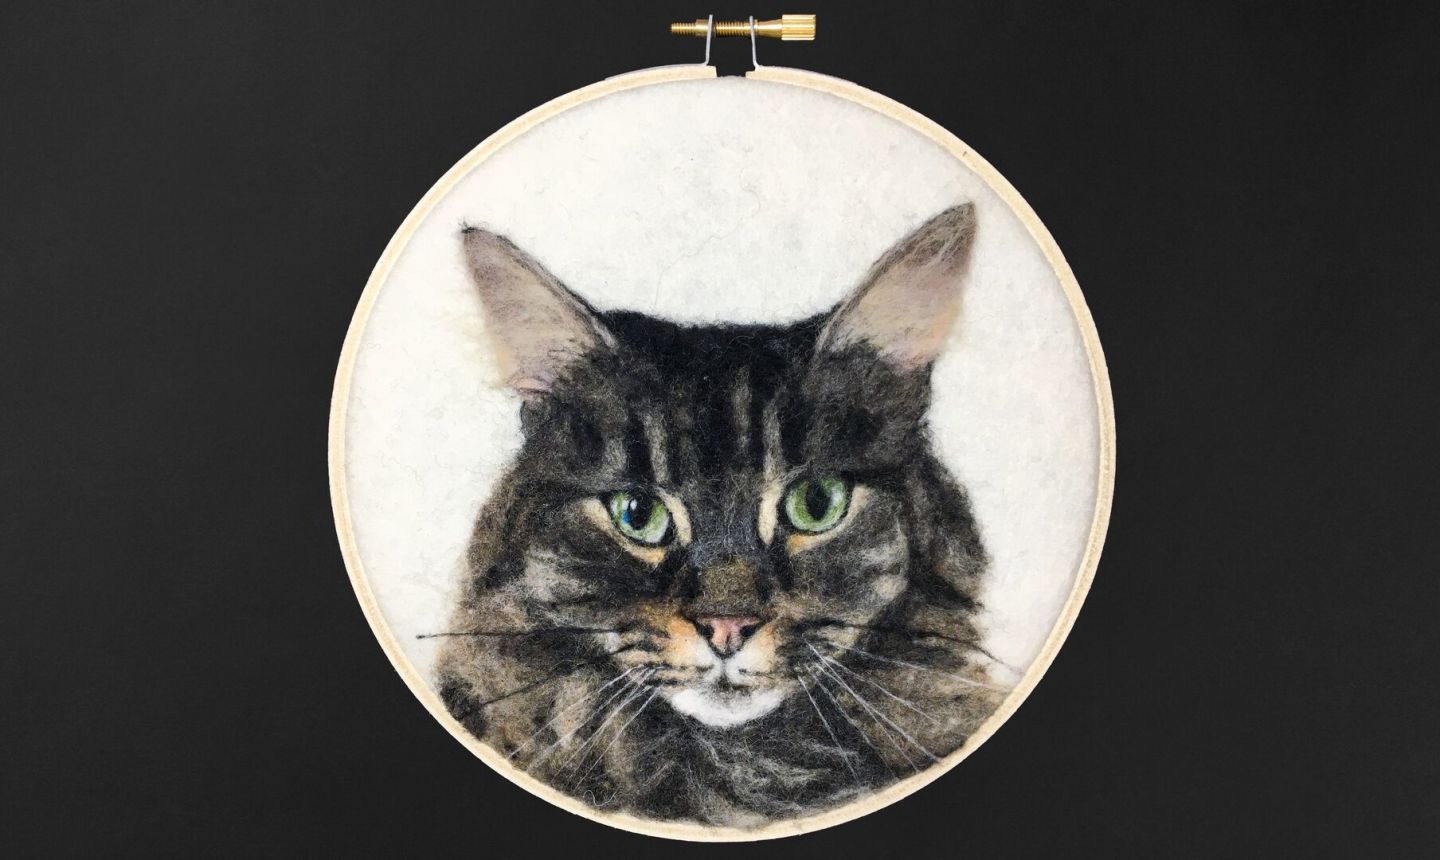
Voilà! You have a lifelike portrait of your fur baby that’s (almost) as cute as they are snuggled next to you.
Photos by Candice LaSalle.
my sister has cats, she would love this as a gift, thank you
Schitterend
Great & well illustrated instructions. Thanks!
Very clear, well-illustrated instructions! Would love to learn how to do small 3-D objects, like little gnomes or Santa. Thanks!
I want to try this. Just ordered some felting supplies and will probably try something more simple, but then I want to do this.