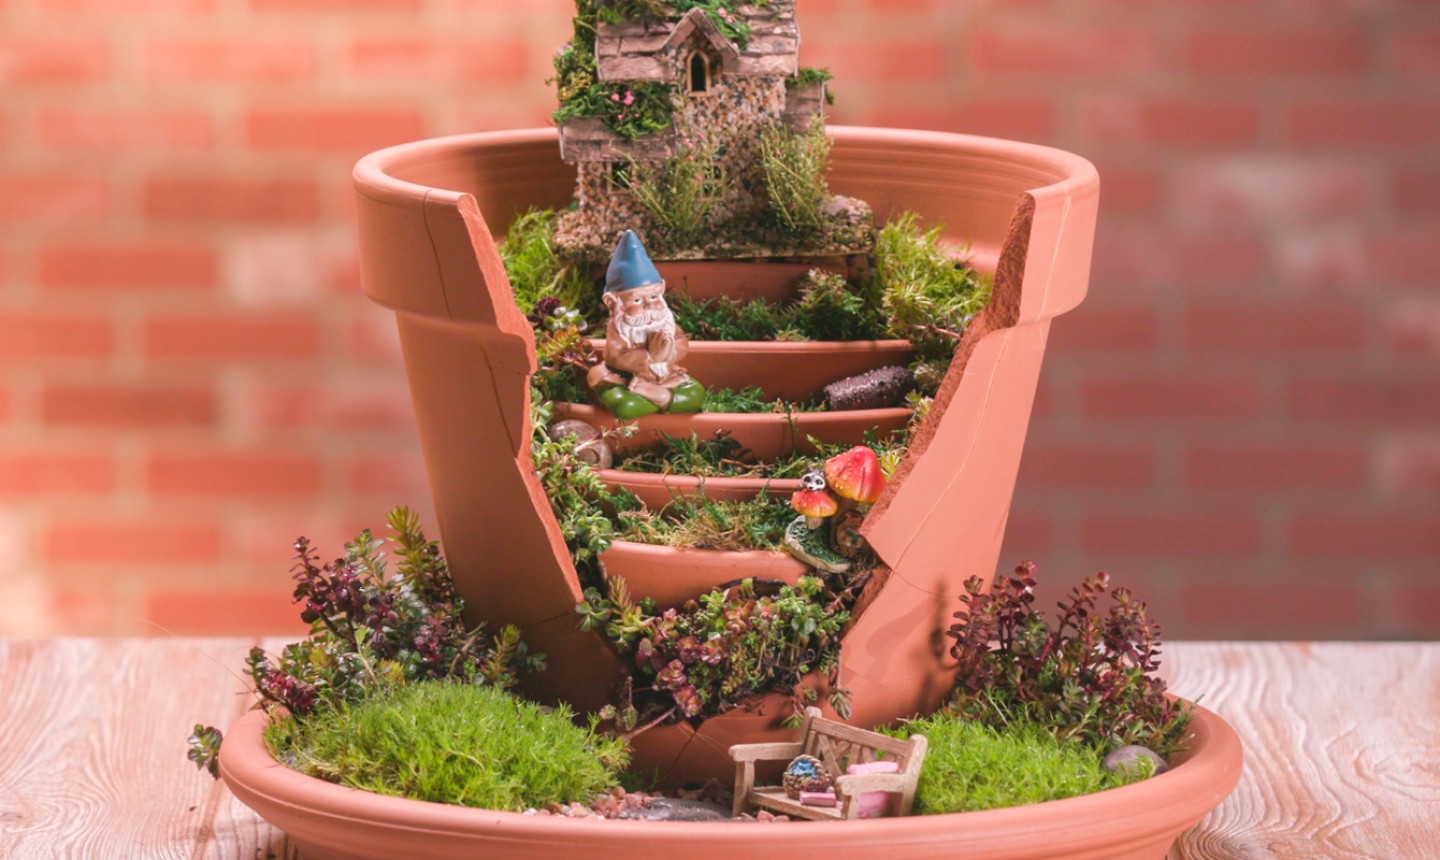
What looks like a run-of-the-mill flower pot is actually an expansive estate… for fairies, that is. Fairy gardens are guaranteed to enchant the littles, but we know more than a few grown-ups who love them too. Bring on the magic!
Fairy Garden
Level: Easy
What You Need
Instructions
1. Prep the Pot
Use a box cutter or sharp knife to score the terracotta pot where you want the break to happen. This step is so important — if you don’t outline the break first, your pot can shatter haphazardly and make it difficult (if not impossible) to use.
2. Wrap It
Cover the pot in plastic wrap. This makes sure fragments don’t scatter everywhere when it’s broken.
3. Hammer Time
Put on some safety glasses and gloves, and then swing your rubber mallet into the center of the scored area. The pot should shatter cleanly. Remove the plastic wrap and place the terracotta shards off to the side. (Don’t throw them away — you’ll use the pieces as part of the fairy garden design).
4. Fill the Pot
Place a paper towel over the drainage hole to prevent the soil from falling out. Place the pot over the terracotta dish and start filling both with soil.
As the soil piles up, layer in the broken terracotta pieces to make little steps. Fill each layer with soil as you work to pack the assembly into place.
5. Decorate!
At the highest point of the soil, add some small rocks and place your fairy house on top.
Cover the soil with sedum mat and sheet moss until the soil in both the dish and pot is well covered in greenery. You can also add more small rocks to make a little fairy path.
If you’ve got gnomes, mushrooms, critters or other details, add ’em now and you’re done!

I love it!
This is so cute . I cant wait to break up a flower pot now. Got knombs already to go. Thanks.
I have just decided to try making a fairy garden, it’s another way I can display my succulents found your website it has been extremely helpful thanks a lot
Questions: never made one before, is this an outdoor or indoor design? Does it need to be watered? Where do I get the sedum mat and scotch moss? In the woods, I have 200 acres I could probably find something? Thank you, Linda
I've made these before but didn't know the scoring trick... Thanks for that, bet my next one is much easier ;)
I love to build one of these.
It's beautiful and so easy to create.
I love this , I dont want to lose contact withyou this is genius!!
Would love to do this
I'd like them to build with my great grandchildren