Class
From Charcoal to Canvas: Training the Painter’s Eye
$39.99
$8.00
At a Glance:
- In-depth Instruction; over 255 mins
- On-demand video access anytime
- Bonus downloadable PDF resources
- Access to class Q&A
Item:
W0826E
Description
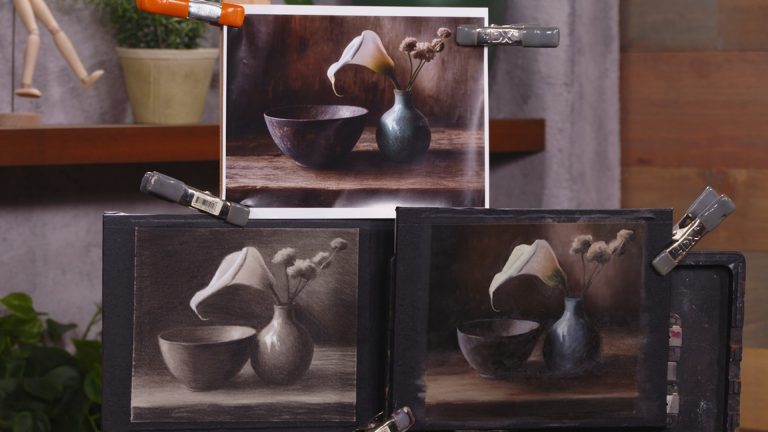
What if you could take the clarity and confidence you build in a charcoal drawing and carry it seamlessly into a rich, fully realized oil painting? In From Charcoal to Canvas, artist Katie Liddiard guides you through that process step-by-step, showing how skills in one medium directly strengthen the other.
The class begins with establishing a strong foundational stage. Working first in charcoal, Katie demonstrates how to quickly capture essential shapes, values, and relationships, focusing on accuracy without getting lost in details. You’ll see how simplifying forms and understanding light and shadow early on sets you up for success in both drawing and painting.
Next, you’ll move into the impression stage. Here, Katie expands on the information from the foundation stage, refining shapes and expanding values with charcoal and paint. You’ll learn to balance accuracy with painterly freedom, keeping the work fresh while developing structure, depth, and atmosphere.
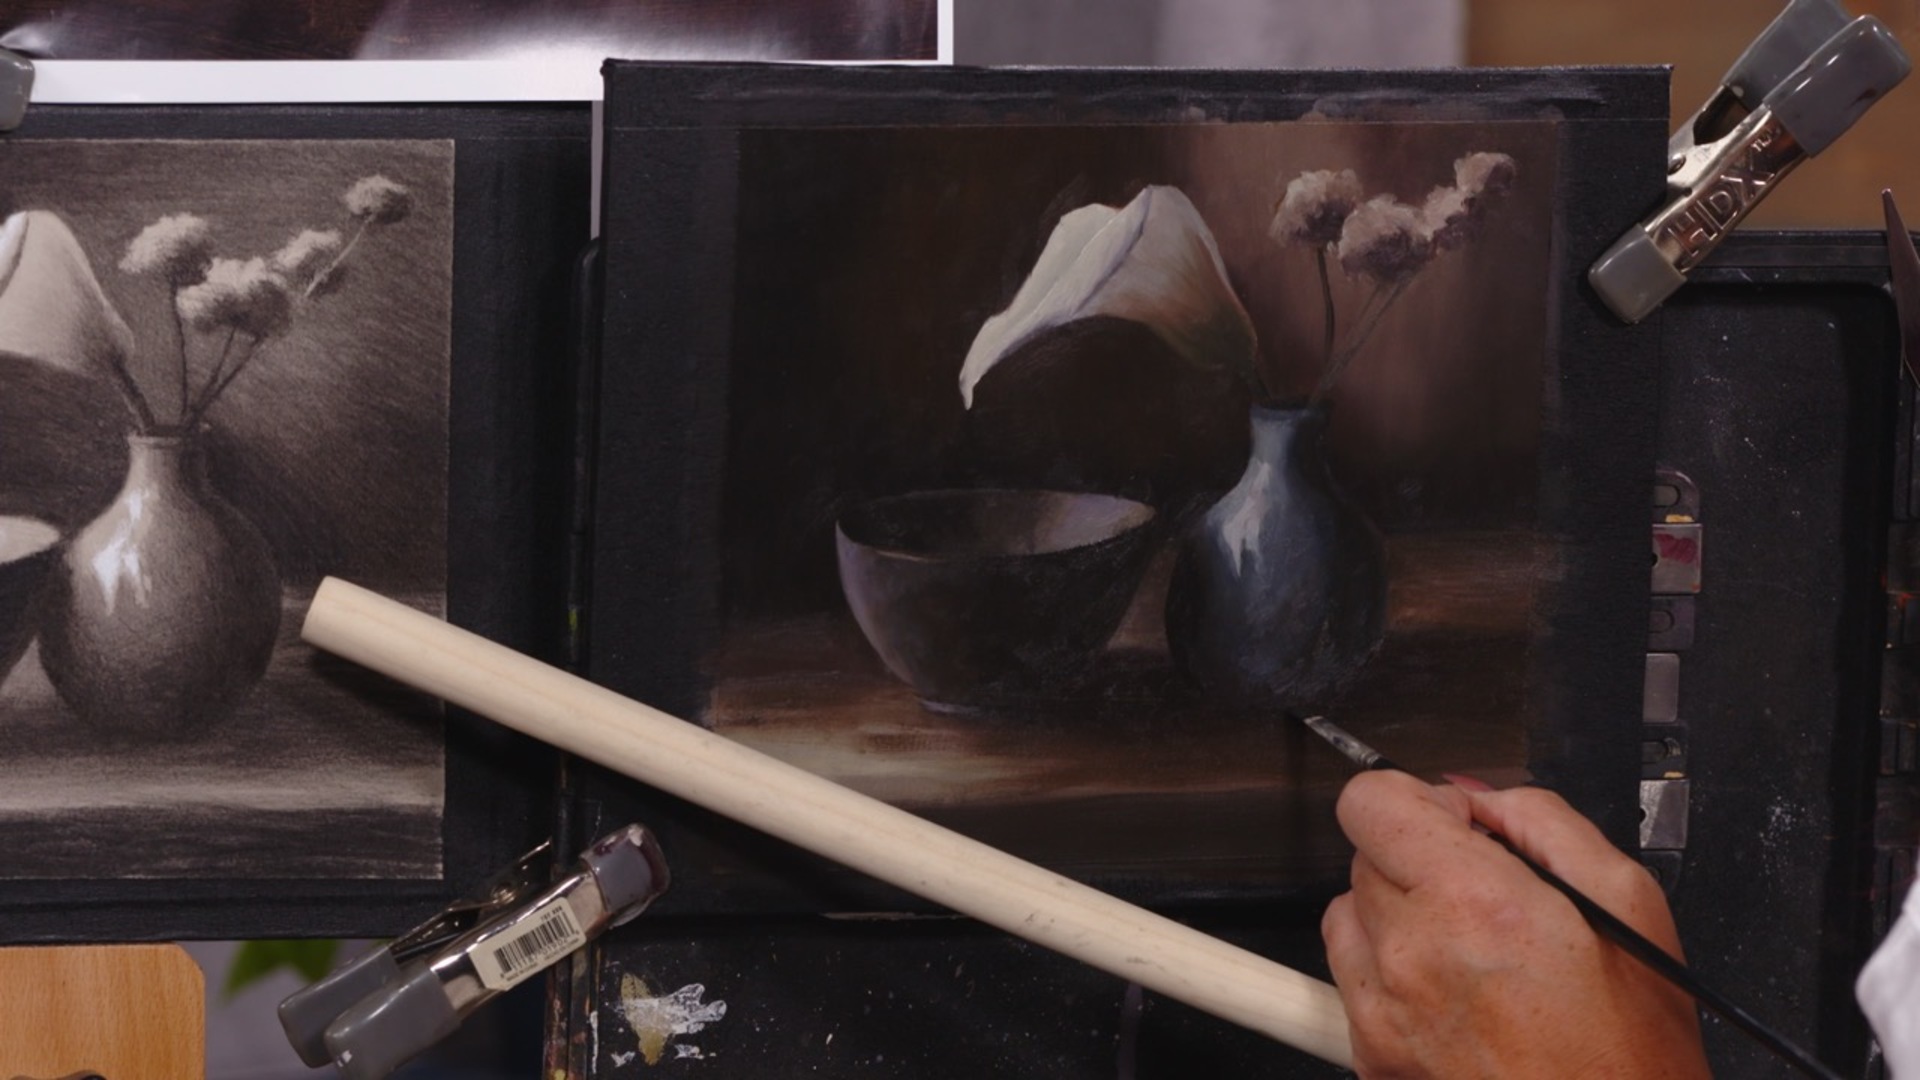
Finally, in the finishing touches stage, Katie works on the charcoal and oil painting side-by-side, revealing how to assess your work critically and make deliberate choices. You’ll explore edge control, subtle temperature shifts, pops of saturation, and precise value adjustments to bring volume, light, and life to your subject—without overworking it.
Throughout the class, Katie emphasizes the importance of thinking like an artist at every step: responding to the needs of the piece rather than rigidly copying a reference. By working in both charcoal and oil, you’ll strengthen your eye, improve your value control, and gain tools to create finished works that feel intentional and alive. You’ll be able to see the differences and similarities of the two mediums and why charcoal is a great medium to pick up to make your paintings more successful.
Whether you’re new to still life or looking to sharpen your finishing skills, From Charcoal to Canvas gives you a clear, repeatable process for creating artwork that shines from first mark to final stroke.
Class Sessions

Introduction
1:14
In this session, Katie gives you a brief overview of the steps and techniques covered in this class.

Materials
6:57
Ever wondered what tools you really need to take a piece from charcoal drawing all the way to a finished oil painting? In the opening video of her From Charcoal to Canvas class, Katie Liddiard walks you through her complete setup—breaking down each material so it feels approachable and easy to understand.
Katie begins with the drawing side, introducing her go-to charcoals: soft willow, versatile compressed sticks in varying hardnesses, and a rich General’s charcoal pencil for deep, final accents. She explains how each type behaves, and why white charcoal is essential for working on mid-tone paper. Alongside her kneaded and hard erasers, she shares practical tips for keeping charcoal sharp, organized, and ready to go—because having a fresh point always keeps the drawing process flowing.
On the painting side, Katie unveils her oil palette. While she has an impressive array of colors laid out, she emphasizes that you don’t need them all to follow along. In fact, her chosen reference—a composition focused on strong value contrasts—means this lesson is about value relationships first, color second. She covers her preferred pigments, from warm and cool reds to cobalt blue, yellow ochre, raw umber, and her favorite black substitute, Van Dyke brown. She also discusses her oil gel medium, brush selection (filberts are her favorite), and the special scrubby brush she uses for oiling out.
Katie finishes by encouraging you to work with whatever materials you already have. The real magic isn’t in owning every supply—it’s in mastering the tools at your disposal. With her warm, encouraging approach, this introduction sets the stage for a class that’s about building skill, confidence, and a solid foundation—so you can take your art from the first charcoal line to the final brushstroke in oil.
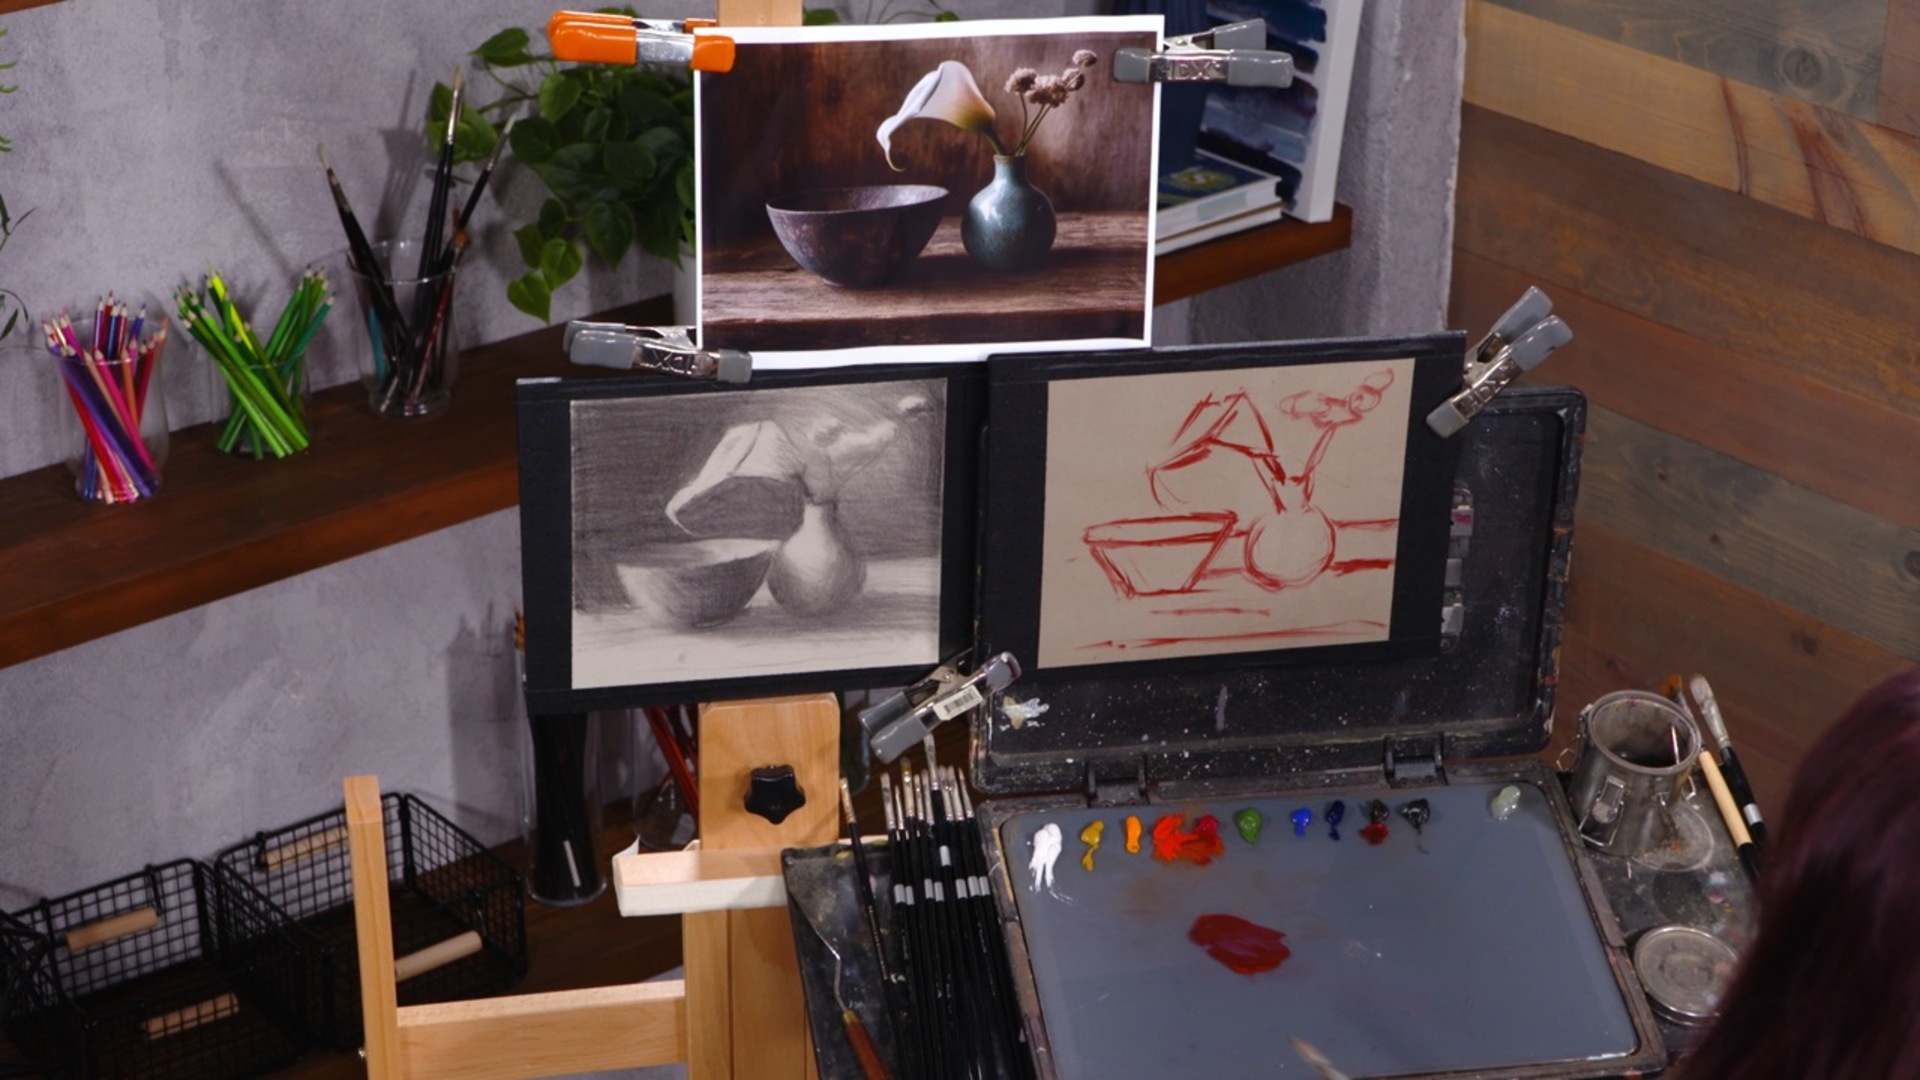
Blocking In
45:33
How do you go from a blank surface to a confident charcoal and oil block-in without feeling overwhelmed? In this video from From Charcoal to Canvas, Katie Liddiard takes you step-by-step through the early stages of building a drawing and painting—from the first loose marks in charcoal to the initial washes of oil paint.
Katie begins with an HB charcoal pencil, focusing on big shapes first. She shows how to lightly map out placement, proportion, and gesture without worrying about perfection. Working with a soft touch keeps the paper clean and allows for easy adjustments later. As she moves into massing, Katie switches to softer B and willow charcoals to quickly fill large areas, carefully considering value relationships, light direction, and the role of core shadows. She stresses the importance of squinting to simplify values, resisting the urge to over-detail too soon, and thinking in terms of general masses before refining.
Once the charcoal drawing is established, Katie transitions to oil paint. Using thin, inky washes with mineral spirits, she blocks in the big value shapes on her toned painting prepared paper, losing unnecessary edges and simplifying forms for clarity. She demonstrates how to match values before worrying about perfect color, how to develop a "puddle" on the palette for consistent relationships, and why certain edges or details can wait until later stages. Throughout, she compares lights, halftones, and shadows—reminding viewers that value relationships, not pure white paint, are what make something read as “white.”
By the end, both the charcoal and oil studies are fully covered and ready for refinement. Katie’s approachable, encouraging style makes the process feel manageable, proving that a solid block-in is all about building context, working general to specific, and staying flexible as you go. This is the foundation for everything that follows in your painting.
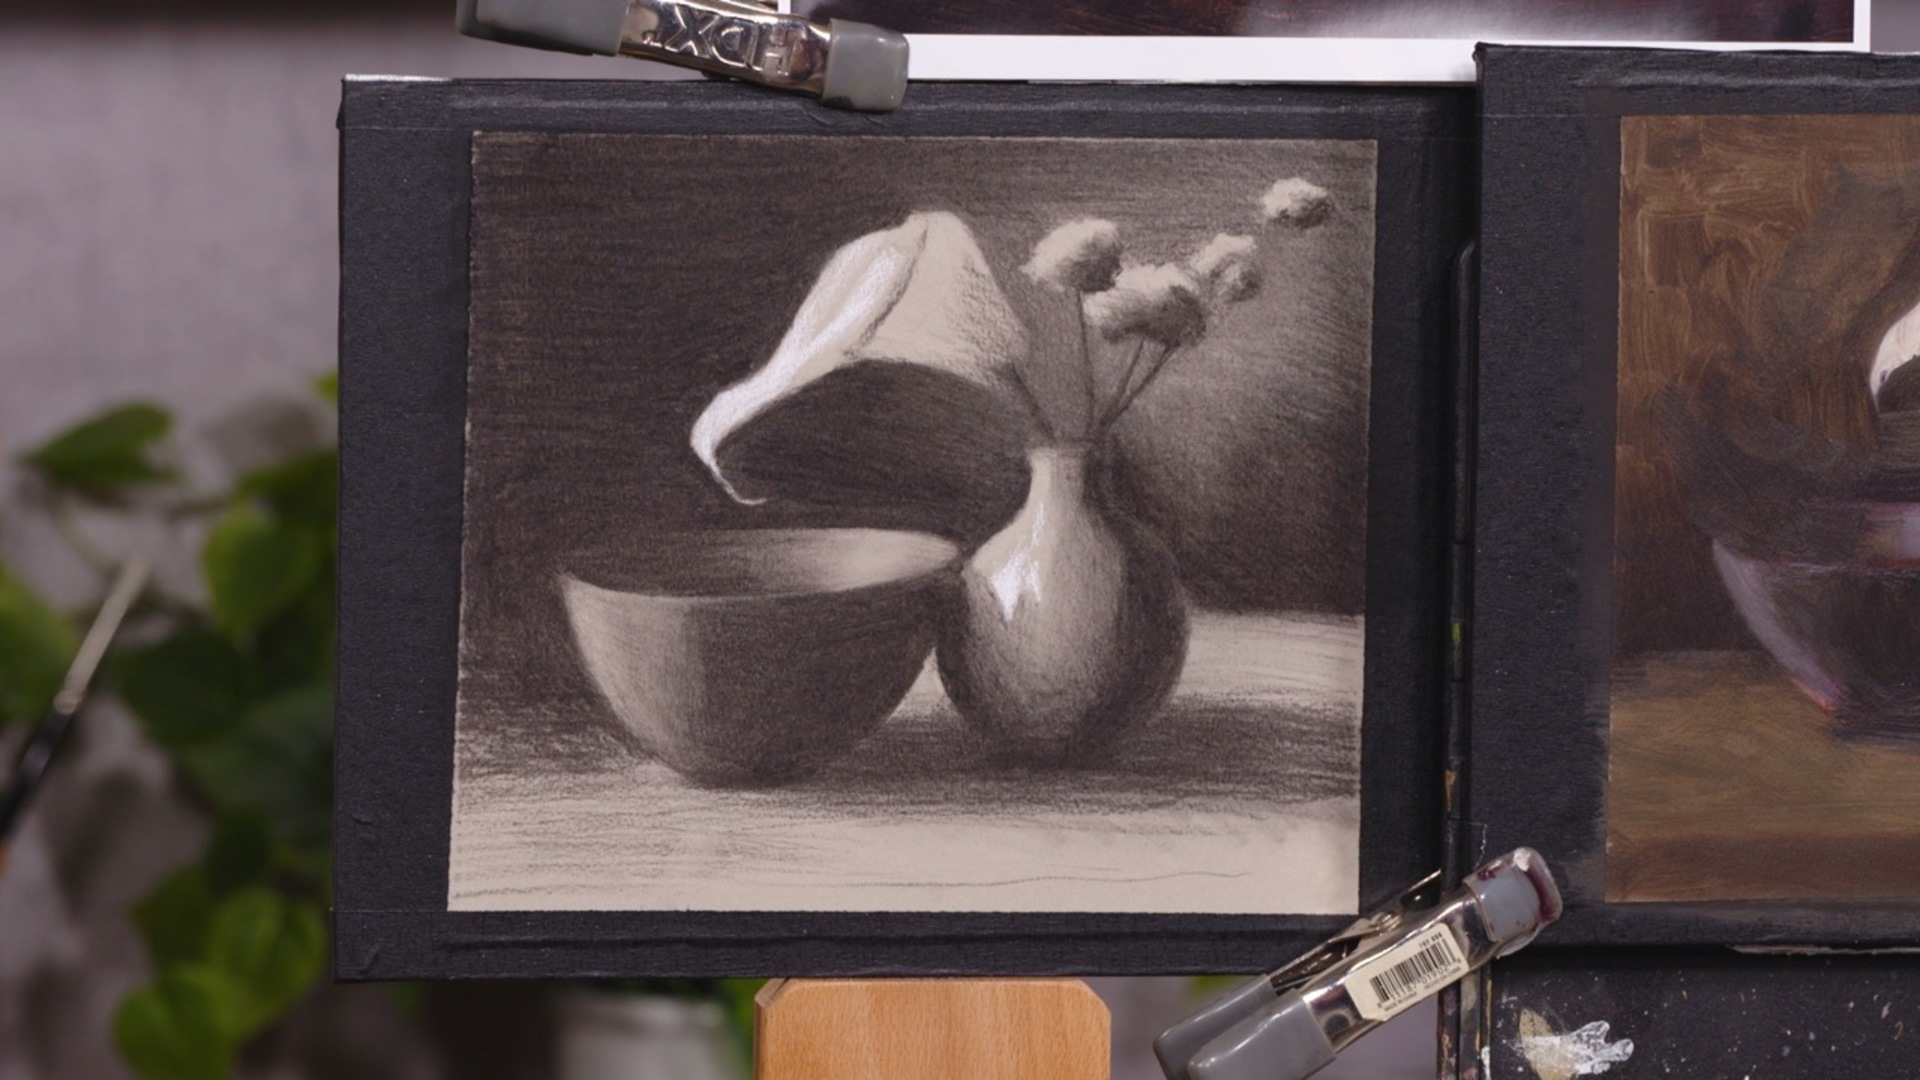
Building The Impression- Charcoal
1:03:32
How do you take a charcoal block-in from rough shapes to a refined, fully realized drawing? In this stage of her From Charcoal to Canvas process, Katie Liddiard slows the pace to focus on accuracy, atmosphere, and value control—transforming the initial sketch into a cohesive, intentional work.
Katie begins by establishing her full value range, placing the deepest darks and brightest lights to set the stage for everything in between. This anchors the drawing, allowing her to judge every midtone in proper context. She demonstrates how to gradually build darks with a soft touch, preserving the ability to adjust, and how to use white charcoal sparingly to keep lights crisp without muddying the paper’s natural tone.
Throughout, she emphasizes the relationship between edges, values, and form. Hard edges define structure and shine, while soft edges suggest subtle turns in light. Katie points out where to lose edges for atmospheric depth and where to keep them sharp for clarity. Her methodical approach to contour refinement, halftone placement, and shape correction keeps the entire drawing developing evenly, avoiding the trap of over-finishing one area too soon.
She also covers practical techniques—rotating through different charcoals for precision, sharpening often for accuracy, and using tools like a mahl stick for clean lines. Attention to background values and transitions ensures the subject sits naturally in space.
By the end, the piece reads as a unified “impression”—values, edges, and forms are all in place, even if the final roundness will come later in the painting stage. Katie’s patient, encouraging guidance shows that the key to a strong drawing is building it slowly, always in relation to the whole, and keeping flexibility for the finishing stages.
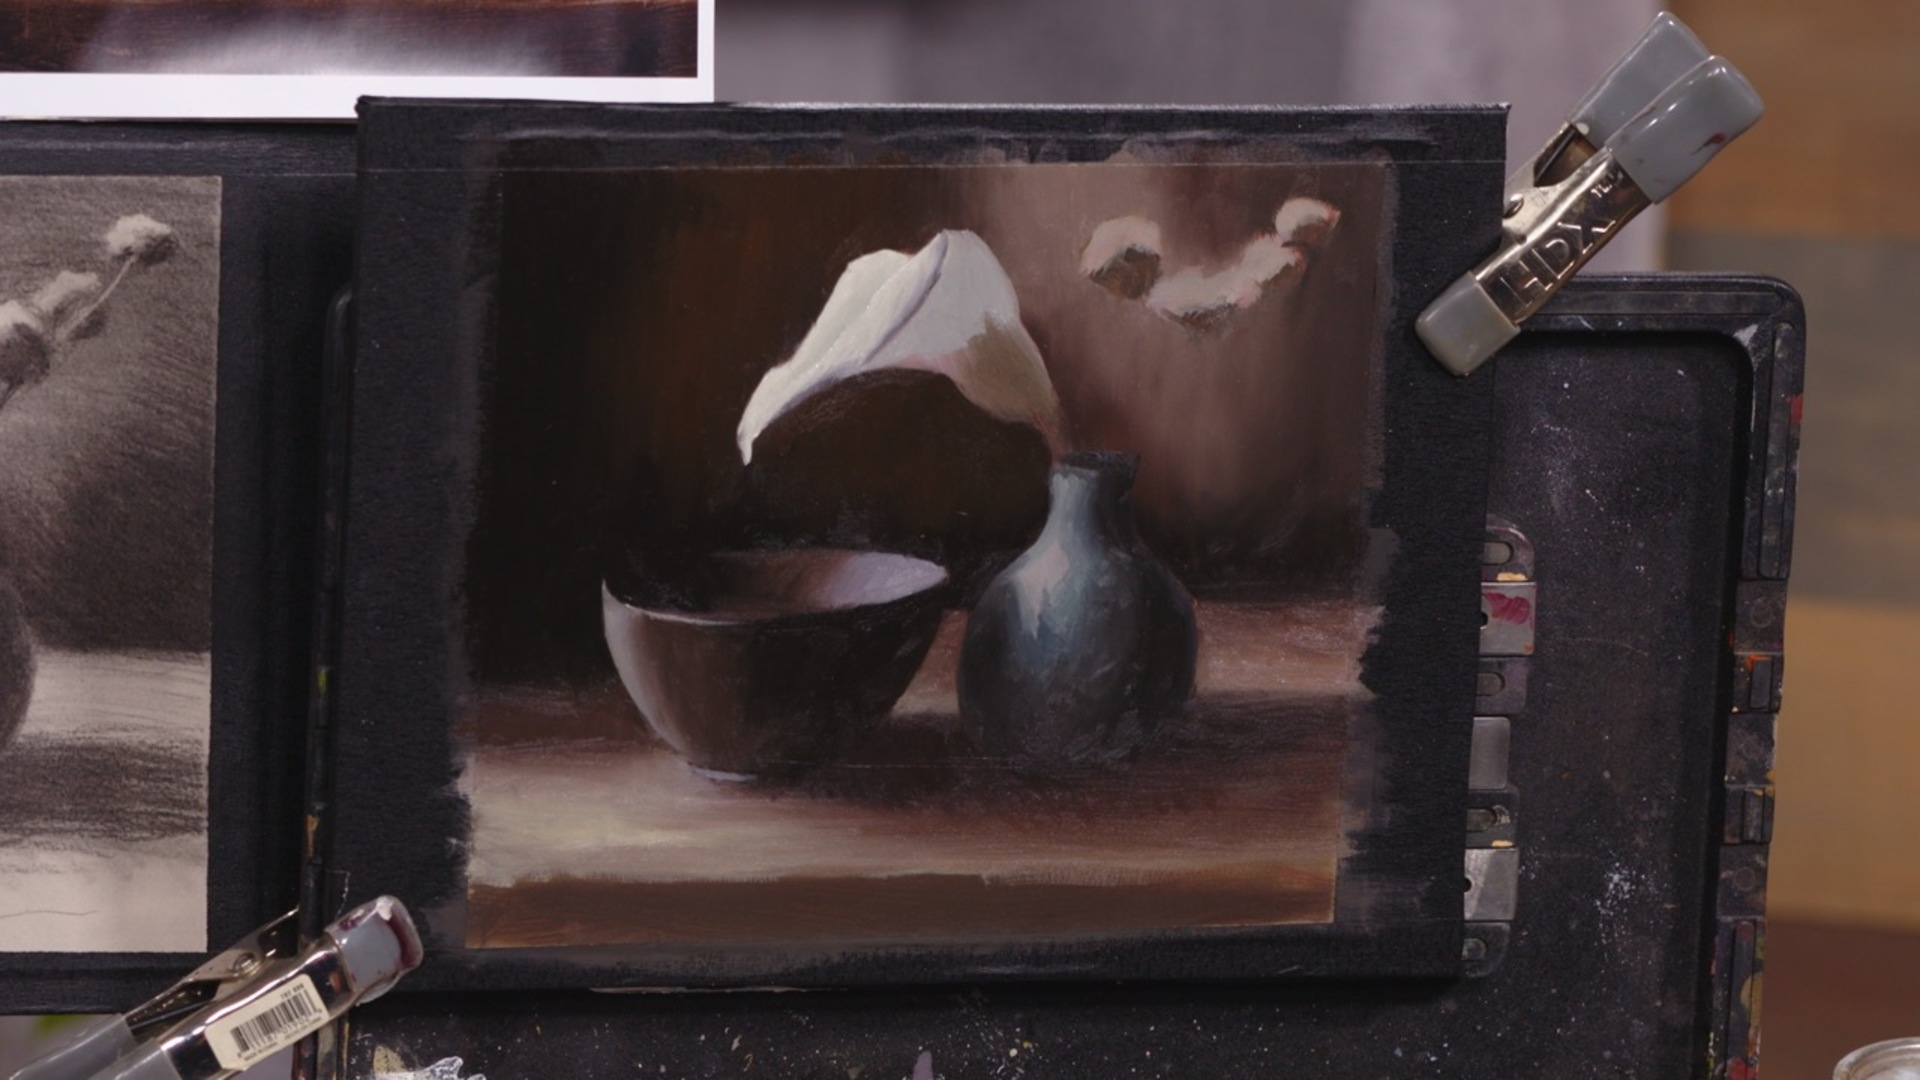
Building The Impression- Painting
1:04:32
How do you take that carefully built charcoal block-in and turn it into a rich, confident painting?
In this stage of From Charcoal to Canvas, Katie Liddiard moves from monochrome precision to vibrant, value-driven color—showing how to translate the discipline of drawing into the fluid world of paint.
Katie begins with her “impression” stage—a foundational layer where she blocks in large shapes and overall values without over-refining. The goal isn’t to match every detail perfectly but to unify the composition, set accurate value relationships, and establish a strong structure before pushing to full form. She builds her paint mixtures in deliberate value steps, starting with her darkest darks and lightest lights to anchor the range, then filling in middle tones that tie shapes together.
Throughout, Katie reminds us that value comes first, color second—color can always be adjusted, but if the value is wrong, the whole painting feels off. She demonstrates how to judge values in context, using the background and surrounding shapes to keep everything in balance. She shows how small variations in a mixture can add visual interest, and how leaving some of the underpainting peeking through can create depth and texture.
This stage is about big-picture thinking—squinting to simplify, keeping edges purposeful (sharp for clarity, soft for atmosphere), and resisting the urge to jump into detail too soon. Katie also shares practical problem-solving tips: adjusting for glare by changing brushstroke direction or tilting the canvas, separating brushes by value families, and making continuous drawing corrections while painting.
By the end, the canvas reads as a complete, unified image—flat in the sense of a posterized impression, yet solid and ready for the finishing stage. It’s a patient, immersive process that rewards those willing to slow down, compare carefully, and let the painting evolve through deliberate, confident passes.
Finishing
1:12:22
How do you take a piece from “almost there” to one that truly sparkles? In this final stage of From Charcoal to Canvas, artist Katie Liddiard reveals how the smallest, most thoughtful adjustments can breathe life into your work. With her signature blend of precision and approachability, she walks you step-by-step through the process of refining both a charcoal drawing and an oil painting—side by side—so you can clearly see how skills in one medium directly benefit the other.
Katie begins by demonstrating how to assess your work with a fresh eye, identifying areas that can be pushed darker, brightened, or softened. You’ll see how controlled shifts in value can give forms more weight and volume, and how edge control—knowing exactly where to sharpen, blur, or lose an edge entirely—guides the viewer’s attention with purpose.
In the oil painting portion, she explains the importance of “oiling out” to restore the brilliance of colors and the accuracy of values before making any finishing strokes. You’ll learn how subtle changes in temperature, small pops of saturation, and careful handling of highlights can create depth, atmosphere, and that elusive sense of realism without overworking your piece.
Throughout the lesson, Katie emphasizes that finishing isn’t about adding endless detail everywhere—it’s about making deliberate choices that serve your composition as a whole. She shows you how to leave supporting elements suggestive, so they enhance rather than compete with your focal point, and how to let your values and edges carry the story of the piece.
Whether you’re polishing a charcoal study or a full oil painting, this stage is where patience, precision, and restraint transform a solid foundation into a finished work that commands attention.
Your Instructor
Katie Liddiard
Katie J. Liddiard was born in Logan, Utah in 1984. She attended Snow College in Ephraim, Utah and afterward attended the Florence Academy of Art in Florence, Italy. When the Masters Academy of Art opened up closer to her home in Springville, Utah she finished her studies there. Upon graduating she became the Assistant Director of the Masters Academy where she guided students to become self-sustaining artists. After having served in that capacity for several years, she decided to focus on her own work and now paints in her home studio in Spanish Fork, Utah.
Bonus Material
Materials List
Bonus Materials available for download after purchase.
