
As baby teeth begin falling out, making room for the permanent “grown-up” ones, the time for the tooth fairy to visit has arrived! The tradition of the tooth fairy visiting to switch it out with money or goodies can be magical to young ones. What better way to celebrate this toothless day than with a oh-so-sweet cupcake fondant topper?!
Follow this tutorial to learn how to make an adorable tooth fairy fondant cupcake topper sure to bring a gap-toothed smile to a child’s face!
Materials needed:
- Fondant (white, pink, yellow and black)
- Fondant rolling pin and 1/8″ guide rings
- Water/edible glue and brush
- Vegetable shortening
- Round decorating tip #7
- Small teardrop cutter
- Medium butterfly cutter
- Rolling pastry cutter
- Precision knife
- Large modeling stick
- Modeling tool
- Lollipop stick
- White soft gel paste/toothpick
- White, pink and gold shimmer dust and brush
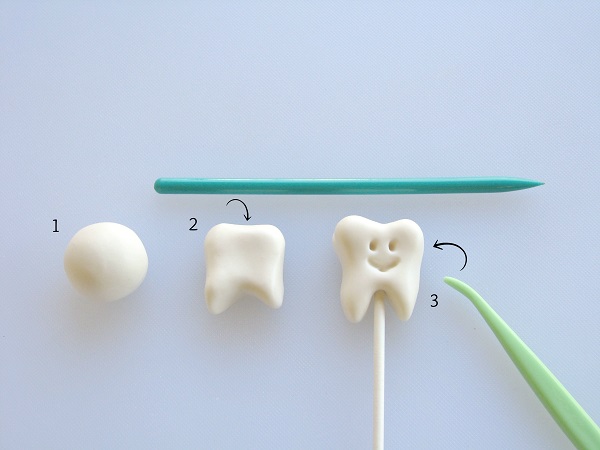
Step 1:
Roll some white fondant into a ball approximately 1″ in diameter.
Step 2:
Dip your fingers in vegetable shortening and begin to mold the tooth from the white fondant ball. Start out by flattening it out a bit into a square-like shape, then begin to pinch the bottom to create the sharper ends of the tooth. Utilize the rounded body of the large modeling stick to indent the center, while continuously shaping and rounding out the tooth.
At the top of the tooth, continue utilizing the body of the large modeling stick to indent the center going both directions (horizontally and vertically) to create the top surface of the tooth. Narrow the center a bit with your fingers and continue to round it out smoothly with your fingers.
Step 3:
Once you are satisfied with the shape of the tooth, utilize a modeling tool to make oval indentations for the eyes and indent an open smile. Make sure you have enough room to later add the tooth fairy’s skirt! Slowly insert the lollipop stick from underneath by slowly twisting upward, but ensuring the stick does not protrude from the top.
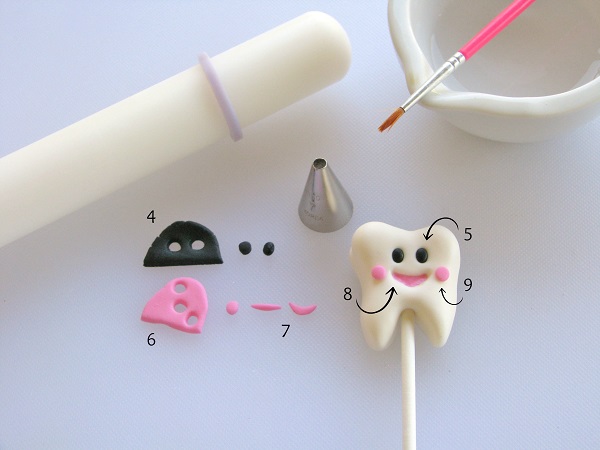
Step 4:
Roll out black fondant with the rolling pin and 1/8″ guide rings. Cut out two circles with round decorating tip #7, then roll them into ovals to create the eyes.
Step 5:
Dab a bit of water/glue in the eye cavities on the tooth and insert the black eyes, gluing them in place.
Step 6:
Roll out pink fondant with the rolling pin and 1/8″ guide rings and cut out three circles with round decorating tip #7.
Step 7:
Take one of the pink circles, roll it on your work surface into a sausage shape, then begin to press down on it to flatten it a bit. With your fingers, shape it into a smile, pinching the sides.
Step 8:
Apply some water/glue in the mouth cavity and insert the smile, gluing it in place. Utilize your modeling tool, if necessary, to smooth it out inside.
Step 9:
Glue the two remaining pink circles on the tooth’s cheeks.
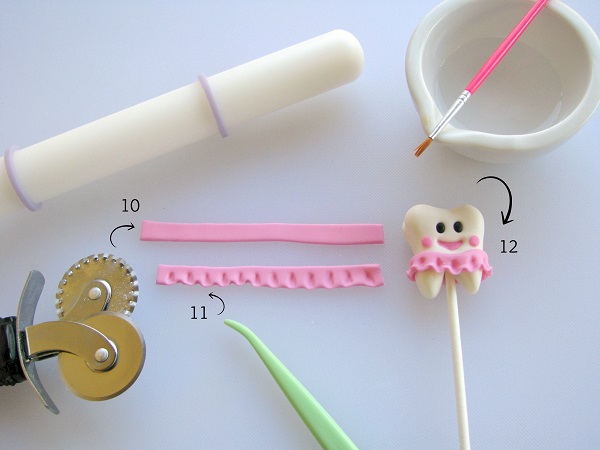
Step 10:
Roll out additional pink fondant with the rolling pin and 1/8″ guide rings. With the rolling pastry cutter, trim a strip lengthwise, approximately 1/2″ in width to begin creating the skirt.
Step 11:
With your modeling tool, begin to make small vertical indentations across the length of the skirt, not quite reaching the very top to create some pleats. Feel free to utilize the tool to press the fondant up a bit in between the pleats.
Step 12:
Fit the skirt around the “waist” of the tooth and trim off the excess with the rolling pastry cutter/precision knife. Apply water/glue to the skirt to adhere it in place. Continue to utilize the modeling tool to flair the skirt a bit and shape it as desired. You will notice I pushed the skirt down a bit in the center to account for the tooth’s mouth.
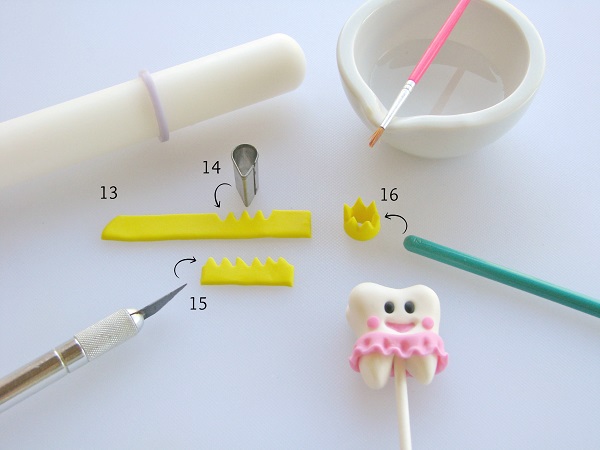
Step 13:
Roll out yellow fondant with the rolling pin and 1/8″ guide rings. With the rolling pastry cutter, trim a strip lengthwise, approximately 1/2″ in width.
Step 14:
With the narrow end of the teardrop cutter, trim triangular pieces off the top for the crown.
Step 15:
Utilize the precision knife to trim off the excess.
Step 16:
Stand the yellow fondant upright, then attach the two ends together with water/glue to form the crown. Utilize the bottom of the large modeling stick to facilitate the wrapping of the fondant, while maintaining its shape.
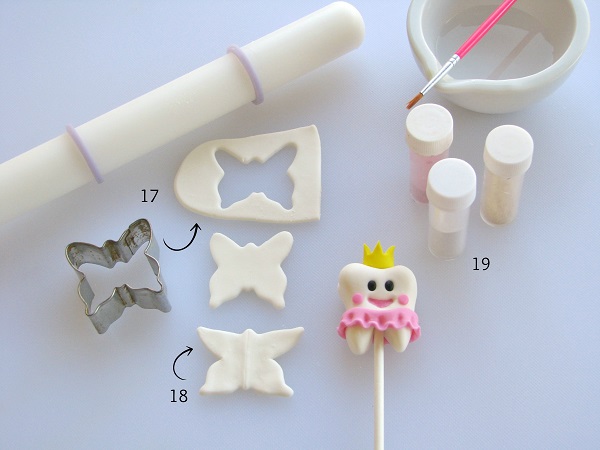
Step 17:
Roll out white fondant with the rolling pin and 1/8″ guide rings. Punch out a butterfly shape with the medium cutter.
Step 18:
Depending on the shape of your cutter, you might want to stretch out the wings of the butterfly to ensure it fits properly behind your tooth and is visible. Allow the wings to dry thoroughly, so that it is hard enough to be glued to the tooth (preferably overnight).
Step 19:
Add shine using shimmer dust — simply apply the white dust to the wings with a brush.
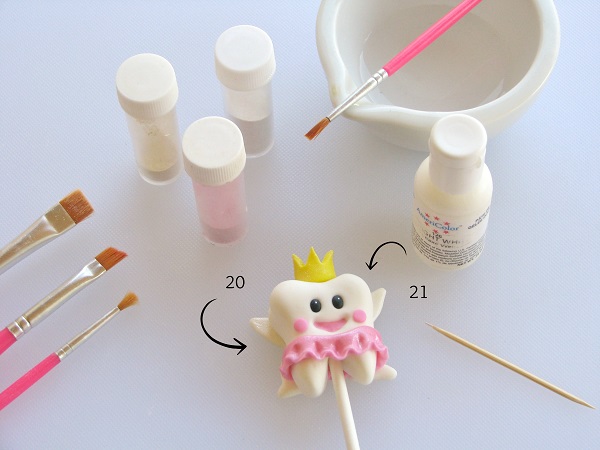
Step 20:
When the wings are sufficiently dry, glue them to the back of the tooth fairy and, if desired, apply some pink shimmer dust to the skirt and gold shimmer dust to the crown. Be sure to only use a little at a time so as not to drip the dust where it is not wanted or consider brushing it over the fondant prior gluing the pieces.
Another alternative is to add a bit of water/clear alcohol to paint the shine on directly to the fondant.
Step 21:
Dip the toothpick in a bit of white soft gel paste and add a little glimmer dot to each of the eyes. Allow the tooth fairy to dry thoroughly prior to insert it in your cupcake or cake.
Share tips, start a discussion or ask one of our experts or other students a question.
No Responses to “A Tooth Fairy Cupcake Topper Tutorial to Satisfy Your Sweet Tooth!”