
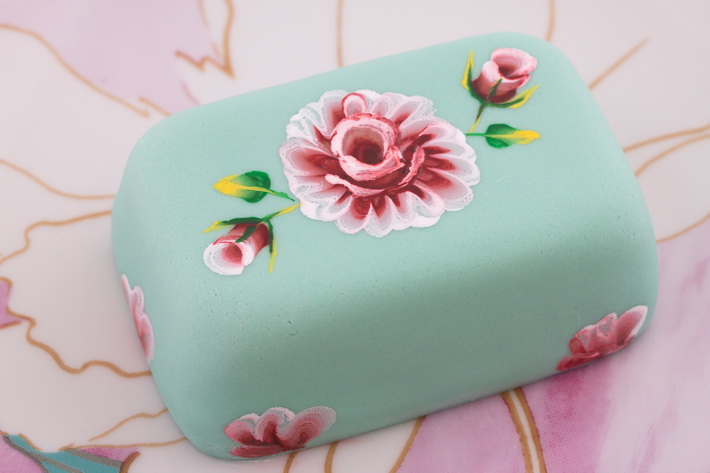
Paint a cake masterpiece resembling a framed acrylic painting of roses — in the simplest way possible! This tutorial uses a paint-by-numbers template and a one-stroke flower painting techniques, helping you finish your cake faster than you thought possible.
Learn on-trend hand painted roses using a paint-by-numbers technique.

Photos via Katrien’s Cakes
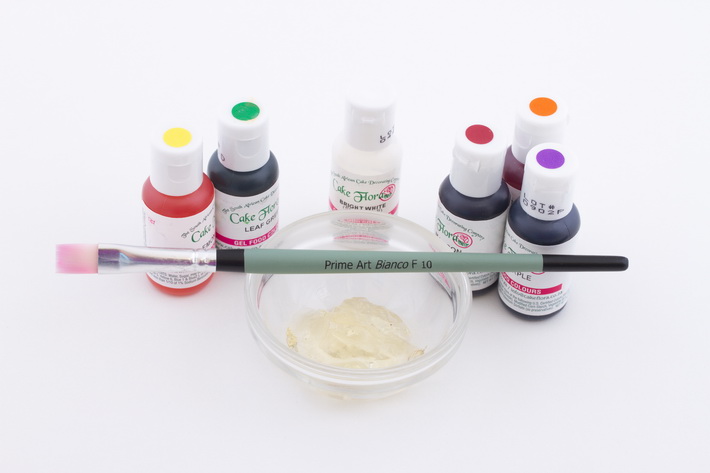
What you’ll need:
- 1 rectangular quarter sheet cake of 9 x 13″ (22.5 x 32.5 cm)
- 7 cups (500 mL) buttercream to fill and coat the cake
- 1 rectangular cake board of 12 x 16″ (30 x 40 cm)
- A4 or 8.5″ x 11″ paper
- Scissors
- Serrated knife for carving
- 10 3/4 ounces (300 g) blue-green fondant or sugar paste
- 2 pounds and 10 3/4 ounces (1.2 kg) white fondant or sugar paste
- Rolling pin
- Apricot jam, sugar syrup or piping gel
- Pastry brush
- Craft knife or scalpel
- Powdered sugar or corn starch
- Gel food coloring
- Clear alcohol or water
- Piping gel
- One or more paintbrushes (I used a no. 10 flat brush with a chisel edge)
- Rose template (download it for free here)
Part 1: Assembling the cake
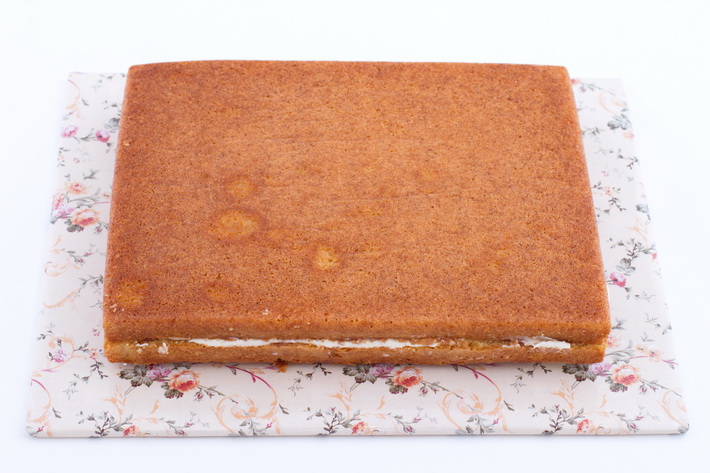
Step 1: Stack the cakes
Slice your cake into two layers and fill with buttercream if preferred. Place them on a rectangular cake board.
Step 2: Shape the cake
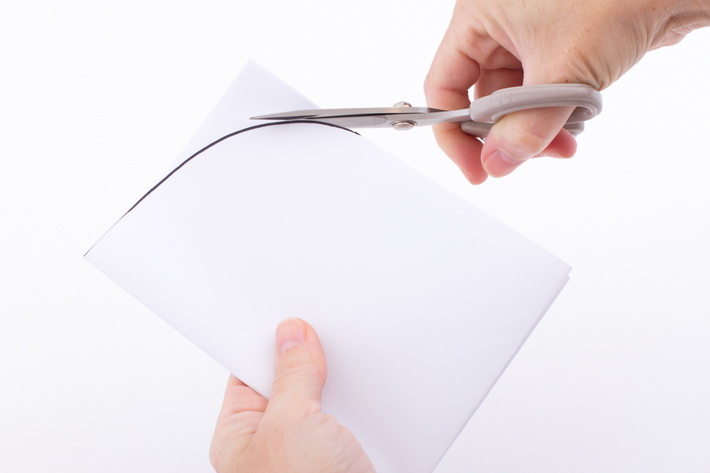
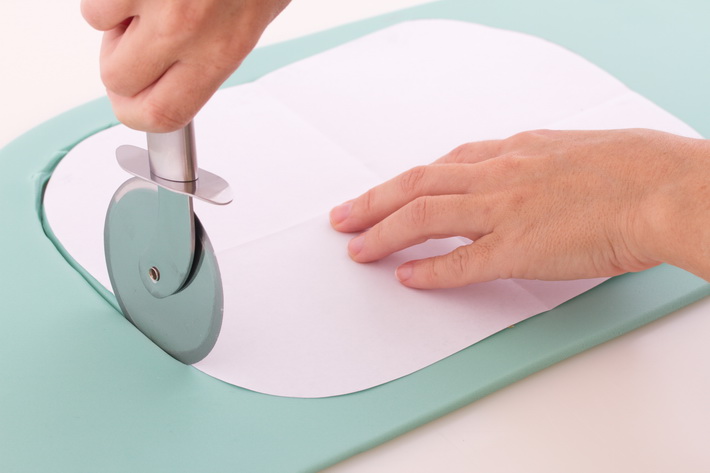
Fold an A4 or 8.5″ x 11″ sheet of paper into quarters and cut a rounded edge with scissors.
Place the sheet of paper on top of the cake and stick sterilized pins through the paper to keep it in position.
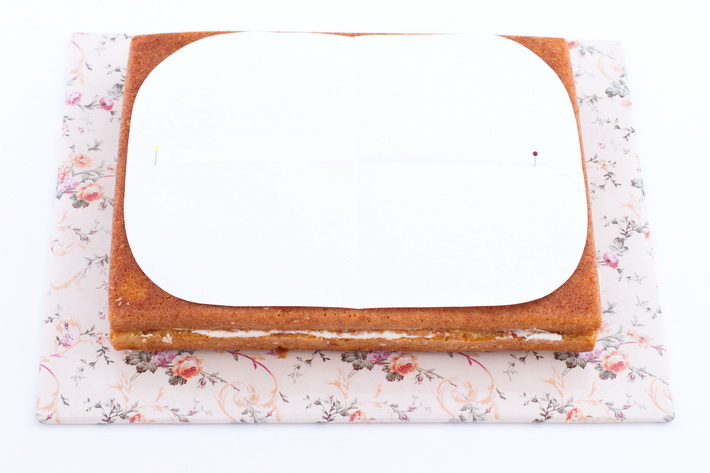
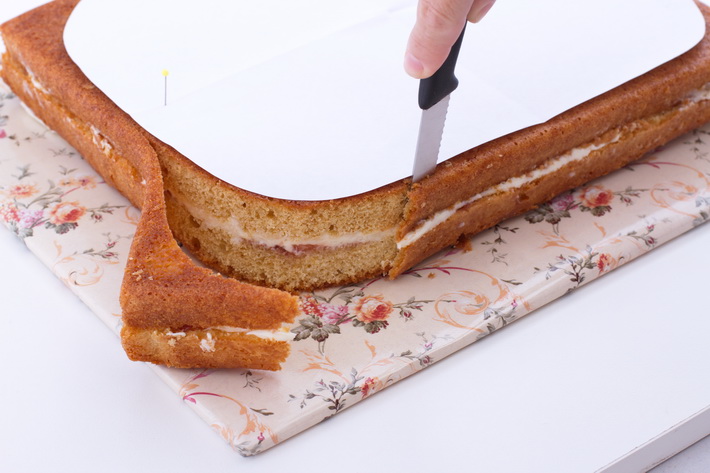
Using the paper template as a guide, cut the cake with a serrated knife into an oval.
Step 3: Cover the top of the cake
Coat the cake with buttercream or ganache. Brush the surface of the cake with apricot jam, sugar syrup or piping gel.
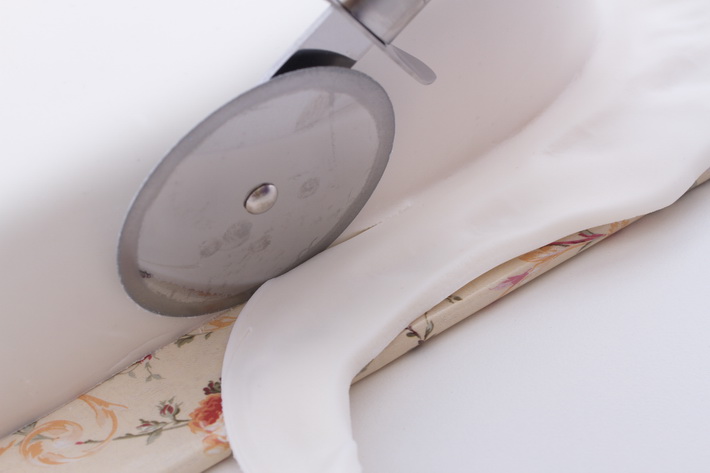
Roll out the blue-green fondant. Place the paper template on the fondant and cut it out with a pizza cutter.
Lift the fondant onto the top of the cake and cut off any excess fondant around the edge of the cake with a craft knife or scalpel.
Smooth the fondant with your hands and dust it with powdered sugar or cornstarch so that the fondant used in the next step does not cling to it.
Step 4: Cover the sides of the cake
Brush the sides of the cake and the edges of the blue fondant with apricot jam, sugar syrup or piping gel.
Roll out the white fondant and smooth it over the cake. This will be like a frame on the cake. Cut off any excess at the bottom of the cake with a pizza cutter.
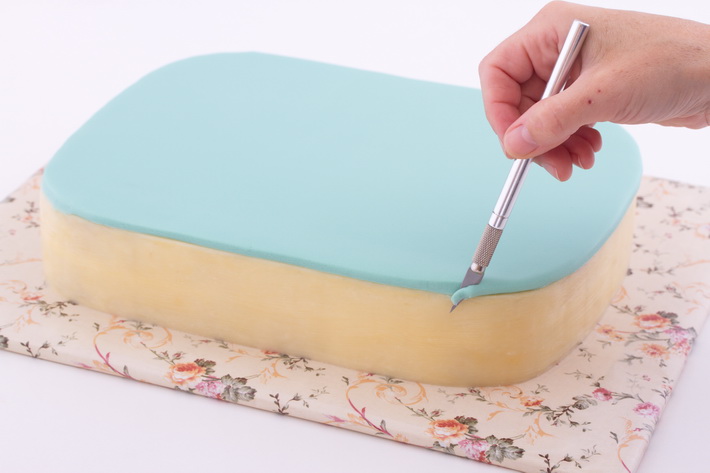
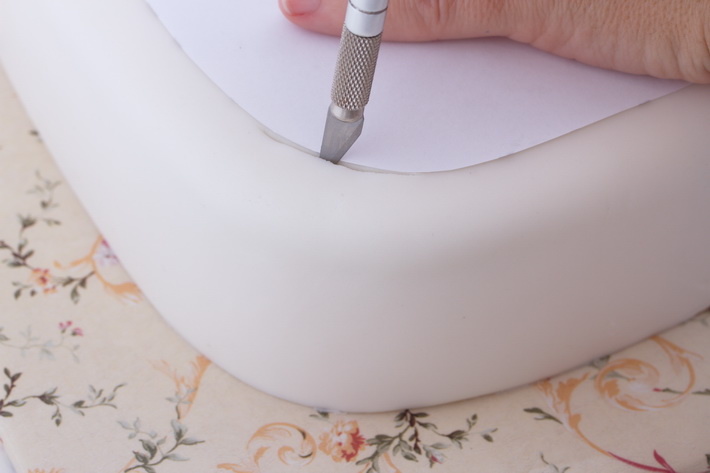
Trim the paper template down — remove about 1/2″ (1 cm) off all edges. Place the smaller template on top of the cake.
Hold the paper in position with one hand and cut around it with a sharp knife, craft knife or scalpel. (Keep the paper template for later.)
Lift out the inside piece of white fondant to reveal the bluish-green fondant.
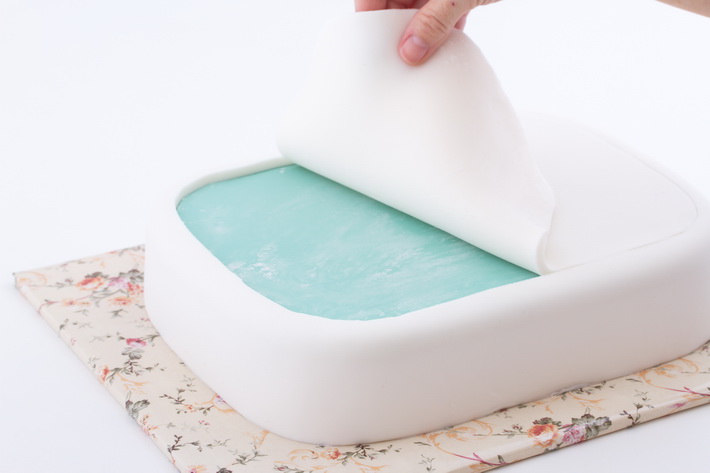
Smooth the edges of the fondant with your fingers and flatten it slightly.
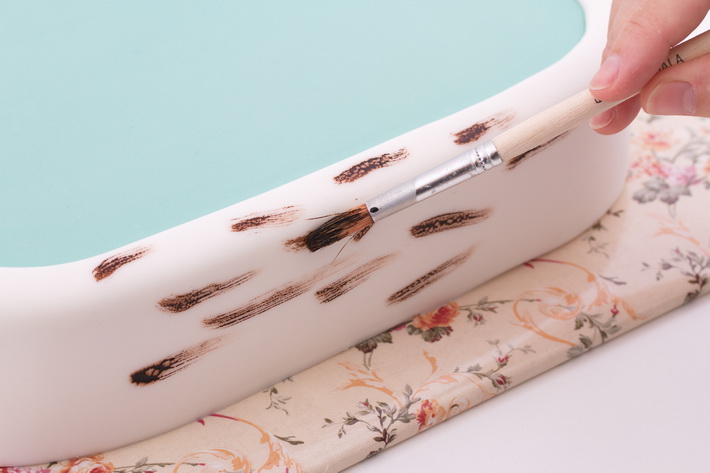
Step 5: Paint the frame
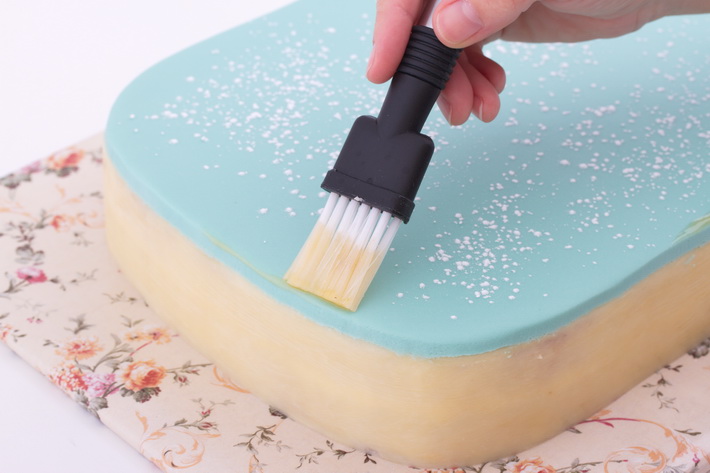
To create a frame-like look, paint blotches of brown gel food coloring on the white fondant.
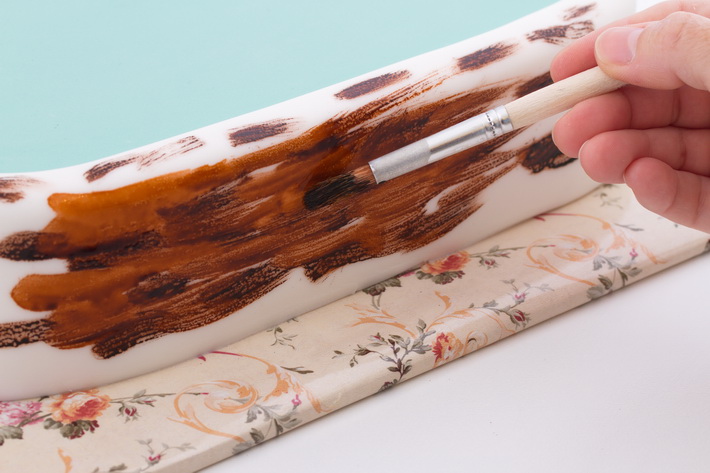
Paint over the brown gel coloring with cooled, boiled water or clear alcohol. This will form lighter and darker patches that resemble wood grain.
Use a thin brush to paint the inside edges of the white fondant frame.
If possible, leave your cake overnight for the fondant to firm up and the gel coloring to dry.
Part 2: Preparing to decorate
Step 1: Prepare the template
Place the paper template used to cut out the fondant on a piece of greaseproof paper (like waxed or parchment paper). Trace the outline with a pencil and cut it out.
Step 2: Transfer the rose template
Enlarge the free downloadable rose template to fit on a standard A4 or 8.5″ x 11″ sheet of paper.
Copy the rose design onto the greaseproof paper with a non-toxic graphite pencil. If you want to duplicate the original, redraw the design on the back of the greaseproof paper to create a mirror image that, when turned over, will create an exact copy.

Position the greaseproof paper on the cake surface and hold it in place with one hand (or tape it in place with non-toxic tape). With the other hand, scratch with the pencil over the surface of the paper or retrace the lines to transfer the design onto the cake.

The design will be faint, but you will still be able to see where to paint.
As you paint the cake, try to remove as much of the pencil marks as possible with a dampened paintbrush while painting.
Part 3: Painting flowers with the one-stroke technique
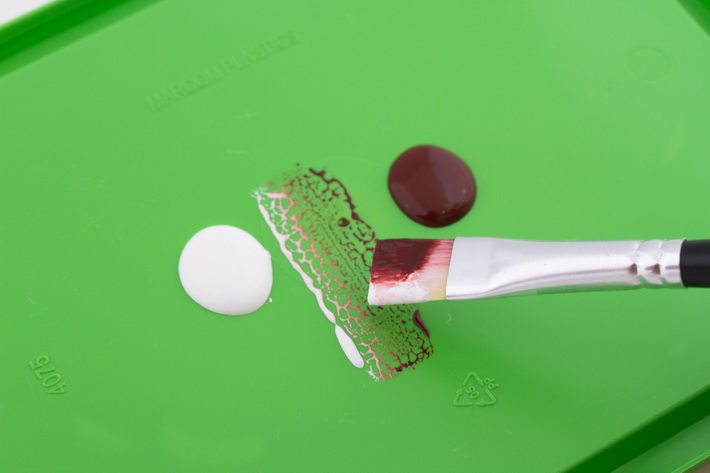
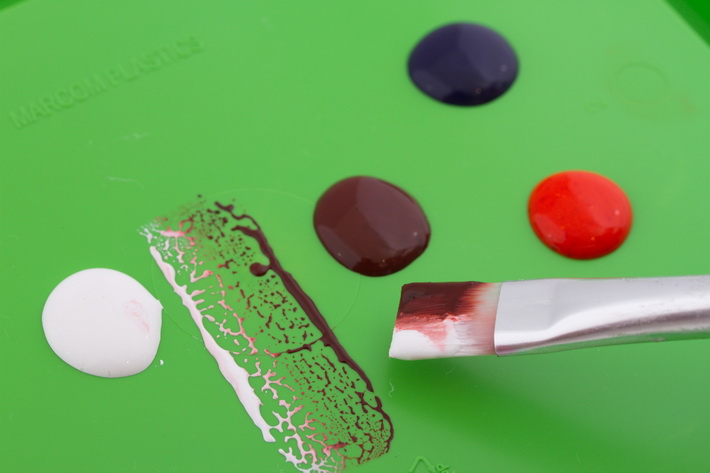
Step 1: Making the paint
To make the “paint,” pour a few drops of gel food coloring into a paint palette and mix each color with about 1 teaspoon (5 mL) of piping gel. Add a drop of white gel coloring to each color to make your paint mixture more opaque. Dilute the mixture with a drop of cooled, boiled water or clear alcohol until you have a thin consistency.
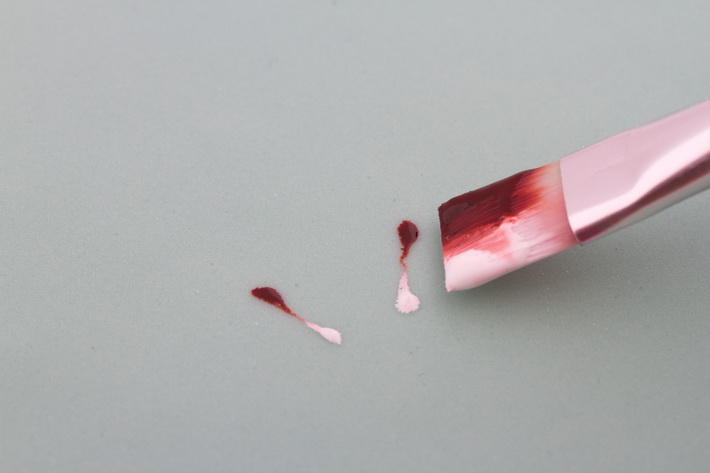
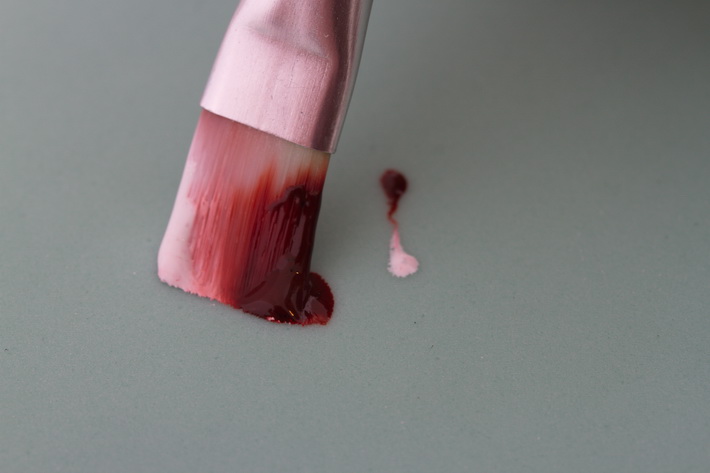
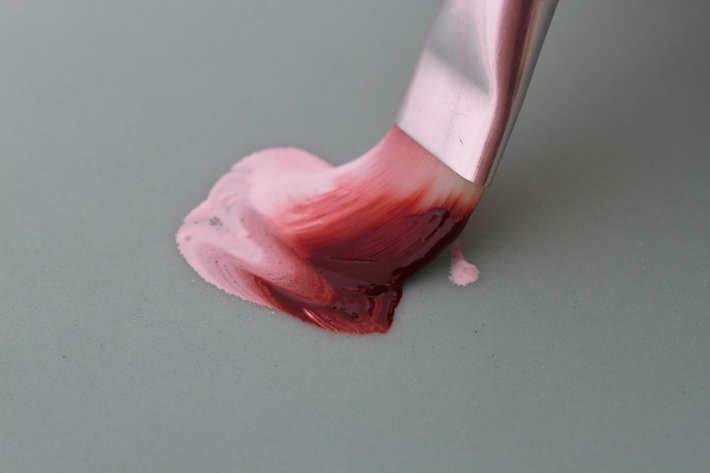
Step 2: Practice loading the paintbrush
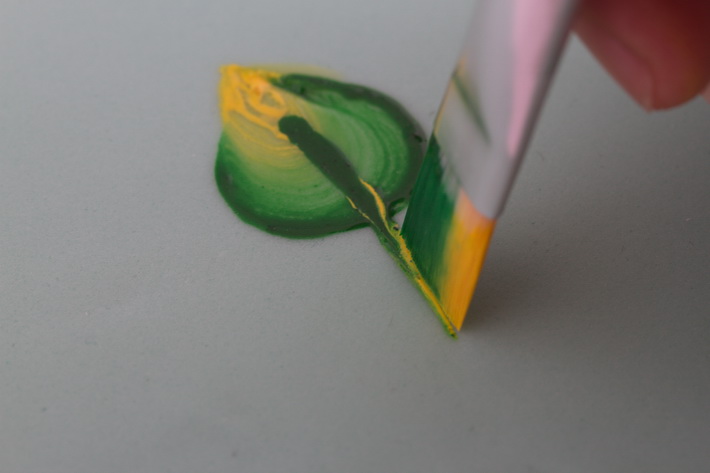
Practice loading your brush and painting on a piece of paper or extra piece of rolled-out fondant.
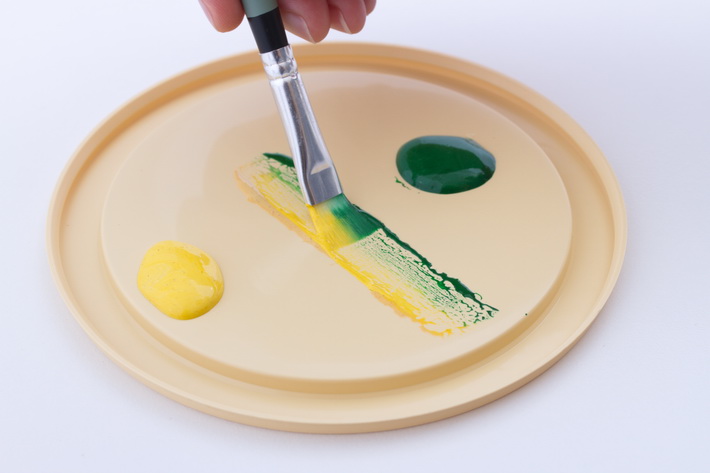
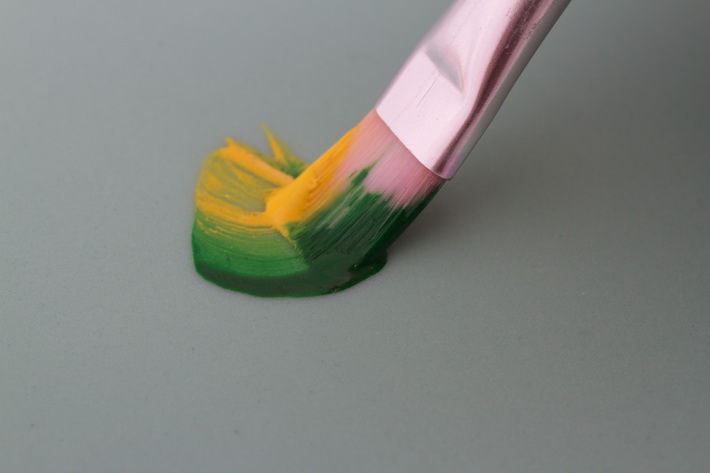
Dip each side of the brush into a different color of paint. Then press the brush on your paint palette to force the paint into the brush’s bristles. Repeat until the brush is two-thirds filled with food coloring.
Be sure to dip each side of the brush into more food coloring every time you start a new stroke.
If you want the paint to dry more quickly, blow cold air on the cake with a hair dryer.
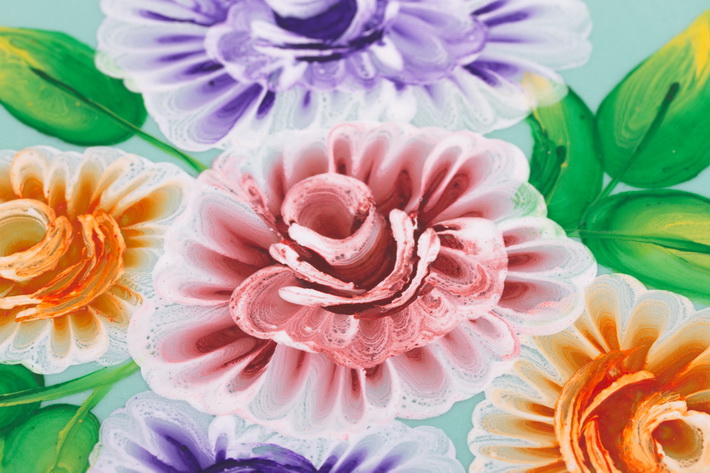
Step 3: Painting the leaves
Paint all the leaves first (they’re marked with the number 1 on your rose template).
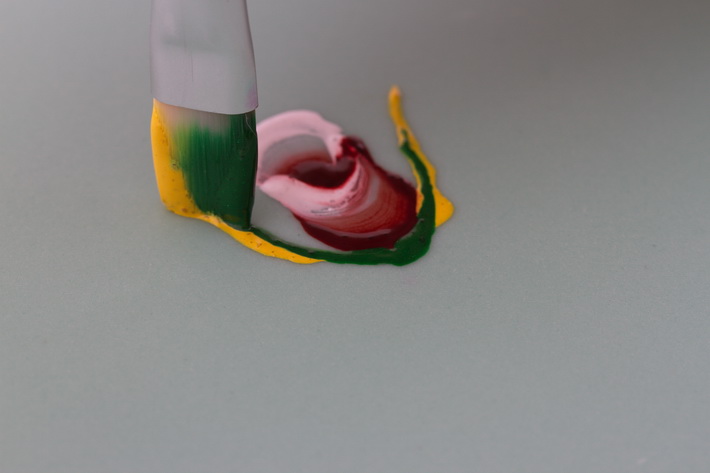
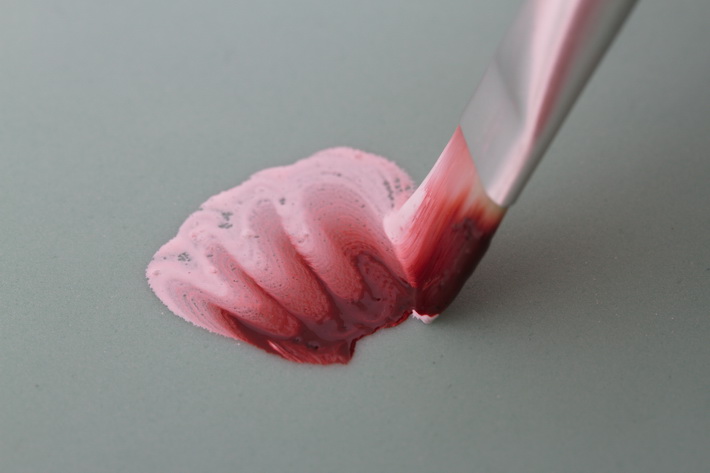
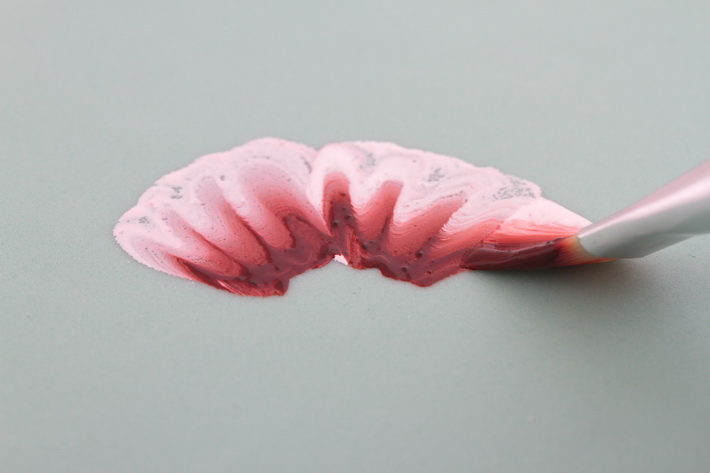
Dip one side of the flat brush into yellow paint and dip the other side in green paint.
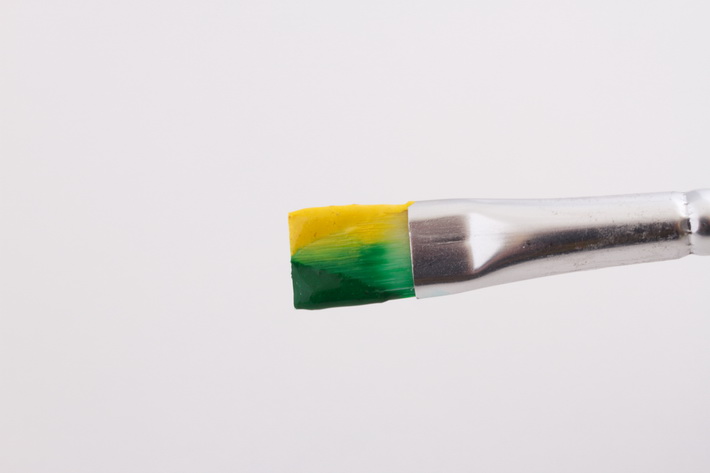
Hold the brush with the green paint closest to you at a slight angle. Place the tip (the chisel edge) of the brush on the cake surface. Then, while pivoting the brush downward from left to right, flatten the brush on the cake following a curved path.
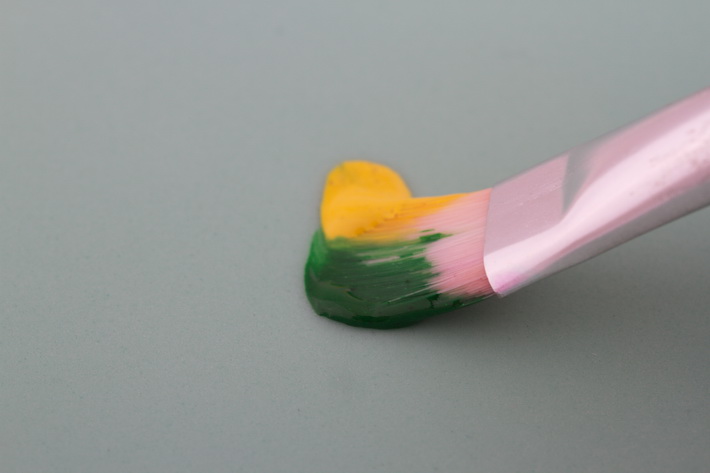
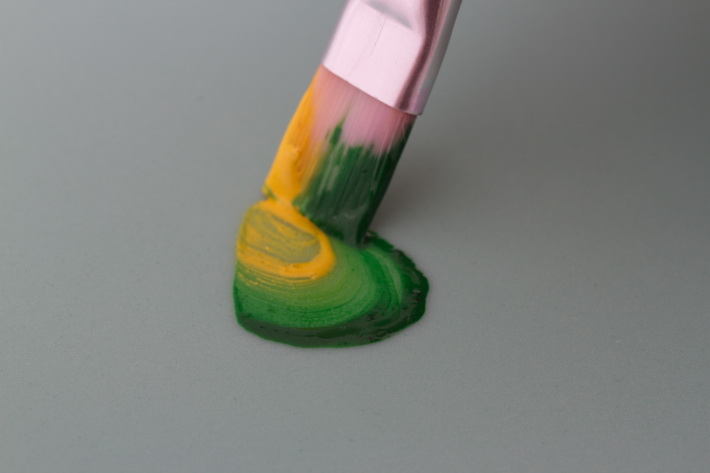
Lift the brush back up onto the tip of the brush and slide the brush to a point.
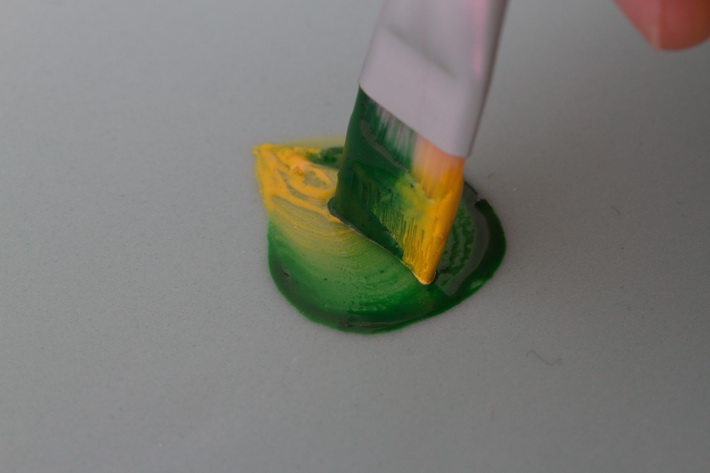
This is called a “closed C” or a “teardrop stroke.”
Dip your brush into more paint and use the chisel edge of the brush to paint a line in the center of the leaf.
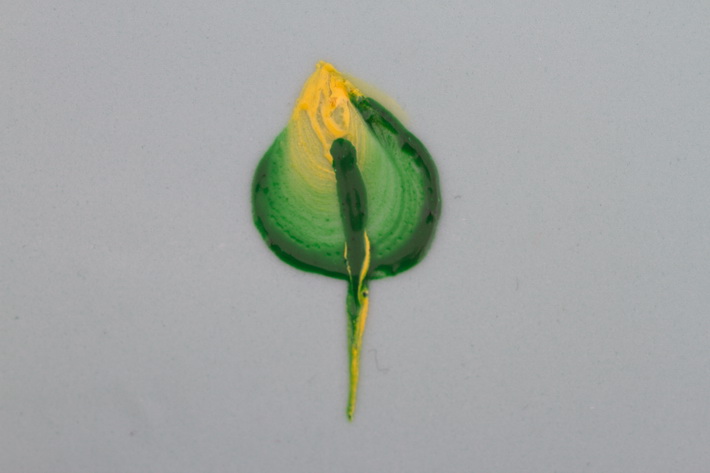
Repeat until you have painted all the leaves, dipping the sides of the brush in more paint each time before painting a leaf.

Step 4: Painting the small rose buds
Next, we’ll paint all the rose buds (marked with a number 2 in the rose template). Wash and thoroughly dry your paintbrush or use a new paintbrush before starting these flowers.
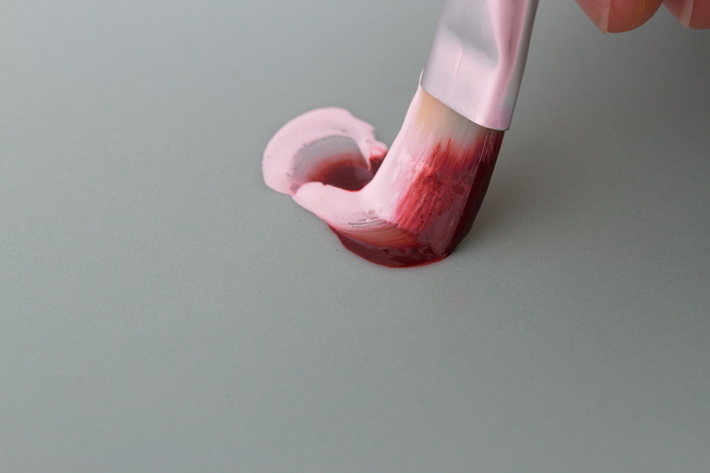
Dip one side of the flat brush into white paint and dip the other side in red paint.
Hold the brush with the red paint closest to you, at a slight diagonal.
Place the tip (the chisel edge) of the brush on the cake surface. Then, while pivoting the brush upward from the left to the right, flatten the brush on the cake following a curved path.
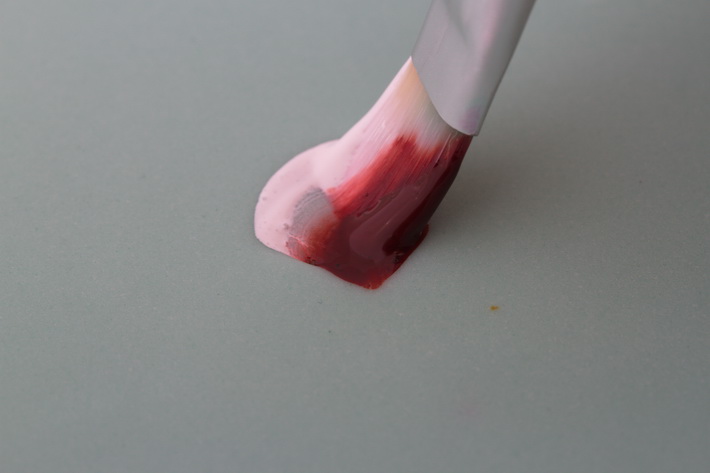
Lift the brush back up onto its tip and slide the brush to a point. (This movement is exactly opposite to the one you used to paint a leaf.)
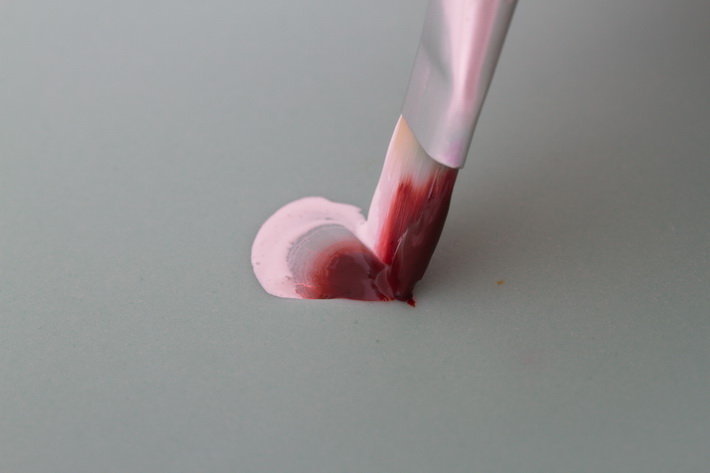
Dip the sides of the brush into more paint before making the next stroke. Place the tip of the brush on one side of the teardrop and make a comma shape, pulling the brush downward from left to right to the other side and ending on the tip of the brush.
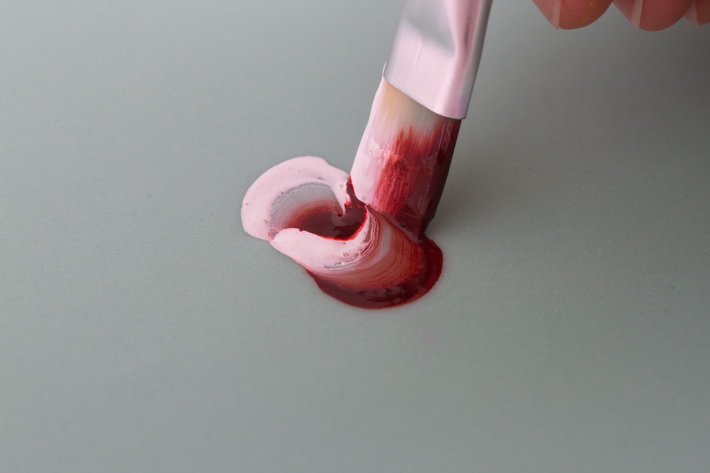
To make the calyx, use some of the green and yellow paint mixture used for the leaves. Use only the tip of the brush and paint single brush strokes on each side of the bud.
Dip the brush into more paint and starting in the center of the calyx, place the tip of the brush on the bud and brush a line downward to form the stem of the bud.
Repeat until you have painted all the buds.
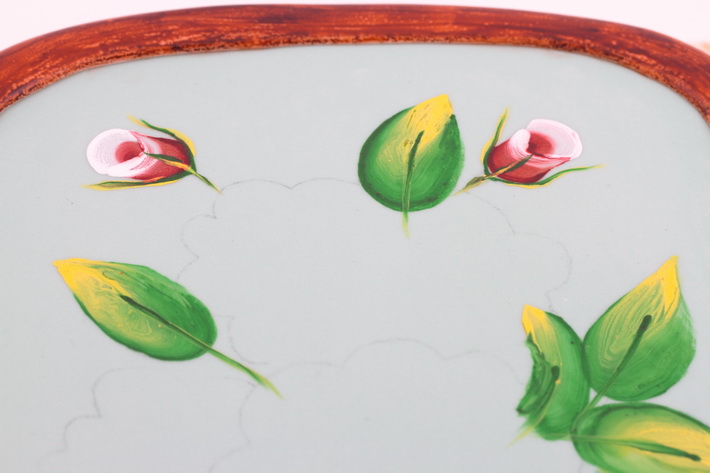
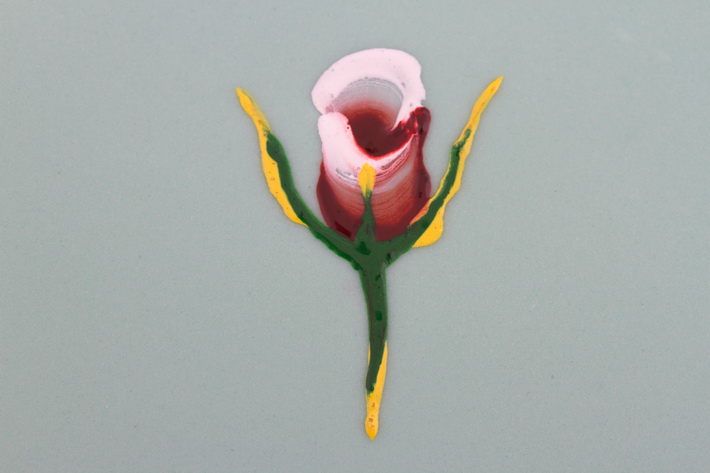
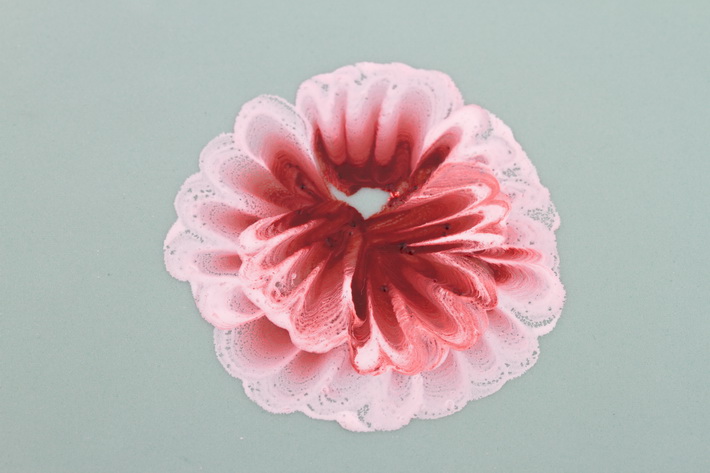
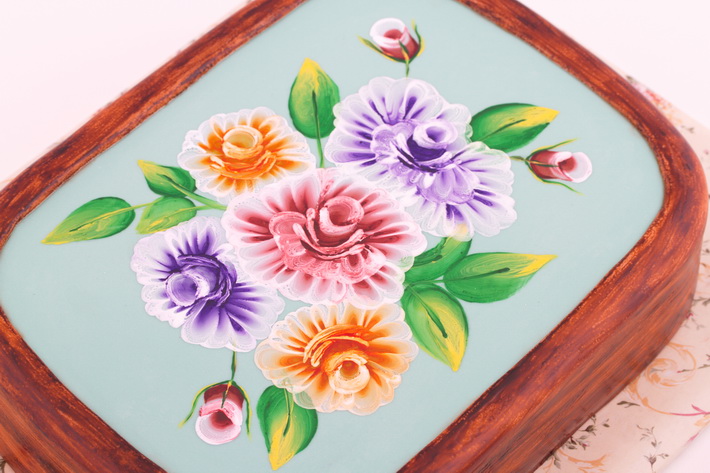
Step 5: Painting the larger roses
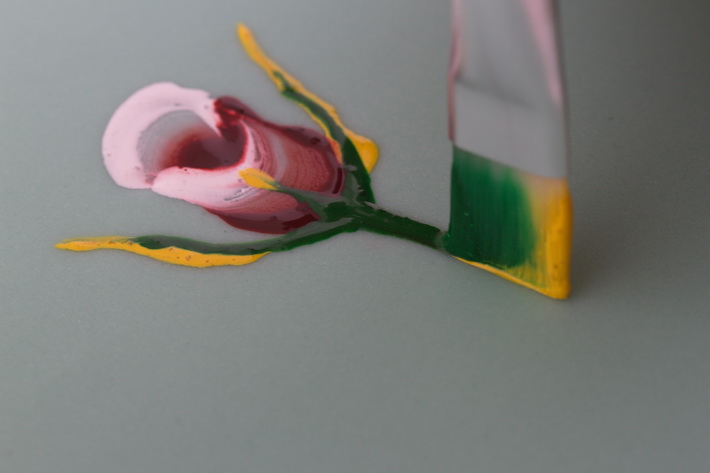
Finally, we’ll paint the large roses, starting with the four outside roses (marked with a number 3 in your template) and then moving on to the largest center rose (marked with the number 4 in the template).
Each rose consists of an outside layer of petals, an inside layer of petals, a bud painted as described above and two to three more painted commas to complete the center of the flower.
Mix four different colors for the roses: purple, orange, red and white. Dip one side of the flat brush into the white paint and dip the other side in the purple, orange or red paint.
Paint two stripes to form a V. This will be your guide for the size of the petal.
Hold the brush with the colored paint toward the center of the flower and the white paint toward the outside of the flower, at a slight diagonal angle.
Place the tip (the chisel edge) of the brush on the V. Then, while pivoting the brush from left to right, flatten the brush on the cake following a curved path. Paint with an up-and-down wiggling movement to form each petal. Finish with the brush upright on its tip.
This stroke is called a “ruffled C” or a “wiggle teardrop” stroke.
Paint five to seven of these petals in a circle, overlapping the petals. This is your outside layer of petals.

To paint the inside layer of petals, hold the brush slightly diagonally, flatten the brush on the surface and paint with a smaller up-and-down wiggly movement. Paint three to four petals in a half-moon shape over the bottom layer of petals.
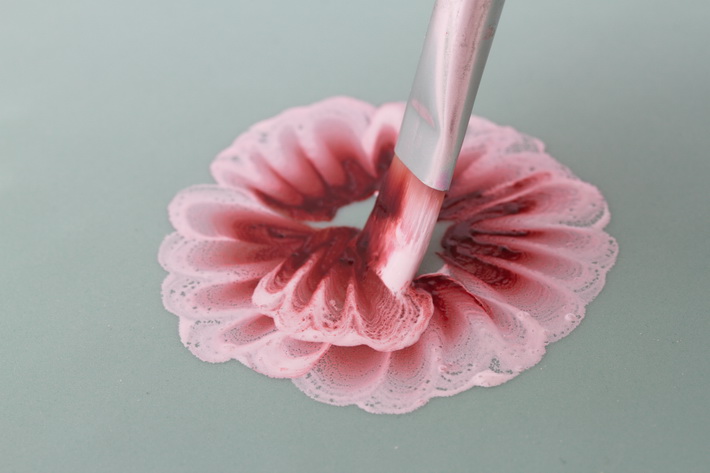
Dip the brush into more paint and paint a bud just off-center in the flower using the instructions above. Overlap the bud on the upper layer of petals.
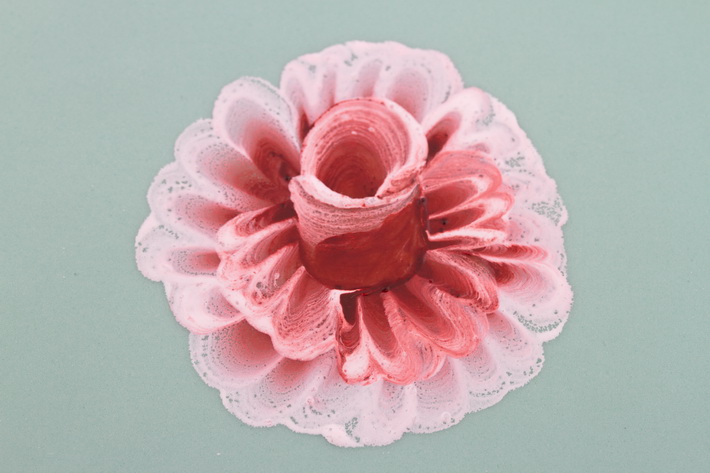
Dipping the brush into more paint each time, paint two to three comma shapes underneath the bud over the second layer of petals.
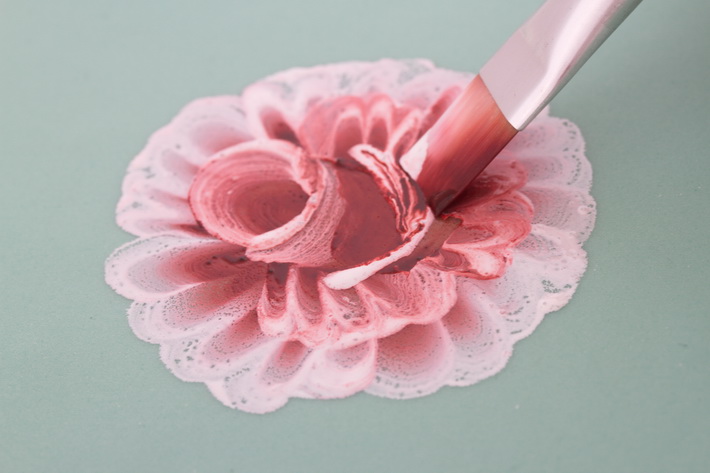
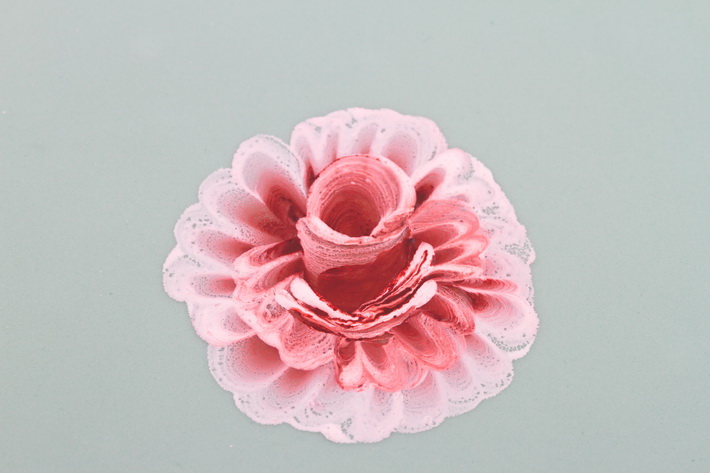
Finish painting all of the roses, overlapping their petals.

How to fix a mistake
For cakes covered with fondant, use an eyedropper to pour clear alcohol or water over the paint. Wipe away the mistake with a paper towel or clean the area with a damp cloth. Dab the area with powdered sugar to take away the excess shine.
You could also wait for the paint to dry and then paint a new design over the previous one.
A few more tips before you get started
- When using a lot of different colors, the more brushes you have, the quicker you will be able to paint — you won’t have to wash and dry the brushes between paint stages.
- To get a natural look, try to use two or more shades of one color. Also, decide where the light or sun would fall on your design and paint those areas a lighter shade of color. Then, painting the side where shadows will fall with a darker shade of the same color.
- It’s not necessary to only use paintbrushes. Remember that you can use household items such as sponges, bubble wrap or crumpled paper to apply paint. Make sure that these items are clean and used only for cake decorating.
- Keep your paintbrush fairly dry and use only a little bit of paint at a time. Too much water or paint on your brush may cause the fondant on the cake to become tacky.
- Be careful not to rest your hand on the cake while painting. This could leave indents on the cake surface.
For more on-trend hand painting techniques, be sure to check out the FREE Bluprint mini-class, The Hand-Painted Cake with Erin Schaefgen.
Share tips, start a discussion or ask one of our experts or other students a question.
No Responses to “Hand-Painted Cakes Made Easy: Download This FREE Paint-By-Numbers Template”