
Let’s face it, custom-made curtains cost a boatload of money. If you are in the market for something elaborate with fancy jabots and swags, it’s probably money well spent. But, if you have your sights set on something much simpler, like gathered curtains, learn to make them yourself. If you’re pretty good at sewing a straight seam, you can make gathered curtains.
The trick is in the math when it comes to making curtains. Figuring out how much fullness is needed, how many panels are required, and the dimensions of the finished and unfinished curtains is the most complicated part of making them. The actual construction is nothing more than sewing straight seams and turning several hems — all pretty basic. See, I told you it would be easy!
I am presenting this tutorial in two steps. This first post will focus on figuring out what the unfinished curtain dimensions should be and how to determine how much material is needed to make them. Next week, I will detail the steps involved in constructing an easy and versatile gathered curtain appropriate for any room in your home.
Here’s how to make gathered curtains:
Step 1: Decide where you want the curtain to hang.
Do you want it to hang within the frame of a window? Outside the frame, both at the top and side, and by how much? And, where is it to land, the floor, windowsill, or somewhere in between as in a valance?
Step 2: Figure out what the completed curtain dimensions are to be without any headings, hems or panel piecing factored in.
It is best to use a carpenter’s measuring tape for the most accurate measurements.
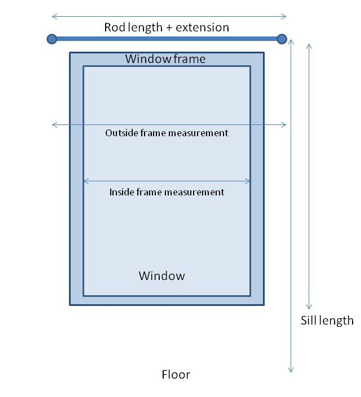
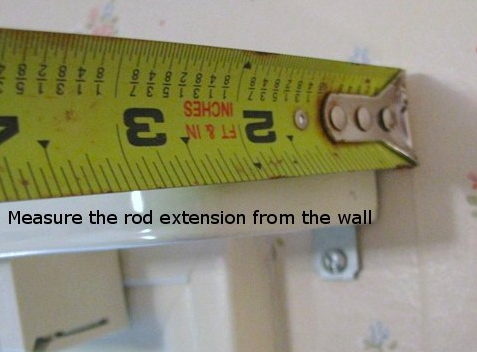
- Begin with determining the finished width of the curtain first. If the rod is already in place, measure from rod end to rod end plus the amount of extension from the wall, if any. Otherwise, for a mount outside the frame, measure the frame width end to end. Most curtains are mounted roughly 1″ – 3″ beyond the frame, so determine where yours will be and factor that amount in for each side. If the curtain will extend around the rod extension, add that amount as well per side.
- Add to this finished width measurement the amount of fullness you want the curtain to have. Typically anywhere from 1 ½ to 3 times the finished measurement is a good rule of thumb to work with. See my post on fabric gathering techniques to learn a simple method of deciding on the amount of fullness you want. Keep in mind the lighter the fabric the more fullness, the heavier the material less fullness.
- For the finished length, measure from the bottom of the rod to the desired length. The headings and pocket measurements will be added later.
Step 3: Now determine the curtain dimensions with all hem and heading amounts added.
These measurements will ultimately determine the amount of material will be needed to make the curtains.
-
For the width, add 1″ double hems for each side, or 4″ total to the finished width measurement.
-
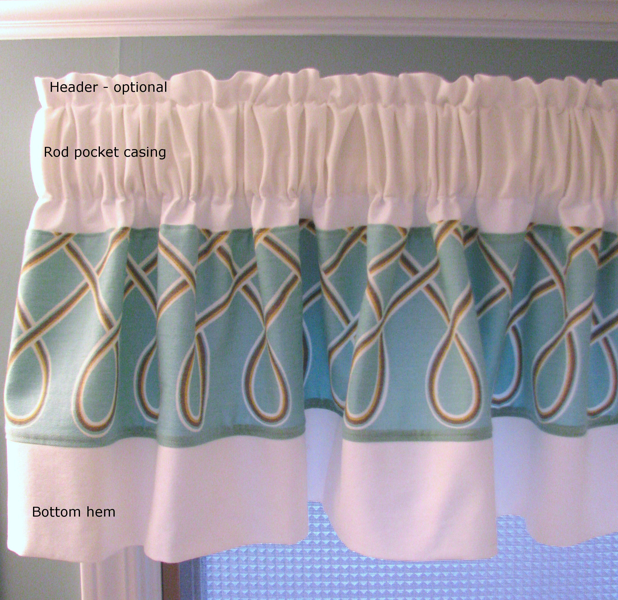
For the length, add in a double hem. For a short curtain a 2 ½” to 3″ double hem is sufficient, so add 5″ to 6″ to the finished length. For a floor length curtain, a 4″ double hem is best, so add 8″.
-
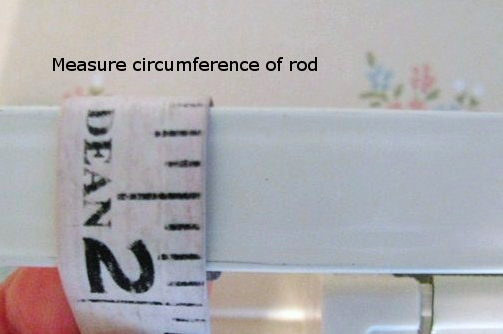
For the rod pocket, take a measuring tape and place it around the curtain rod. Add that measurement to the length plus an additional ½” for ease, so the rod moves easily through the pocket.
- Do you want any material to show above the rod — a header? If so, factor in that amount, say 1 ½”. Double that amount (3″ in this example) and add that to the length.
-
Lastly, add in a ½” in hem allowance for attaching the rod pocket and header to the back of the curtain.
-
This is now the curtain length you will be working with to determine the amount of fabric to buy and make the curtain.
To summarize the unfinished curtain width and length measurements:
-
For width (A), the calculation is the finished width plus side hems times the amount of fullness (1 ½ to 3 times).
-
For the total length (B), the calculation starts with the bottom of rod to desired length measurement, plus the bottom hem amount, plus the rod pocket amount, plus the top header (if using) amount, plus the ½ hem seam allowance.
Step 4: Calculate how much material you will need to buy:
-
First you need to determine whether panels will need to be pieced together to add up to the curtain width. To do this you will need to know the width of the material you are using. Take the width of the curtain (A) and divide by the width of the fabric. That will determine how many panels are needed to make the curtain.
-
To determine the amount of material you need to buy multiple the number of panels by the unfinished length (B) of the curtain. Divide that number by 36 to determine the number of yards needed.
Come back to the Craftsy blog next week for step-by-step instructions on how to make gathered curtains.
I sew drapery for my home, children’s homes and for VERY GOOD friends! Lol. I have done a few for local designers. I love to sew and I love fabric.
I make quilts, table runners and pillows,