
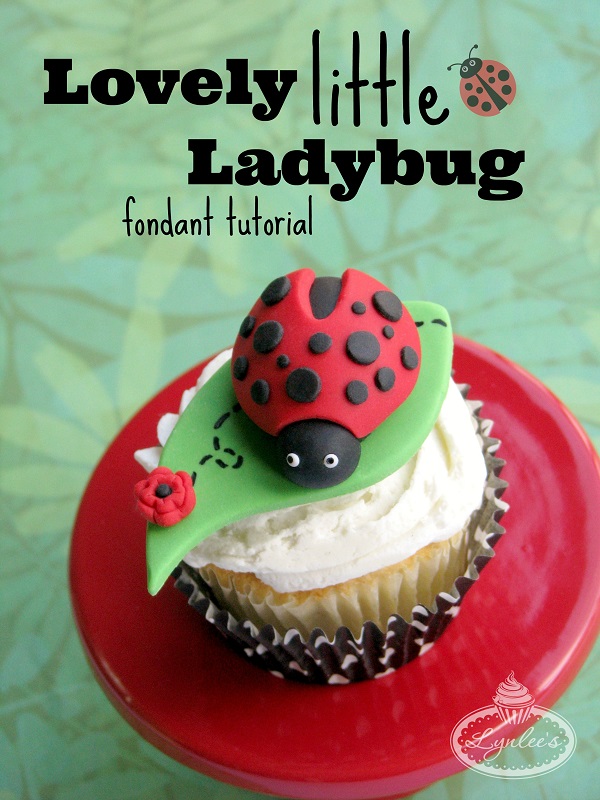
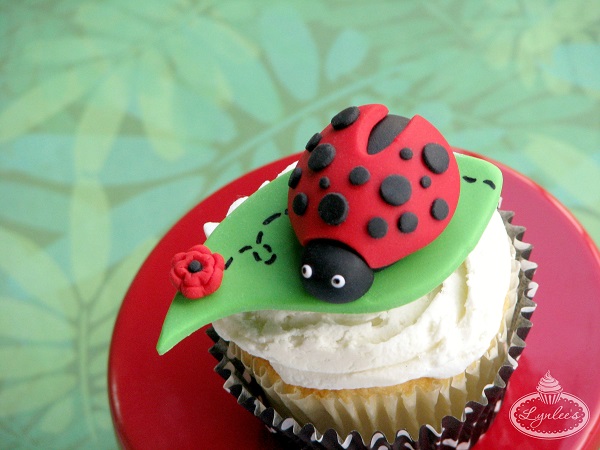
Ladybugs, also referred to as ladybirds or lady beetles, are widely popular insects, especially with children, mostly due to their pleasing polka-dot appearance. Today, we’ll go over how to make a fondant ladybug. With the start of spring, these lucky little bugs are starting to show up in themed parties, such as baby showers and 1st birthdays.
Flutter on over and learn how to make a fondant ladybug to adorn your springtime cakes, cupcakes and confections!
Materials:
- Black, red, white and green fondant
- Water/edible glue and brush
- Fondant rolling pin with 1/8″ and 1/16″ guide rings
- Round decorating tips #3, #7 and #10
- Round 1 1/2″ circle cutter
- Medium teardrop cutter
- Large leaf cutter
- Miniature flower cutters (2 sizes)
- Small modeling stick
- Black edible pen
- Black soft gel paste & toothpick
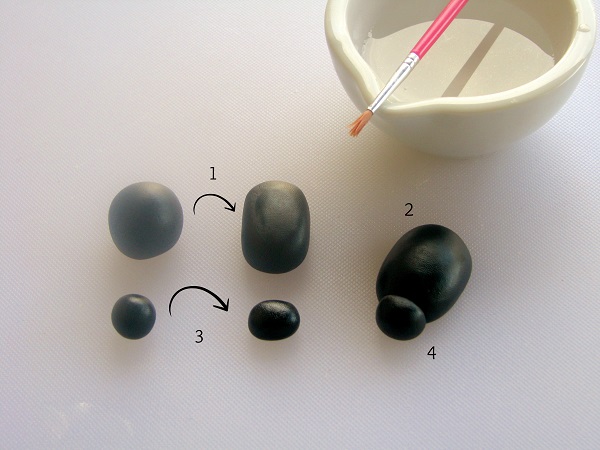
Step 1:
Roll black fondant into a ball (approximately 3/4″), then shape it into an oval.
Step 2:
Round the edges of the oval by smoothing the fondant with your fingers, adding vegetable shortening as needed. As you round it out, the bottom will flatten to lay nicely on your bottom topper, forming the ladybug’s body.
Step 3:
Roll another piece of black fondant into a ball (approximately 1/4″), then shape it into an oval for the head.
Step 4:
Flatten out one side of the oval/head and fit it on the front of the larger oval/body. Dip your brush in water/edible glue and attach the head and body together.
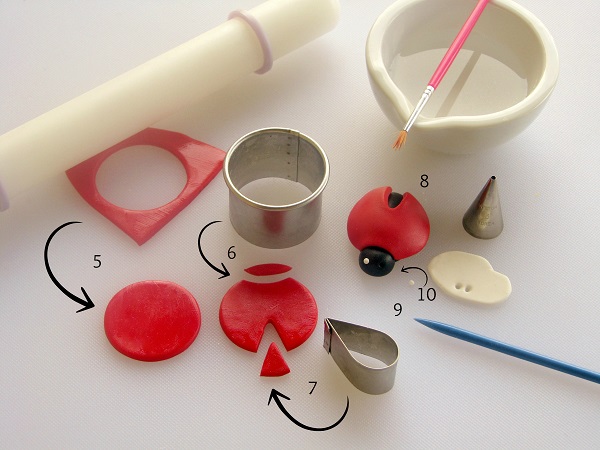
Step 5:
Roll out red fondant 1/8″ thick with the rolling pin and guide rings. Utilize the 1 1/2″ round cutter to punch out a circle.
Step 6:
Use the same 1 1/2″ round cutter to trim a small piece off the edge of the red circle to fit around the ladybug’s head.
Step 7:
Use the pointed side of the teardrop cutter to trim a triangular piece off the opposite end of the red circle.
Step 8:
Fit the red circle over the ladybug, rounding it out a bit into a dome-like shape. Dip your brush in water/edible glue and apply it to the inside of the dome. Glue it in place.
Step 9:
Use the small modeling stick to indent circles for the eyes on the ladybug’s head.
Step 10:
Roll out white fondant 1/8″ thick with the rolling pin and guide rings. Use round decorating tip #3 to punch out two circles. Roll them into balls, then glue them in the holes on the ladybug’s head.
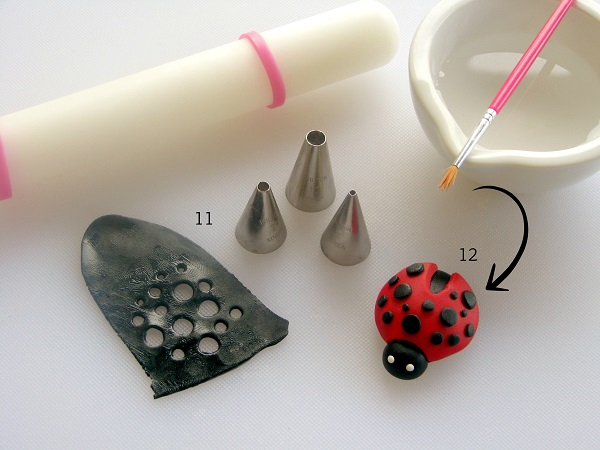
Step 11:
Roll out black fondant 1/16″ thick with the rolling pin and guide rings. Punch out a bunch of circles in various sizes utilizing decorating tips #3, #7 and #10.
Step 12:
Clean up the edges of each circle with your fingers, then place them over the ladybug. Dip your brush in water/edible glue and carefully attach each spot onto the ladybug’s back.
Tip: Vary the locations of the dots and sizes. Carefully place them sporadically on the red fondant and when you’re happy with the design, attach them.
Step 13:
Roll green fondant 1/8″ thick with the rolling pin and guide rings. Cut out a large leaf with the cutter.
Step 14:
Dip the toothpick in black soft gel paste and make little dots in the ladybug’s eyes.
Step 15:
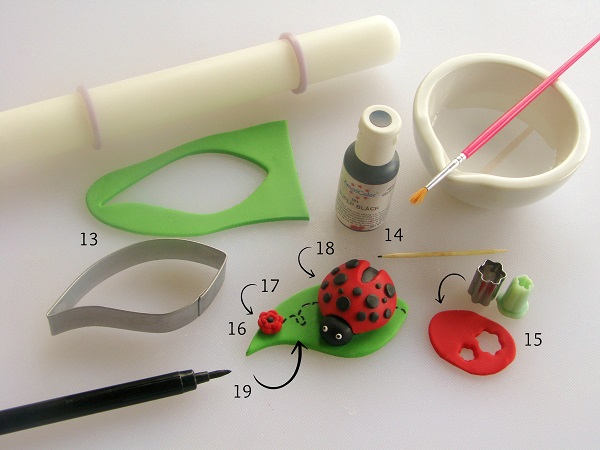
Roll red fondant 1/8″ thick with the rolling pin and guide rings. With the miniature flower cutters, punch out a couple flowers in different sizes.
Step 16:
Glue the smaller flower in the center of the larger one and either use your fingers to push up the petals or place them on a foam block and use a small ball tool to press into the center.
Step 17:
Roll black fondant 1/8″ with the rolling pin and guide rings and use round decorating tip #3 to punch out a small circle. Roll it into a ball, then glue it to the center of the flower.
Step 18:
Place the ladybug and flower over the leaf topper in the desired location and glue it in place.
Step 19:
Use an edible marker to draw a dotted path. Allow it to dry thoroughly.
Tip: The drier the fondant is on the leaf topper, the easier it is to write with the marker.
Share tips, start a discussion or ask one of our experts or other students a question.
No Responses to “Lovely Little Ladybug Fondant Tutorial”