
Adobe Lightroom is a great tool for wedding photography. It has made the editing process so much faster and allows me to give clients more images to choose from. Developing a workflow is essential to limiting how much time you spent in front of the computer and the quality of images you can output in that time.
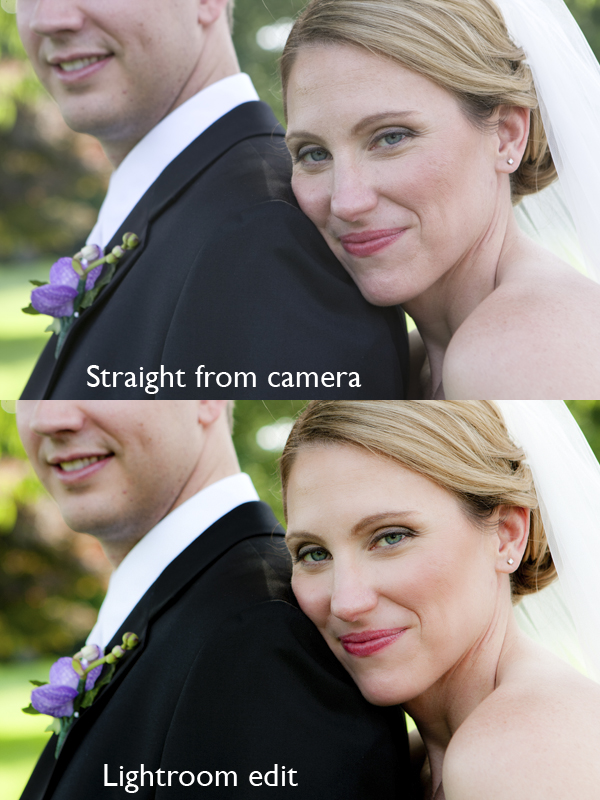
The top file is the untouched RAW file. The bottom was run through a batch edit in Lightroom.
Everyone has a different workflow for editing a large batch of photos.
1. Time sync
If I am using several cameras for one wedding or shooting with other photographers, I will first make sure that our cameras are all time synced. When a digital camera takes an image, it gives it a time stamp. When you import photos into Lightroom, it will automatically sort them by time. Batch editing is much easier when you have the option to view all your images chronologically.
2. Import photos
After the wedding, I use a card reader to pull all the images onto my hard drive into one folder and label it “X Wedding RAW.” Some people import straight from their memory cards into Lightroom — this is just how I prefer to do it. I like having the photos on my desktop instead. Then I import the images into a new Lightroom catalog and give it time for the previews to render.
3. Cull photos
Once the photos are imported and rendered, I will go through and flag all the images I want to keep. You can flag images by pressing the “P” key. All the blurry photos, duplicate photos, or ones where people’s eyes are closed do not get flagged. Only the images that I want to give to my client are flagged. While I’m culling the photos, I will give star ratings to the photos I really like. Five star photos are ones that I’ll use for my portfolio or blog or recommend as prints to my clients. Sometimes I’ll give a photo four stars if I’m not sure I want to use it.
4. Export as Catalog
After I have chosen the photos I want to keep, I will select all of them and go to Edit > Export as Catalog. This new catalog gets saved to an external hard drive along with all the RAW images that I have flagged. Once the export is finished, I throw away the old catalog and RAW images on my desktop. I don’t see a need to keep bad photos and waste storage space.
5. Editing
Now that I’m working in the new saved catalog, I can get to editing. My star ratings should still apply to the new catalog, so I start by choosing the Develop module and viewing and editing only the five-star photos. These are the ones that I’m really excited about and want to spend time on. Many times, I’ll use presets that I have purchased or created myself to speed up the editing of these photos. Once the five-star photos are edited, I can go through and batch process the rest. First, I choose one of my already edited five-star images and then I shift-click on all the similar looking images. The edits apply to all when you select “Sync Settings.” Always batch edit when you can — it just doesn’t make sense to manually change the settings for every photo, especially when many of the shots are very similar.
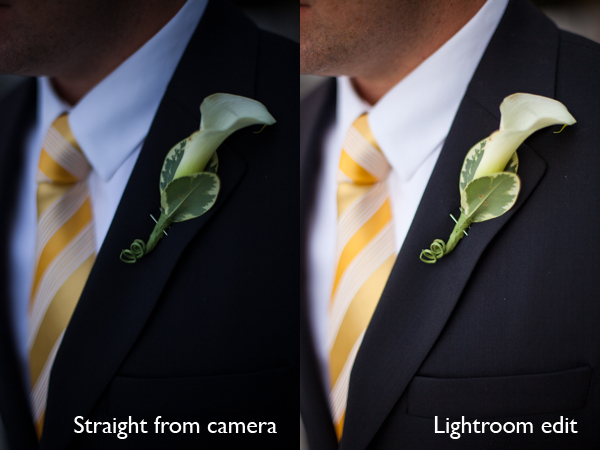
Before and After
6. Create collections and export
Once all my edits are complete, I will select all the photos and create a new collection. I name this collection “Color.” Then, I select all the images again and create a new collection. I name this one “Black & White.” I then choose one image and convert it to black and white. Next, I shift-click the rest of the images and sync just that one setting for B&W. After that, I choose the Color collection, select all the images and hit File > Export. I choose JPEGs at full size. Lastly, I do the same thing for the Black & White collection. Once the images are exported, I have a set of color and a set of black and white images for my wedding clients.
Share tips, start a discussion or ask one of our experts or other students a question.
No Responses to “Wedding Photography Wednesday: A Streamlined Editing Workflow”