
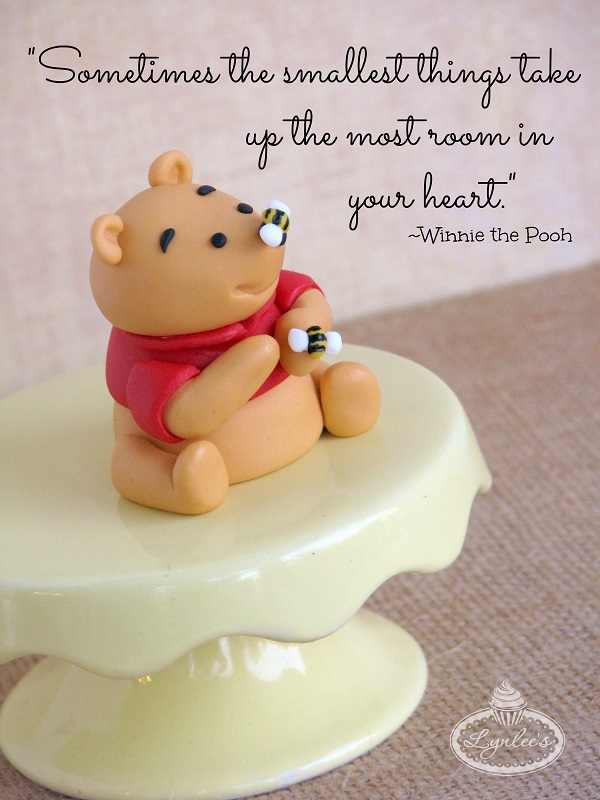
A.A. Milne is the author of the classic stories centered around the character of Christopher Robin, his lovable Pooh Bear and his loyal friends in the Hundred Acre Wood. January 18th marks Milne’s birthday and therefore, the celebration of Winnie the Pooh Day! To honor of this special day in the cake decorating world, let’s take a look at how to make a fondant Winnie the Pooh.
Follow this step-by-step fondant tutorial to re-create this silly old bear to top your cupcakes and cakes in honor and commemoration of the upcoming Winnie the Pooh Day.

Materials:
- Honey gold, black, red, yellow and white fondant
- Water/edible glue and brush
- Fondant rolling pin with 1/8″ guide rings
- 1/4″ wooden dowels
- Round decorating tips #3, #7 and #12
- Rolling pastry cutter
- Precision knife
- Knife tool
- Modeling tool
- Miniature spatula
- Flower forming cup
- Raw spaghetti
- Black edible marker
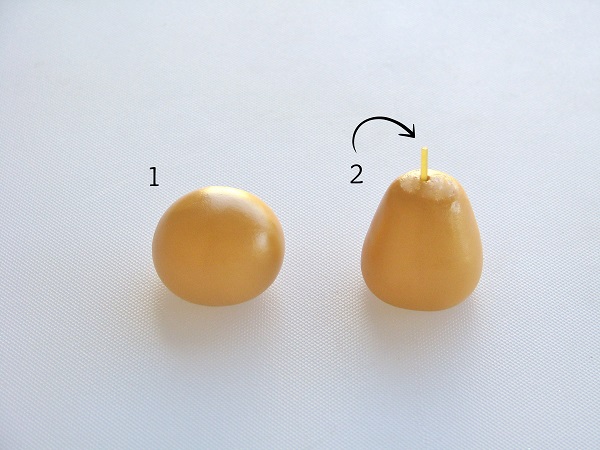
Step 1:
Roll honey gold fondant into a ball (approximately 1 1/2″) and begin shaping it into an oval.
Step 2:
Narrow the top a bit with your fingers and insert a raw spaghetti through the center by gently twisting it through the center, leaving enough protruding to hold the head.
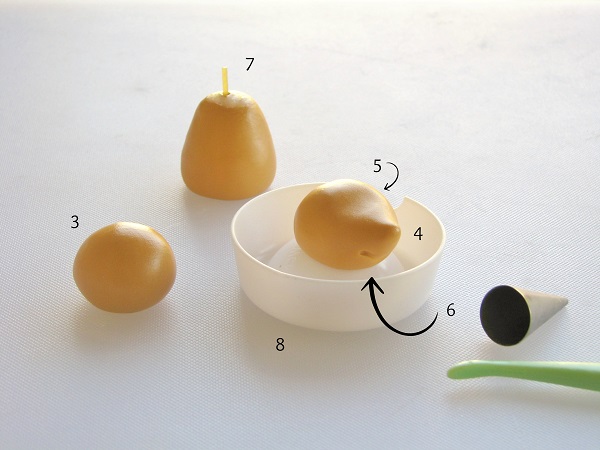
Step 3:
Roll more honey gold fondant into a ball (approximately 1″) for the head.
Step 4:
Use your fingers to begin molding the bear snout, ensuring the remainder of the head remains rounded.
Step 5:
Utilize the modeling tool to flatten above the snout a bit to later add the eyes.
Step 6:
Once the head is complete, use the large end of round decorating tip #3 to indent a smile below the snout and utilize the modeling tool to indent the ends of the smile to form small dimples and push the cheeks up a little.
Step 7:
Fit the head over the body by inserting it through the protruding spaghetti to ensure it fits properly.
Step 8:
Turn the flower-forming cup upside down and place the head in the center to allow it to dry.
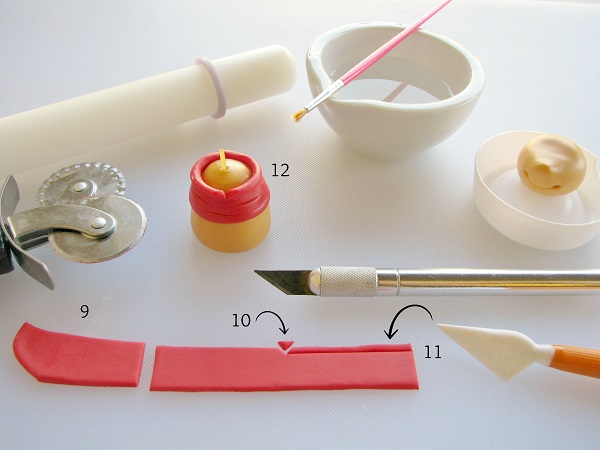
Step 9:
Roll out red fondant with the rolling pin and 1/8″ guide rings and use the rolling pastry cutter to cut a strip (approximately 1 1/2″ wide). Form it around the bear’s body and use the precision knife to trim the excess.
Step 10:
Lay the red fondant on your work surface and use the precision knife to cut out a little triangle out of the top center.
Step 11:
Use the knife tool to indent a line lengthwise across the red fondant.
Step 12:
Glue the red fondant to the bear’s body to create the shirt. Roll the top collar outward at the indented line and use the knife tool to make small creases horizontally across the front.
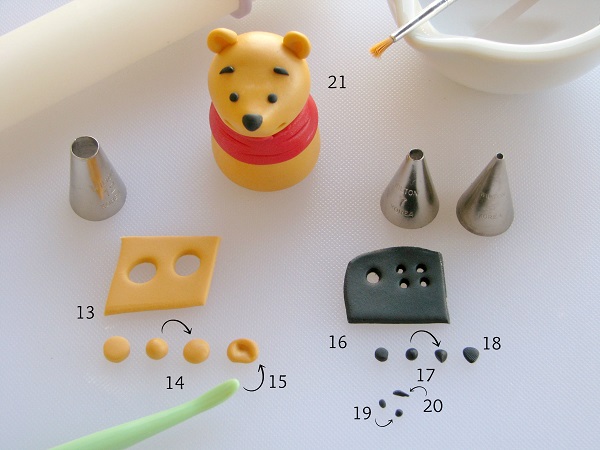
Step 13:
Roll out honey gold fondant with the rolling pin and 1/8″ guide rings and cut out two circles with round tip #12.
Step 14:
Roll the circles into balls, then flatten them out a bit on your work surface.
Step 15:
Use the modeling tool to indent the center of the circles to create the bear’s ears. Glue them in place on the top of the head.
Step 16:
Roll out black fondant with the rolling pin and 1/8″ guide rings and cut out one circle with round tip #7 and four circles with round tip #3.
Step 17:
Roll the larger black circle into a ball, then shape it into a triangle shape.
Step 18:
Flatten out the black triangle and mold it to the bear’s nose. Glue it in place.
Step 19:
Roll the remaining small black circles into balls. Glue two of them to the bear’s face for the eyes.
Step 20:
Roll out the other two black balls carefully on your work surface, pinching one end with your fingers to form the eyebrows. Glue them in place.
Step 21:
Insert the bear’s head over the raw spaghetti and glue it in place.

Step 22:
Roll honey gold fondant thick with the rolling pin and wooden dowels and cut out two circles with the bottom of round decorating tip #7.
Step 23:
Roll the circles into balls, then roll them into sausage shapes on your work surface.
Step 24:
Fold one end of each shape upward to form the bear’s feet. Form each leg around the bear’s body and glue them in place.
Step 25:
Roll out honey gold fondant with the rolling pin and 1/8″ guide rings and cut out four circles with the bottom of round tip #7.
Step 26:
Combine two circles together and roll them into a ball. Repeat with the other two circles.
Step 27:
Roll both balls on your work surface into sausage shapes and form them into the bear’s arms in your desired positions.
Step 28:
Roll out red fondant with the rolling pin and 1/8″ guide rings and cut a strip with the rolling pastry cutter (approximately 3/4″ wide).
Step 29:
Shape it over the top of one of the arms and trim the excess with the precision knife. Shape and glue the sleeve in place. Repeat with the second arm.
Step 30:
Glue the arms with sleeves onto the bear’s body.

Step 31:
Roll out yellow fondant with the rolling pin and 1/8″ guide rings and cut out two circles with round tip #7.
Step 32:
Roll the yellow circles into balls, then into oval shapes to create the bees’ bodies.
Step 33:
Allow the bees’ bodies to dry and harden a bit. Then, use the black edible marker to draw three lines on each.
Step 34:
Roll out white fondant with the rolling pin and 1/8″ guide rings and cut out four circles with round tip #7.
Step 35:
Shape the white circles into triangles, then use the precision knife to trim off the pointed ends to create the bees’ wings. Glue the wings to the bees’ bodies.
Step 36:
Dab a bit of water/glue to the bear’s nose and hand, then use the miniature spatula to pick up the small bees and glue them in place.
[box type=”shadow”]Master the art of fondant modeling while learning to make more adorable fondant animals, including ducks, penguins, biggies, bunnies, bears and lovebirds, in the Sharon Week’s fun Bluprint class Cake Topper Techniques: Fondant Animals.[/box]
Share tips, start a discussion or ask one of our experts or other students a question.
No Responses to “A Silly Old Fondant Winnie the Pooh Tutorial!”