
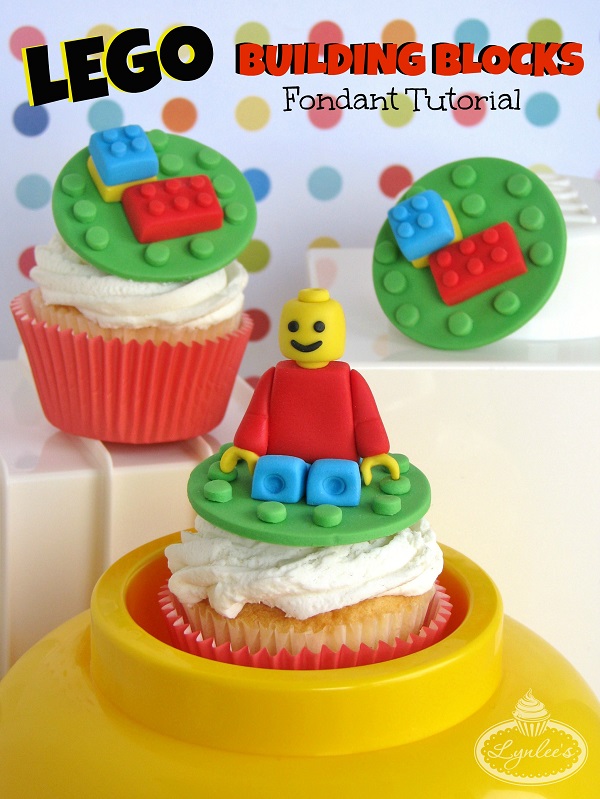
Every kid loves to play with building blocks and especially with the recent release of the new Lego Movie on February 7th, they are more popular than ever! They’re even make their way into the cake decorating world — which is fine by us.
Follow these brick-by-brick instructions to construct Lego-inspired cake and cupcake toppers to thrill any master builder!
Materials:
- Green, red, blue and yellow fondant
- Water/edible glue and brush
- Fondant rolling pin w/ 1/8″ guide rings
- Round decorating tips #3, #7 and #10
- Large round cutter (approx. 2 1/4″)
- Precision knife
- Knife tool
- Large modeling stick
- Small ball tool
- Small spatula, large square cutter, or smooth knife)
- Raw spaghetti
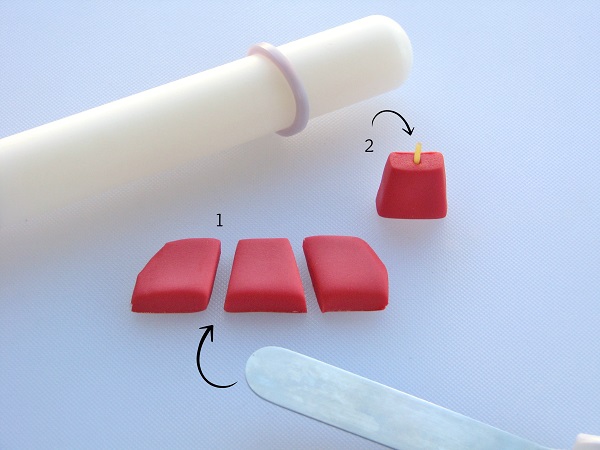
Step 1:
Roll out red fondant thick (approximately 1/3″) with the rolling pin and trim it into a trapezoid shape with either a small spatula, the sides of a large square cutter or a smooth knife.
Step 2:
Insert raw spaghetti into the top of the trapezoid by carefully twisting it in, leaving enough protruding to hold the head.
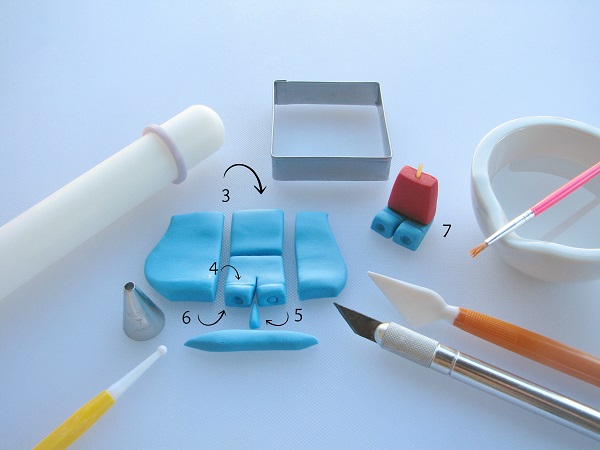
Step 3:
Roll out blue fondant thick (approximately 1/3″) with the rolling pin and use the sides of the large square cutter to trim a rectangular shape for the pants the same width as the bottom of the red top.
Step 4:
Mark horizontal lines at the front end of the rectangle with the knife tool to form the feet/shoes and use the rolling pin or your fingers to flatten out the remainder of the pants a bit.
Step 5:
With the precision knife, cut out a slit at the center of the pants.
Step 6:
Use round decorating tip #7 to indent circles at the bottom of the feet. Then use the small ball tool to indent the center of the circle.
Step 7:
Glue the red top to the pants so that the figure is sitting down.
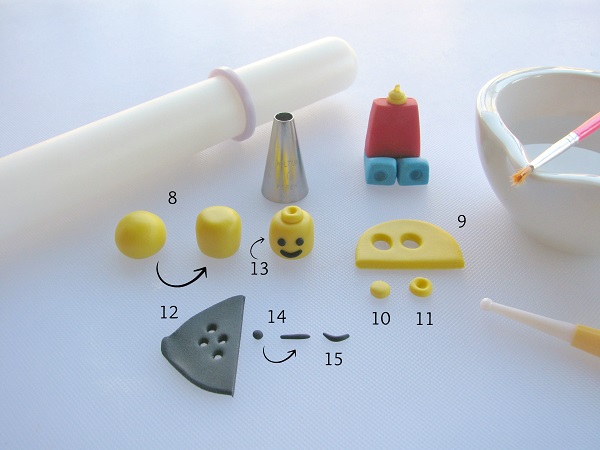
Step 8:
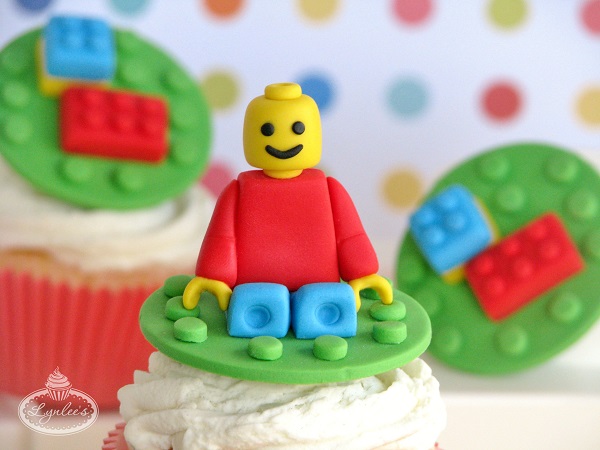
Roll yellow fondant into a ball (approximately 1/2″), then shape it into a cylinder with your fingers to form the head.
Step 9:
Roll out yellow fondant with the rolling pin and 1/8″ guide rings and cut out two circles with round tip #10.
Step 10:
Insert one of the small yellow circles over the protruding spaghetti to create the neck and glue it in place.
Step 11:
Indent the second small yellow circle with the small ball tool and glue it on top of the head.
Step 12:
Roll out black fondant with the rolling pin and 1/8″ guide rings and cut out four circles with round tip #3.
Step 13:
Roll two of the black circles into separate balls to form the eyes and glue them in place.
Step 14:
Roll the remaining two black circles together, then roll it out on your work surface into a line.
Step 15:
Pinch the ends lightly upward to form a smile and glue it in place on the figure’s face. Glue the head to the figure’s body.

Step 16:
Roll out red fondant with the rolling pin and 1/8″ guide rings. With the wider end of round decorating tip #10, cut out four circles.
Step 17:
Roll two red circles together into a ball, then into a teardrop shape.
Step 18:
Flatten the bottom of the wider end with your fingers, then insert the large modeling stick through the center to make a hole for the arm.
Step 19:
Use the knife tool to make a light indentation across the center of the arm where it would bend.
Step 20:
Repeat the above steps to make the second arm.
Step 21:
Roll out yellow fondant with the rolling pin and 1/8″ guide rings. Cut out four circles with round tip #10.
Step 22:
Combine two yellow circles together and roll it into a ball. Then, roll it on your work surface into a sausage shape.
Step 23:
Form the small little yellow sausage shape around the top of the large modeling stick, flattening the sides a bit, while pinching the center to later insert into the arm.
Step 24:
Repeat the above steps with the remaining yellow circles and allow the hands to dry a bit.
Step 25:
When sufficiently hardened and dry, apply glue to the pinched part of the hands and insert them into the bottom of the arms.
Step 26:
Glue the arms to the sides of the figure.

Step 27:
Roll out green fondant with the rolling pin and 1/8″ guide rings. Cut out two circles with the large round cutter.
Step 28:
Roll out additional green fondant with the rolling pin and 1/8″ guide rings. Using round decorating tip #10, cut out 20 small circles.
Step 29:
Place the figure in the center of one of the green circles. Place 10 small green circles strategically around the figure and glue them in place on the topper. Glue the figure to the topper and allow it to dry thoroughly.
Step 30:
Roll out red, blue and yellow fondant thick (approximately 1/3″) and cut two colors (yellow and blue in this case) into squares with the large square cutter and one rectangle with the remaining color (red) to create blocks.
Step 31:
Roll out blue and red fondant with the rolling pin and 1/8″ guide rings. With round tip #7, cut out four blue circles and six red circles. Glue them in place over the corresponding colored blocks.
Step 32:
Glue the blue square block over the yellow square block. Place all the blocks on the green circle topper and strategically place the 10 remaining green circles around the blocks. Glue all the pieces in place on the topper and allow it to dry thoroughly.
[box type=”shadow”]If you want to learn how to make even more cake and cupcake toppers from fondant, Cake Topper Techniques and Advanced Fondant Techniques are both perfect places to get started. Sharpen your skills![/box]
Share tips, start a discussion or ask one of our experts or other students a question.
No Responses to “The Coolest Lego Cake Topper Tutorial Ever: Perfect for Birthdays”