
Simple envelope-style throw pillows have to be one of the fastest, most enjoyable projects you can make. They provide instant gratification, and you can easily make them in any size. There are many “right” ways to sew an envelope backed throw pillow, and today I’m going to show you my go-to method.

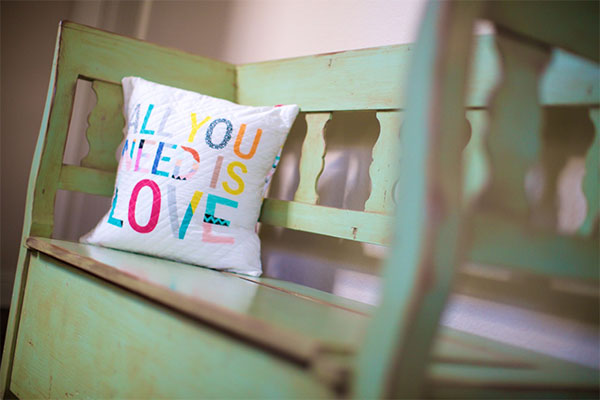
Recently, my friend Mathew (Mister Domestic) sent me some Art Gallery fabric from the new Letters capsule and gave me permission to make anything I wanted! So I spent a couple of days sewing throw pillows (with simple envelope backs and french seams) to brighten up my family room.
I quilted designs on each pillow; the quilting added some of my own personality to the mix and will lend durability to the pillows. (They certainly will take a beating in my home with the number of children that come and go each day.)
Here’s how to make any size throw pillows with an envelope-style back.
Supplies:
- Pillow insert (size of your choice; I usually choose 16″ x 16″ or 18″ x 18″ so I can use fat quarters!)
- 3 Fat Quarters of coordinating fabric (one for the front and two for the back pieces)
- Coordinating thread
- Batting
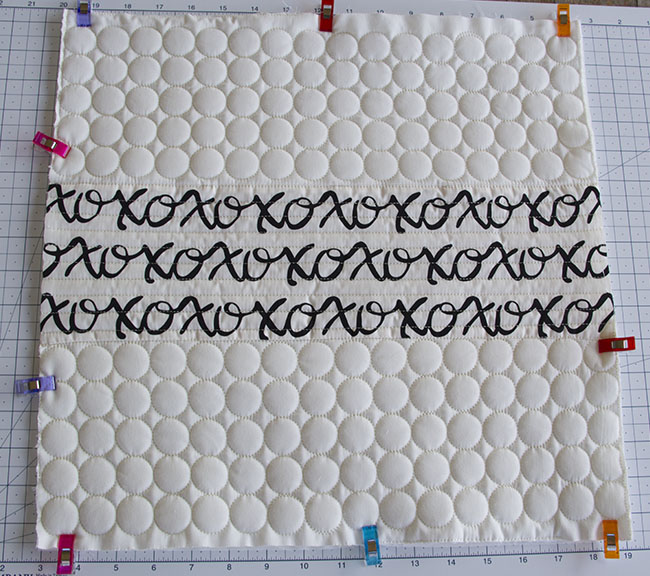
Cutting and quilting the fabric
Step 1:
Cut one fat quarter 2″ larger than your chosen pillow form. For example, my pillow form is 16″ x 16″, so I cut my featured fat quarter to 18″ x 18″.
Once it has been quilted, you may find that the quilting has caused the piece to shrink or become skewed. By cutting your front piece larger, you leave room to trim it after quilting.
Step 2:
Cut your batting to this same size as your front panel.
Step 3:
Make a quilt sandwich out of the top panel and the batting, and quilt your feature fabric as desired. You can use a backing of scrap fabric or muslin, but it’s not necessary. This will not be seen.
This is a great opportunity to practice free motion quilting or a computerized design you’ve been wanting to try, if you have a longarm.
Step 4:
Trim your quilted piece to be 1″ bigger than your pillow form on all sides. For my 16″ x 16″ pillow form, I started with a bigger quilted piece and eventually trimmed my piece to 17″ x 17″ so I could ensure that it was perfectly square.
Step 5:
Cut two pieces of coordinating fabric to the same width of your front panel piece, and about 6″ less than the total length. For my panel piece that’s 17″ x 17″, I cut my coordinating back pieces to be 11″ tall and 17″ wide.
Assembling the pillow
Step 1:
Fold the long raw edge (for me, the 17″ side) of one backing piece under ½” and press. Fold down that same side another ½” and press. Top-stitch in place (1/8″).
Repeat for the second backing piece as well. Your piece should now measure 1″ shorter in length (for me, 16″ x 11″).
Step 2:
Ly the 2 smaller backing pieces on top of the larger quilted top, right sides together, with the backing pieces overlapping at the folded edges.
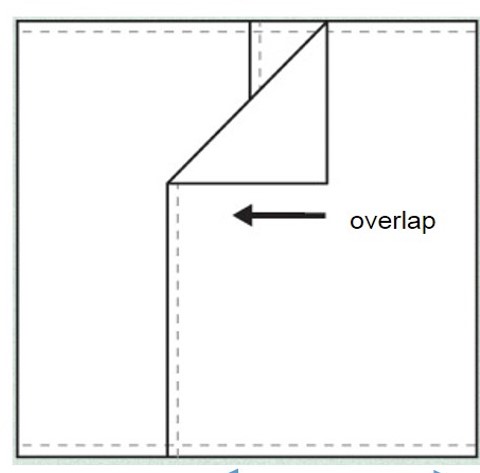
Step 3:
Pin or clip all the way around and then sew all the way around with a ½” seam allowance.
Step 4:
Clip the corners, turn it right-side out and use a pointed object like a chopstick to gently push out corners. Press. Insert your pillow form and sit back and enjoy your new creation!
Want to see some super fun and inspirational pillows like nothing you’ve ever seen before?
 These gorgeous pillow panels will be included in the 2018 Quilter’s Planner accompanying pattern magazine!
I made a set of these envelope pillow covers. They turned out great BUT the insert is really hard to get in. I am sure I constructed them as presented. 🙄 Anyway they look great and the inserts won't be removed very often. Thanks for the tutorial.