
As a holiday, the Day of the Dead, or Dia de los Muertos, is a Mexican tradition to remember and celebrate all the friends and family who have passed. This custom is filled with colorful and lively decor to emphasize the festive and convivial tone, as loved ones are memorialized and revered.
Observe Dia de los Muertos with this fondant cupcake topper, inspired by the traditional sugar skulls from the Mexican cultural commemoration.

Materials needed:
- White, black, red, yellow, blue and green fondant
- Fondant rolling pin, 1/8″ and 1/16″ guide rings
- Water/edible glue
- Vegetable shortening
- 1 1/4″ circle cutter
- Miniature circle cutter
- Large heart cutter
- Knife tool
- Medium and large ball tools
- Round decorating tip #12
- Miniature flower cutter
- Flat and thick foam
- Powdered sugar and dusting pouch
- Rolling pastry cutter
- Floral impression mat
- Edible markers
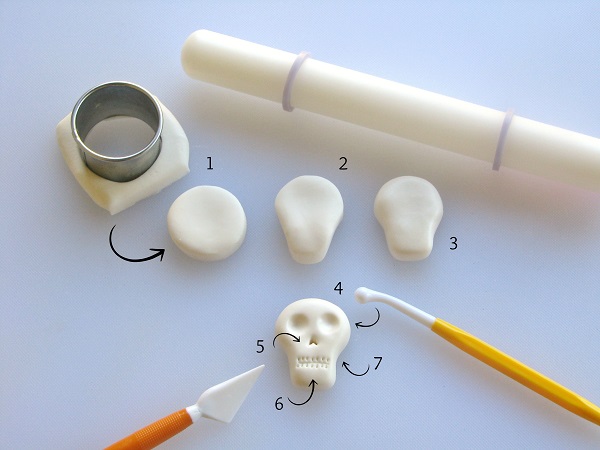
Step 1:
Roll out white fondant approximately 1/3″ thick with the fondant rolling pin and cut out a circle with the 1 1/4″ round cutter.
Step 2:
With your fingers, begin to mold the circle into a skull shape, narrowing the bottom portion.
Step 3:
Dip your fingers in vegetable shortening and round out the edges of the fondant skull and flattening out the bottom.
Step 4:
With the medium-sized ball tool, make indentations for the eyes in the skull. Round it out as necessary.
Step 5:
Utilize the tip of the knife tool to make indentations for the nose in the middle of the skull in an upside down “v” shape.
Step 6:
With the knife tool, make a long horizontal line for the mouth and small vertical indentations over the top of the mouth and underneath for dental marks.
Step 7:
With the large ball tool, gently indent both sides of the skull, narrowing it a bit and giving it more shape.
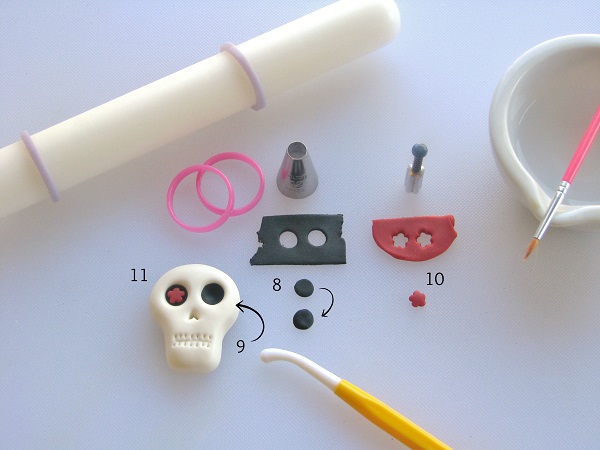
Step 8:
Roll out black fondant with the rolling pin and 1/16″ guide rings. Cut out two circles with round decorating tip #12 and with your fingers, flatten them out a bit more, but maintaining the circular shape.
Step 9:
Apply a tiny bit of water/glue to the inside of the eye socket and place one of the black circles inside. Utilize the medium ball tool to indent it to the socket’s shape. Repeat with the other eye.
Tip: Make sure you don’t put too much water/glue inside the eye socket or it will seep out when you press the black fondant into it.
Step 10:
Roll out red fondant with the rolling pin and 1/8″ guide rings and cut out two miniature flowers with the cutter.
Step 11:
Glue the flowers to the inside of the eyes.

Step 12:
Roll out fondant (the color of your choice) with the rolling pin and 1/16″ guide rings. Cut out three circles: one with the smaller end of round decorating tip #12, one with the larger end of the round decorating tip #12 and one with the miniature circle cutter.
Step 13:
Dust some powdered sugar over the flat foam and place your three circles on it. Utilize the ball tool to indent the perimeter of the circles by pressing and twisting the tool around them, creating ruffles and petals.
Step 14:
Layer the three petals over the thick foam with the largest size on the bottom, then utilize the small ball tool to gently press the center down to form the flower.
Step 15:
Grab the center of the flower from the back and pinch it together just a bit. Utilize the knife tool to gently separate and arrange the petals and remove any excess from the back. Repeat the steps with different colors to create additional flowers and vary the circle sizes to make bigger or smaller flowers as desired.
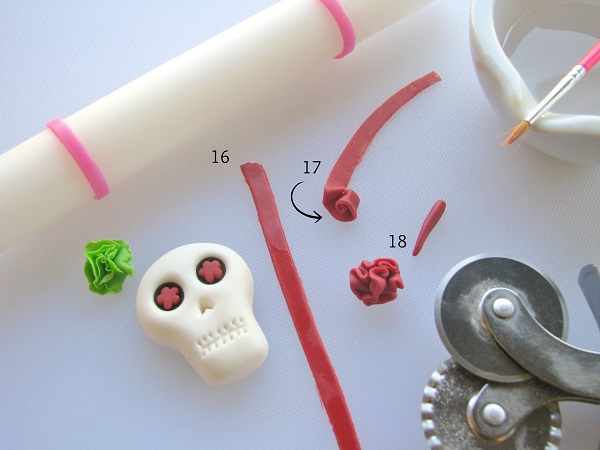
Step 16:
Roll out red fondant with the rolling pin and 1/16″ guide rings. Utilize the rolling pastry cutter to cut out a fondant strip approximately 1/4″ wide.
Step 17:
Take one end of the red fondant strip and begin to roll it into itself. Then, continue to roll the strip around the center, while ruffling the fondant by folding it back and forth like an accordion.
Step 18:
Grab the center of the flower from the back and pinch it together just a bit. Trim off any excess and repeat the steps with different colors to create additional flowers and a variety of sizes.

Step 19:
Glue the various flowers to the top of the skull’s head, positioning the larger ones in the center and cascading down with the smaller sizes.
Step 20:
Roll out black fondant wit the rolling pin a bit thicker than 1/8″. Spread a bit of vegetable shortening over the fondant and place the embossing mat over it. Roll the rolling pin with the 1/8″ guide ringers over it again to impress the floral pattern on the fondant. Gently separate the mat from the fondant and cut out a heart shape with the large cutter.
Step 21:
Utilize the edible markers to draw on the skull with a variety of patterns and designs. It is preferable that you wait overnight to allow the fondant to dry a bit. If it is too soft or wet, the liquid of the marker will seep directly into the fondant and sink into it. When you do begin to draw on the fondant skull, be careful not to press too forcefully
Step 22:
Glue the skull to the black heart and allow it to dry thoroughly.

Share tips, start a discussion or ask one of our experts or other students a question.
No Responses to “Celebrate Mexican Heritage With a Day of the Dead Cupcake Tutorial”