
With the seat, seat extension and their joinery ready to go from my last installment, it’s time to focus on drilling holes for the legs of our Tage Frid-style three-legged stool. There are two major tasks to accomplish when making the seat: cutting 1” holes to join the legs and shaping the curve of the seat. Since the seat blank is still square, I’ll focus on drilling the holes first and work on shaping the seat in the next blog post.
Step 1: Cutting holes to accept the legs
The legs of this three-legged stool are joined at compound angles. If you were looking straight at the stool, you’d see the front legs pitched forward, which is called the rake, and to the sides, which is called the splay. The complicated part of drilling these holes is that you have to incorporate both angles at the same time. In his book Tage Frid Teaches Woodworking (1985, The Taunton Press), Tage Frid describes making a jig for his drill press to drill these holes at the proper angles. My drill press doesn’t allow me to tilt the table, so I had to improvise a bit.
Step 2: Establish the rake and splay angles
First, the drawings in the book indicate the back leg is at a 72-degree angle, which is the rake angle. The front legs are splayed at about 78 degrees. To simplify matters, I established both the rake and the splay at 75 degrees, a good compromise. These angles aren’t exactly what Frid chose, but they are close enough for my purposes.
Step 3: Transfer angles and reference lines
With the seat blank still square and cut to the final length of 16”, mark where the holes will be drilled: in the center front-to-back and 3” in from each side. Make reference lines square to the front of the stool and to the side. (I make reference lines like crazy because you never know when they might come in handy.)
Next, make a line at 45 degrees from the front corner on the top of the seat, defining the direction the legs will be pointing. Let’s call this Angle A. With a bevel gauge set at the splay angle, which is 75 degrees, draw a line on the front face of the seat blank at this angle starting at the reference line. Let’s call this Angle B. Because the angles for each leg are opposites of each other, you’ll have to do this set-up for each side. I’ll focus on the right side hole first.
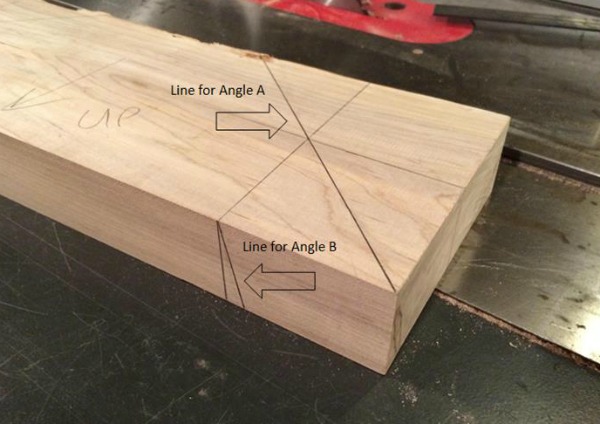
Make reference lines to help align the seat blank on the drill press table.
Step 4: Set up the angles at the drill press
At the drill press, orient the seat blank so the drill bit will be in line with Angle A and tilted so it will be in line with Angle B. Use your reference lines to position the wood. This process involves moving things around until you are satisfied with the angles. Clamp a fence perpendicular to the center line of the drill press and set the seat blank on it so it tilts forward. Clamp a small piece of wood to the table to register against the front right corner of the seat blank.
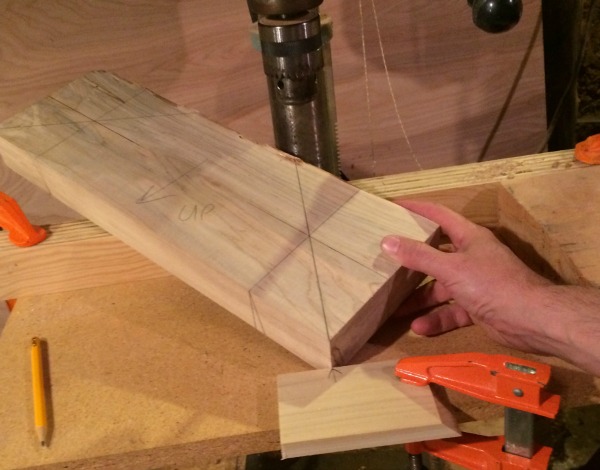
Orient the board so the line for Angle A lines up with center of drill press.
Set your engineer’s square on the table and move the fence (and the clamped piece of wood, if necessary) to change the tilt of the seat blank until the line for Angle B is parallel to the upright of the square. Confirm the angle with your bevel gauge.
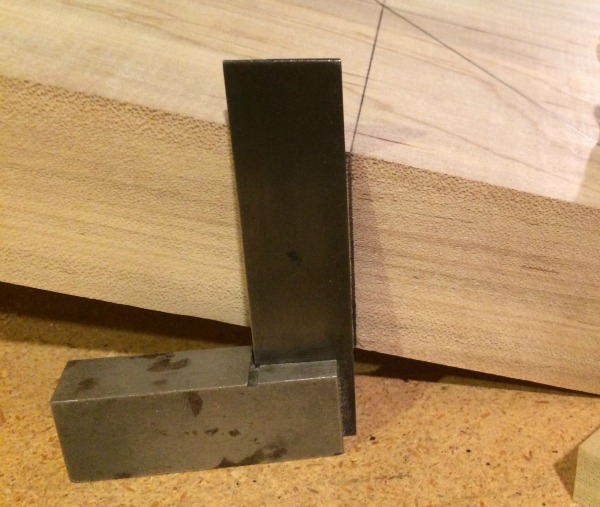
When the line for Angle B is parallel to the upright of the engineer’s square, you have the correct angle.

Your bevel gauge should line up with the original line on the front face of the seat blank, confirming your angles are correct.
Step 5: Make sure the work piece is secure
Clamp a large block of wood so one side registers well against the front face of the seat blank. The seat blank should sit firmly in this little corner you’ve made with the blocks of wood. To keep things stable, clamp the seat blank to the large block.
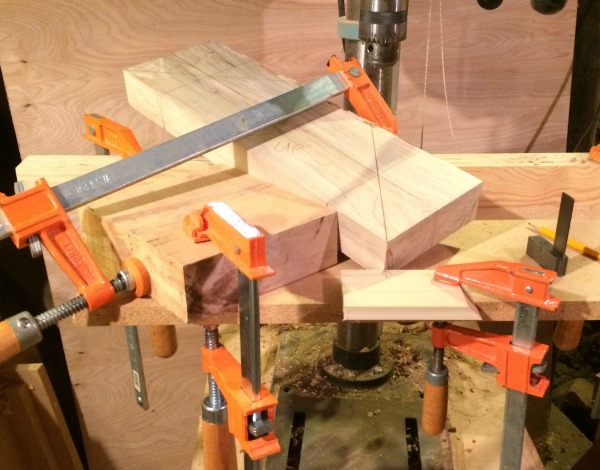
Blocks and clamps keep the seat blank secured in the correct position.
Drill the hole with a 1” bradpoint or Forstner bit, whichever you have on hand and will fit with the table location of your drill press. If you are making multiple stools, cut all the right side seat holes with this set-up. When you’re done with the right side, keep the fence and the front piece of wood in the same location. Rotate the seat blank to focus on the left side and reconfigure the blocks.
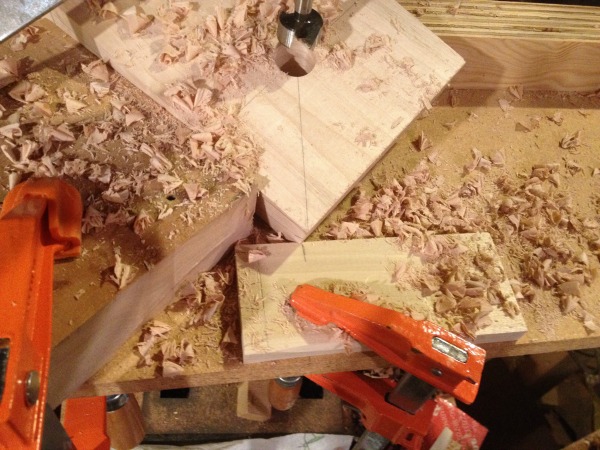
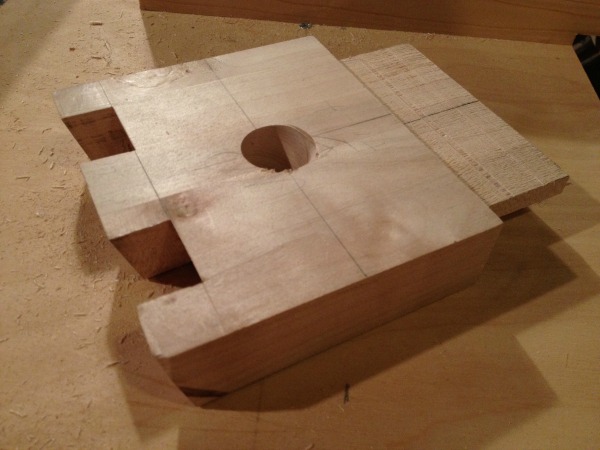
Accurately drilled holes are critical to positioning the legs for the stool.
Step 6: Cut a hole for the back leg
Follow a similar procedure to cut the hole in the seat extension for the back leg. It’s a bit easier because you only have one angle to worry about. Mark the location of the hole in the top of the seat extension and make center lines intersecting at that point. With the bevel gauge from earlier, draw the angled line on the side of the seat extension (Angle C). Keep the fence where it is on the drill press table. Position the seat extension on the fence so the center line along its length is in line with the center of the drill press. Using the small engineer’s square, make sure the line for Angle C is parallel with the upright of the square. Clamp a block to secure the wood and drill the hole.
Hole in seat extension for joining the back leg
Next step: Shaping the seat
Drilling these holes signals the end of the joinery for the seat. In the next post, we’ll take on the dished shape of the seat, which gives the stool a lot of its character. We’ll also do some final shaping of the seat extension. After that, we’ll glue up the seat and move on to making the legs and rungs. Even with a complicated build like this one, if you plan out the sequence and make things in stages, it will all come together in the end.
[box type=”shadow”]
FREE for you!
Sign up for Flawless Finishing, a completely FREE Bluprint mini-class taught by expert furniture maker Robert Spiece. He shows you how to achieve a durable and beautiful finish on any woodworking project.
[/box]
Share tips, start a discussion or ask one of our experts or other students a question.
No Responses to “Making a Tage Frid-Style Stool: Time to Drill Holes for the Legs”