
Photoshop actions are a great way to streamline your photography post-processing workflow, and they are also a neat way to experiment with different looks and effects. Actions (also known as presets in Lightroom) are a programmed series of steps that are saved and can be applied to any photograph. This post will walk you through using Photoshop actions.
Photos via Boost Your Photography
Getting Photoshop actions
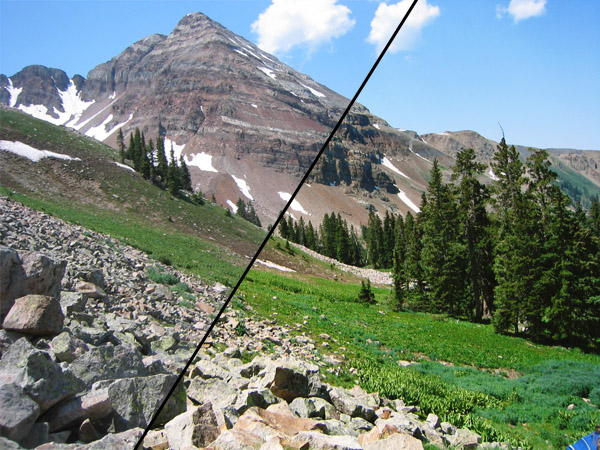
Actions exist for a wide range of photography situations, but some of the most common involve resizing and sharpening for web publication, skin smoothing for portraits and color changing or other stylized effects. Some actions can be downloaded for free, while others are available in large packages with a many options and applications. Most sites offer before and after examples for you to see how an action or package can be used.
There are many different vendors that offer Photoshop actions, both free and paid versions. Some of the most popular include Coffee Shop Blog (free or donation), MCP Actions (free and paid), Florabella (paid), Little Lusker (paid), Paint the Moon (paid) and many others. I recommend signing up for the newsletters from companies that you like, as you often receive links to additional freebies.
Once you have your actions downloaded, you may need to unzip and extract the actual action file. (Actions have the file extension *.atn.) I recommend creating a new folder for downloaded actions to keep them organized and easy to find.
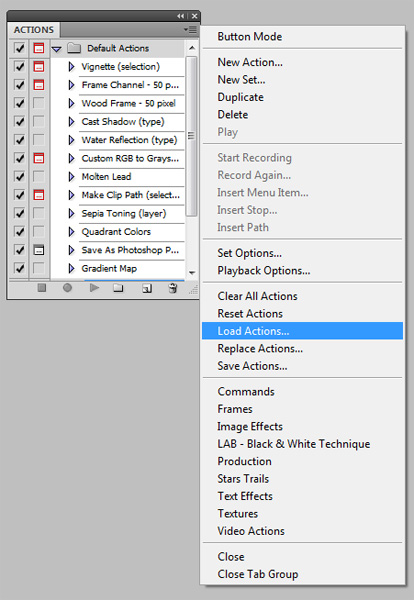
The most reliable way to install actions is from inside Photoshop itself. Open Photoshop and navigate to your Actions palette. Click on Windows -> Actions to open it, if it is not already visible. At the top right corner, click the list-looking icon and select Load Actions from the drop-down menu. Navigate to the folder where you saved your action, click on the file name and click open. Your newly installed action will join the list of actions in your Actions palette.
Using Photoshop actions
You will notice that Photoshop already comes preloaded with several different actions. Clicking the triangle next to the Default Actions folder will display a list of these actions. Clicking the triangle again will close that folder and hide them again.
To use an action on a given photograph, first open the selected image. Navigate to the action that you want to use and click the triangle to open that folder. Then click the name of the action itself. Hitting the play arrow button at the bottom of the actions palette will run the action. (If your mouse becomes a “do not” sign when you hover over the play button, it means you are trying to run a folder, not an action. Click the triangle to open the folders until you find the action file itself.)
Some actions will run entirely by themselves, while others may pause and ask you for input, such as using the color picker to select the skin color or drawing a selection around where you want to add fade to an image. After you complete that step, the action will continue its process.

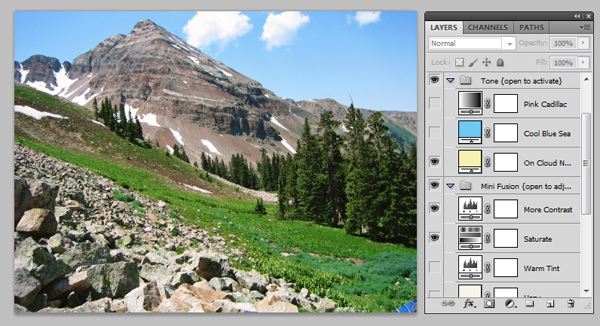
This screen shot above shows the layers created after running the free MCP Mini Fusion action. Most actions will create several different layers and folders and will often leave all of them active at the same time, as shown.
After an action like this one has finished running, I recommend clicking the eye icon next to the individual layers and folders to turn them all off. This allows you to selectively turn on each layer and see how it impacts your photograph. Most actions do not intend for you to use every layer and effect for every image.
In addition to turning layers on and off, you can also change the opacity of an individual layer. Lowering the opacity will decrease the impact of that given layer and its effect. You can selectively apply an effect to just part of your image by using a layer mask. You can learn more by reading Using Layer Masks to Create Composites in Photoshop.
Once you have found the combinations of effects that you like, consider saving both the JPEG and PSD versions of your file. The PSD will allow you to go back and adjust your layers later, while the JPEG will flatten all your layers into a single, finished image.
One caveat: always save a version of the PSD file before running another action on the same image, as most actions begin by flattening all layers. If you want to run an action to resize and sharpen a photograph for posting to Facebook, for example, save the PSD of your file before running that action. Otherwise, you will only have the flattened and smaller version of your image left.
Unleash power of Photoshop to dramatically improve and enhance your photos and videos in just a few clicks in Craftsy’s 25 Innovative Photoshop Techniques for Photo & Video class.
Share tips, start a discussion or ask one of our experts or other students a question.
No Responses to “Improve Editing by Installing and Using Photoshop Actions”