
The ultimate goal in realist drawing is accuracy. The artist faithfully renders all forms, being as precise as possible when drawing out subjects, landscapes and everything else of interest. To learn the draftsmanship of the drawing, every artist starts at the beginning. Learn these simple pencil drawing techniques and watch your art improve!
1. Measurement techniques
Every drawing begins with a sketch. There are three main methods, which all involve extrapolating the information in front of you and using only what’s necessary, to relate objects to one another, understand the linear perspective and develop accurate forms.
Sight method
In the sight method, you’ll set up your drawing pad right next to the subject itself, so you can transfer the object to the paper at accurate size by measuring your object with a pencil.
Comparative
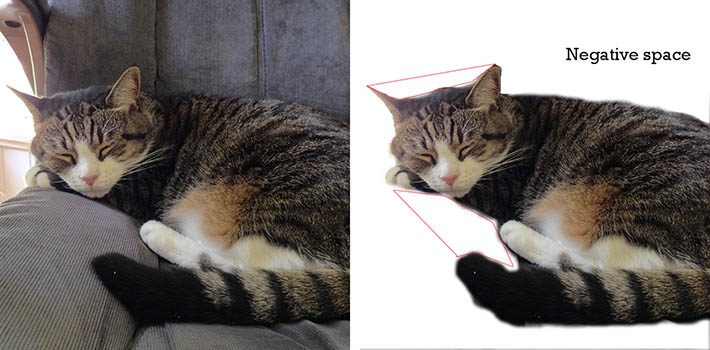
Comparative measurement involves seeing the ratios between the objects and using the negative space as a measuring device. For instance, an apple might be two times smaller than a vase placed next to it; a child could be three times shorter than an adult. In other words, you relate one object to the next by placing invisible comparative lines to demonstrate the relationships.
The negative space helps to find distances between the shapes. In the photo below, the negative space is the background around the cat, which helps you find the distances between the cat’s ears or toes.
The grid method
The grid method is often used to enlarge the drawing for a mural painting or a large artwork. This old method involves dividing the drawing into equal squares. Then, you compare and transfer abstracted shapes from the squares to the enlarged surface. This technique helps seeing the comparative relationships between the objects.

Once the outline drawing is ready, the artist does a simplified block in.
2. Block in and shading
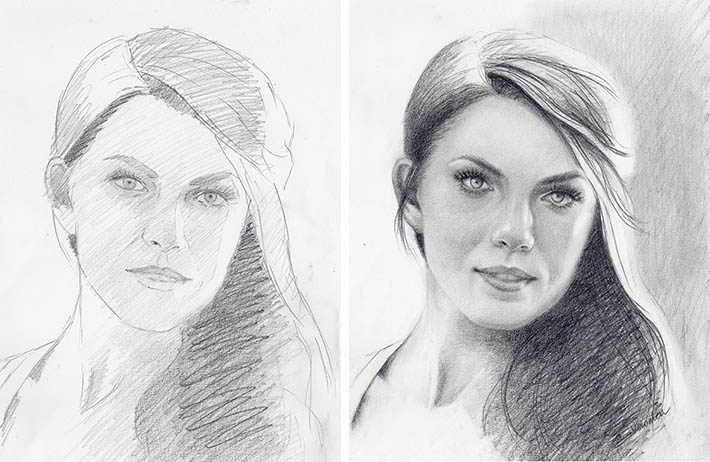
The block-in is done by making a simplified division between the light and the dark parts of a composition. Artists create volume by observing the light, how it travels across the form and where it turns to shadow. Shadows are rendered first, as you can see in the sketch above on the left.
For a complete guide to shading, watch Drawing Dimension: Shading Techniques on Bluprint.
3. Blending
Blending of graphite works best with a paper stump or a small piece of sketch paper. Don’t rub the surface, however, because it ends up looking smudged. Strive for a nice and even application of pigment, which requires just a bit of blending. Blending tends to make all tones (values) look as the middle tone. Thus, it’s important to re-establish the darkest areas and to work on the highlights afterward.
4. Using lines
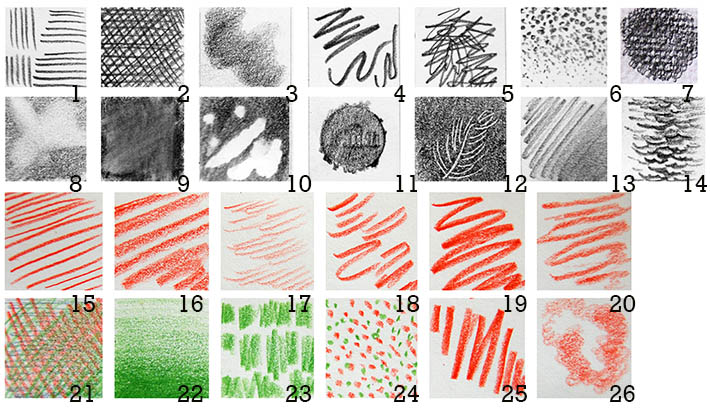
Lines are a simple way to add texture and value to a drawing. You can start your drawing with directional strokes or you can layer texture over the general shading. Above, you can see a few types of the lines that help to describe a variety of objects and shapes. You can see that the top half (images 1 – 14) are done in graphite, and the bottom half (images 15 – 26) are in colored pencil.
- Hatching (images 1 and 15, 16) and crosshatching (images 2 and 21) are the most common form of shading and mark making. The more strokes you layer, the finer and darker the area is going to be.
- Soft shading (images 3, 13 and 22) is applying the pigment using the side of a pencil tip. Such soft shading is necessary around the highlights for realistic appearance
- Varied outline (images 4 and 18) or a line quality often describes the artist’s personality. Some artists produce energetic, rough lines, while others make deliberate, careful contours. The quality of the line determines how interesting your subject looks.
- Zigzag lines (images 5 and 18, 19, 20) come in handy when you draw uneven surfaces, like a leafy bush or a tree.
- Stippling (images 6 and 24) is a very time-consuming type of shading, but it’s sometimes necessary to describe a specific texture. Some artists have the patience to do a complete drawing using the dots only. The more dots you place, the darker the value is; fewer dots create a lighter value. By varying the strength, size and number of dots, you can make a range of values in a picture.
- Crosshatching over a raised surface (image 7) gives the texture in a particular area only. (Get Bluprint’s free guide to hatching and crosshatching here.)
- Lifting out the highlights with a kneaded eraser (image 8) or a gum eraser (image 9) is necessary to create depth.
- Applying a masking fluid before the shading, shading and lifting out the masking fluid to reveal the lightest areas (image 10). Usually the edges are rough after the removal of the masking fluid (used for watercolor painting) and require softening.
- Rubbing (image 11) creates unique textures.
- Impressing the surface (image 12) is a great method to make whiskers, blades of grass or to draw any other super fine lines.
- Create wave-like marks by making definite strokes (image 14).
- A very light application of strokes for a whisper effect (image 17).
- These short and stubby clusters of lines describe surfaces like short grass, a roof, etc. (image 23)
- Short, circular strokes create soft shading (image 26).
Experiment with a variety of lines, combine them in different ways and have fun drawing!
FREE Guide: Learn 6 Essential Crosshatching Techniques

From basic parallel hatching and crosshatching to less common techniques, this guide will help you create value and texture for drawings that pop.
Im so excited to start this it is so interesting. We look at so many things and don't know what it is or even know it has a name. My biggest problem is i have a tendency to rush through things. So I am trying not to do that. thanks so much!
just learning n.orgew medium