
A watermark is an essential feature for blogging and posting to websites to make sure the photo credit remains with you. Also, people will know how to find you if they really like the image!
Read on to learn how to put your personal stamp on photos.

There are lots of options for putting a watermark on your photos, but this post will focus on how to watermark photos using Photoshop and Lightroom.
Lightroom
I’ll share two ways, one simple one more complicated, for watermarking. The first and easiest way is to simply export the image you want (File -> Export) and in the export dialogue box to check “watermark.” You can create a simple text watermark using the “Edit Watermarks” tab, and choose the placement and size. If you have a logo prepared and saved as a JPG or PNG file you can use that. Once you have found the file in your Watermark Editor, you can adjust the size, placement and opacity to taste. Keep in mind that you will need a light logo to show up well against dark photos and a dark logo to show up well against light photos.
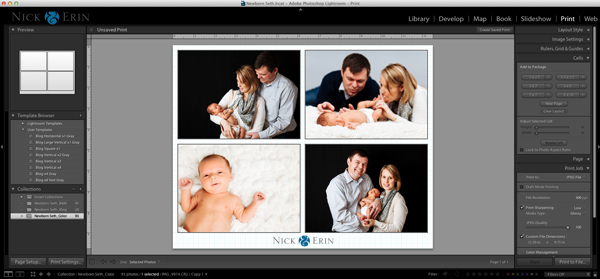
The second way allows you to watermark groups of images — for example, if you want to show four images at a time on your blog. First, you need to create an Identity Plate. This is just your logo, no more than 57 pixels high for Mac and no more than 46 pixels high for Windows. Under Lightroom’s main menu, click Identity Plate Setup. Click “Use a graphical identity plate” and find the file you made from your logo. Then go to the Print Module. Under the “Page” tab, check the Identity Plate button and scale and position it as you like. After that, go to the “Print Job” tab and create custom file dimensions to match whatever the website requires. Then go to the “Cells” tab and add some cells to hold the photos you want on each file. You can use just one cell, or multiple cells depending on the layout. I created templates for each layout so that I could go back to them with one click. Drag photos into the cells and then click “Print to File…” to save your work.
As a bonus, your identity plate should show up in the upper left hand corner of your screen when Lighroom is open, giving your software a personalized look.
Loving this tutorial? Download this easy, printable PDF, and enjoy it anytime, anywhere, forever!
Photoshop
Lightroom is certainly the easier option over Photoshop, but it has a little less control over the look. A quick way to create watermarked images for a blog or website is to make a custom brush and a custom action.
For the brush, take your logo and turn it to black. Then go to Edit-> Define Brush Preset. Name your brush something you will remember, like “MY LOGO.png.”
For the action, drag the first photo into Photoshop and in the Action panel choose “Create New Action.” Then start recording. Photoshop will remember everything you do, until you stop recording. Next, resize the image to the proper size, and add borders if you wish, using Image -> Canvas Size.
Once the action and brush are set up, choose the brush tool and find the brush panel. Navigate to the brush you just created. Choose what color you would like to use in your color picker and click the brush once on your image to stamp the watermark. You can use the bracket keys to make the watermark stamp bigger or smaller.
Other options
Lightroom and Photoshop are great options if you don’t have tons of images and you have complex watermarking to do. I’ve been using Blogstomp for the past few years to really speed up the process. It doesn’t do everything Lightroom or Photoshop does, but it does exactly what I need for blogging.
Share tips, start a discussion or ask one of our experts or other students a question.
No Responses to “3 Quick and Easy Ways to Watermark Photos”