
Sometimes the most basic of tasks are the hardest, like sewing straight!
Sewing straight mostly comes with time and practice as you build muscle memory and develop a relationship between your hands, your fabric and your machine. But there are a few key things that will help you get there faster.
I’ve been teaching sewing students for years, and I see a couple of habits come up repeatedly, and a couple of simple solutions seem to help everyone. Even if you’re an advanced sewer, keep reading — you might learn a new trick for how to sew a straight line too!
1. Sit straight
I frequently see beginner sewers pull themselves up to their sewing machine, all off-kilter and approaching their machine and table at an angle. It’s so hard to sew straight if you aren’t lined up straight with your machine.
First, straighten your machine in relation with your table, and pull the machine close to the edge of the tabletop so you don’t have to stretch your arms sew. Then square your chair up with your table, directly in front of your machine. Sit up straight in a comfortable position, and place your foot pedal on a spot on the floor where you can reach it without changing your sitting position. Now that you’re straight in front of your machine, you can sew straight too!
2. Follow the seam allowance
Nearly all machines come with seam allowance markings on the footplate of the machine. Not only are the seam allowance lines there so you can sew at the correct seam allowance, but they also act as guides to help you stay straight along the edge of your fabric.
Having trouble seeing the seam allowance lines or have a machine that does not have any lines etched into the footplate? Read on to tip number three…
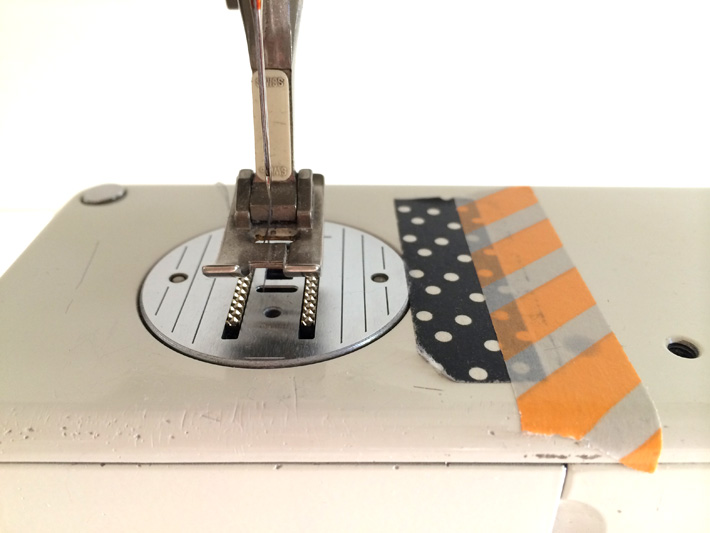
3. Use washi tape
I have two lines marked with washi tape on my sewing machine (pictured at the top of this post), to the right of my footplate. They mark larger seam allowances that aren’t marked on my machine but that I use often.
But you can also use tape to mark any spot to aid in your sewing. A lot of my students have trouble spotting their seam allowance marks while sewing, so I encourage them to use washi tape or painter’s tape to mark the line for easier viewing.
4. Don’t watch the needle
You really are better off following a guide, a line of tape, or the edge of your fabric, rather than watching the needle go up and down. This will be too dizzying and won’t put your stitches in context with the big picture of the project. I find that watching the needle will result in a wavy line most of the time.
So if you’re topstitching or edge stitching, find something to use as your guide instead of just eyeballing it by watching the needle sew as you go.
5. Mark your stitch line
If you’re really struggling to stay on track — especially when sewing exposed topstitching in highly visible locations — consider using a water-soluble marking tool to mark your stitch line before sewing. This can serve as your guide to ensure straight sewing.
A marking line is especially helpful when topstitching a collar, a patch pocket or anything involving a pivot, like at an angled corner. As always, test the marking tool on a scrap of fabric before using on your project to ensure it will wash out.
6. Move the needle position
When you need to use your seam allowance markings, you need to leave your needle in the “center” position so that the distance from your needle to the measurement is correct.
But often when topstitching, edge stitching or hemming, you’re not using a seam allowance — instead, you’re sewing near an edge. You can move your needle from left to right as much as you want without any consequences.
Personally, I like to align the edge of my fabric with the right edge of my presser foot. To make this happen, simply move the needle so it hits your fabric where you want, while keeping the edge of the fabric along the side of the presser foot so you can use it as your guide.
7. Slow down
So many people forget the connection between their machine and their body. I often see sewers get out of control, lose their place in their sewing, speed up and then panic.
Don’t forget you can stop at any point along the way — you are the one powering the machine! If it feels like the machine is getting away from you, make it stop.
Some machines have speed control settings, which is a wonderful way to set yourself a slow and comfortable speed so you can just focus on the sewing and seam allowance.
8. Think of it like driving
Much like when driving a car, you’re not just looking at the immediate distance in front of you. You’re also looking at what’s coming ahead, as well as where you’ve been in the rearview mirror. Same goes with sewing!
Think about the follow-through from where you just sewed, where you’re sewing now, and what’s coming along the way. If your fabric is pulling down as it falls down the table or is bunched up behind the presser foot, pause and keep the project fluid on either side of the needle, so it’s going through with ease.
Share tips, start a discussion or ask one of our experts or other students a question.
No Responses to “Sewing Basics: How to Sew a Straight Line”