
This handmade thank you card is a great project for using up pieces of scrap card stock or paper that are left over from other paper crafts projects. I’ve included the letters and all of the different letter segments in free templates below, so you can mix and match to create your own, custom color block letters.
DIY color block thank you card
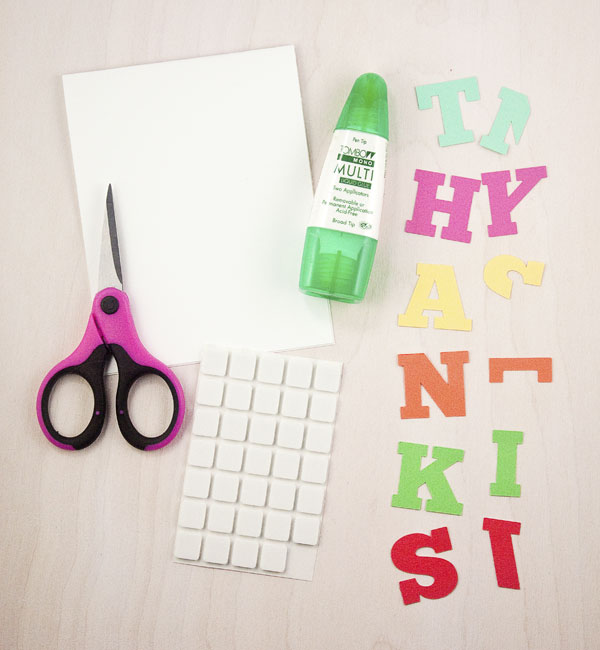
Materials you’ll need:
- Scrap paper or card stock
- SVG (if using a die cutting machine) template file
- An A2 top-folding card base (basically, a piece of 8 1/2” x 11” cardstock cut in half lengthwise)
- Craft glue
- T-square (optional)
- Adhesive foam squares or dots (optional)
- Scissors (if cutting by hand or using foam adhesive)
Step 1:
Cut out the letters and letter segments using a die cutting machine, or cut out by hand. If cutting out by hand, print the templates onto a sheet of regular printer paper, cut out the templates that you’ll be using, trace onto pieces of scrap card stock or paper, and cut out the traced letters and letter segments.

Step 2:
Pair each letter with its matching letter segment and glue the pieces together using craft glue.

Step 3:
After you’re finished gluing the letters and segments together, lay them out on the card base. Use a T-square (optional) to help with alignment and placement.
Note: I attached a 4 1/4” w x 5 1/2” h piece of wood-grain patterned card stock to the front of the card base before I laid out the letters to add some texture to the finished card.

Step 4:
When the letters are laid out in a way that you’re happy with, remove one letter at a time and add adhesive foam squares to the back (optional). Adhere the foam-backed letter to the front of the card. If you don’t have foam adhesive, you can use craft glue, glue dots or double-sided adhesive to attach the letters to the front of the card.
Note: The foam squares that I used were a little on the large side, so I cut them into quarters for a better fit. This is a great way to make your foam adhesives last longer, too!
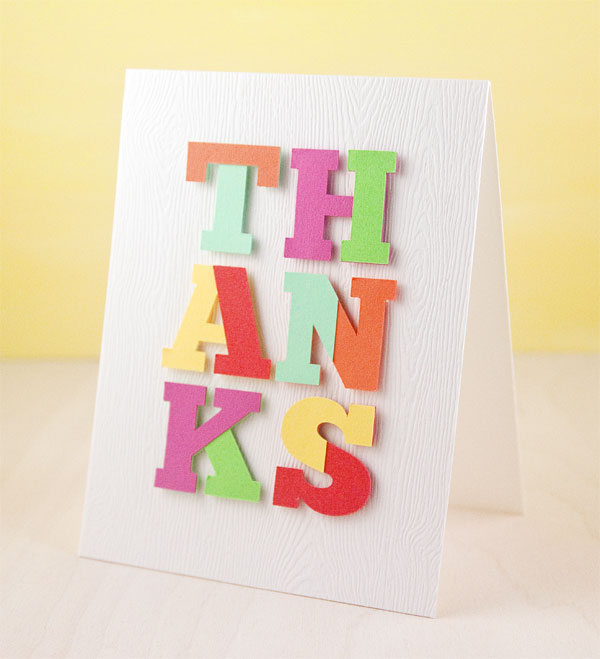
And you’re finished!
I used plain, solid-colored card stock in my version of the card, but there are so many techniques and materials that you can incorporate to create a variety of looks.
Here are some suggestions for making it your own:
-
Mix and match solid colors with patterns, or make the letters out of several different patterned papers.
-
Heat or dry emboss specific letters or segments to add dimension.
-
Stamp patterns (dots, stripes, crosshatch, etc.) onto letters and segments in a single color or in a coordinating variety of colors.
-
Add glitter or Glossy Accents to specific segments for a little sparkle and interest.
-
Use white card stock for the letters and segments and paint them different colors using watercolor, acrylic or gouache paints.
Share tips, start a discussion or ask one of our experts or other students a question.
No Responses to “Make a Stash-Busting Color Block Card: Free Template + Tutorial”