
In the quilting world, it is certainly not uncommon to come across a beautiful antique quilt. A few months ago, I was antique shopping and ran across a vintage quilt top that was unlike anything I’d seen. The colors and construction were simple (butter yellow and a navy pinstripe), and the log-cabin piecing was done completely by hand. With a price tag of less than $30, I decided I had to add it to my collection.
Now that I have the quilt home, it’s folded and stashed in a dresser drawer. But I’d love to learn how to finish an antique quilt and turn it into the blanket it was intended to be. With that end goal in mind, I’ve done a little research on finishing an heirloom quilt. Here’s what I’ve learned!
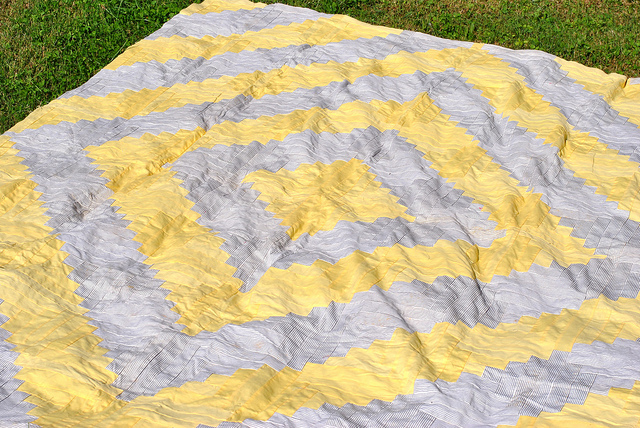 Photo via Lindsay Sews
1. Repair the quilt top
The first step in finishing an antique quilt is getting the top itself into restored condition.
If there are any undone seams, you can reinforce the piecing with your sewing machine. Small holes can be patched with coordinating fabric and a hand-sewing needle. When shopping for my heirloom quilt top, I selected the one with the strongest natural seams. I only had to contend with one small hole, and the quilt top had no visible stains.
To remove stains from an antique quilt, spot treat them with a mixture of cool water and oxygenated bleach (sodium percarbonate), which is also called color-safe bleach.
OxiClean or Clorox 2 are two popular products that can be used to remove stains on vintage quilt tops. Quilt History gives a great primer on how to remove particular stains, like wax, wine or grease, from antique quilts.
Before you prepare your quilt sandwich, it’s probably a good idea to air out your quilt top outside to get rid of any musty odor.
Cleaning a vintage quilt requires extra care. If the quilt top is dusty, try slipping pantyhose over the end of a vacuum hose and gently sweeping up dust particles this way. It’s generally recommended that you do not wash a vintage quilt top, which may cause damage to the fabrics. If you decide you must wash it, make sure you do so by hand, testing out a small section first to see how the fabric responds.
If you believe you have a valuable quilt top in your collection, you may wish to have it professionally appraised before you quilt it.
After all, the quilt may lose value if it is truly rate. However, many quilters live by the philosophy: “It’s not a quilt unless it’s quilted!” So if you’d prefer to finish an antique quilt and enjoy it rather than letting it collect dust, feel free to jump right in.
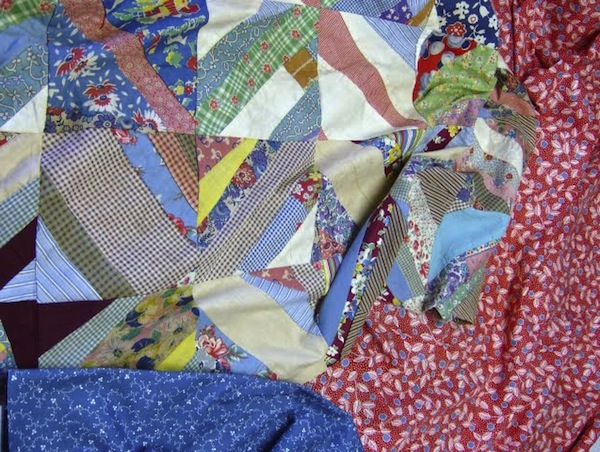 Photo via SuKnitWitty
2. Choose batting and fabrics
To finish an heirloom quilt, you’ll need to decide which type of batting to use, as well as any supplemental fabrics like backing and binding. SuKnitWitty recommends choosing reproduction fabrics that match the era of the quilt.
When choosing quilt batting for your restoration project, think about how you’d like to finish the quilt (by hand or machine, and how far apart you’d like to place your stitches). Cotton batting, polyester batting or other blends can all be good choices for finishing an antique quilt. Quilter Judy Shubert recommends cotton batting if you plan to use lots of stitching close together or polyester batting if you’d like the quilting rows to be 3 inches apart or wide.
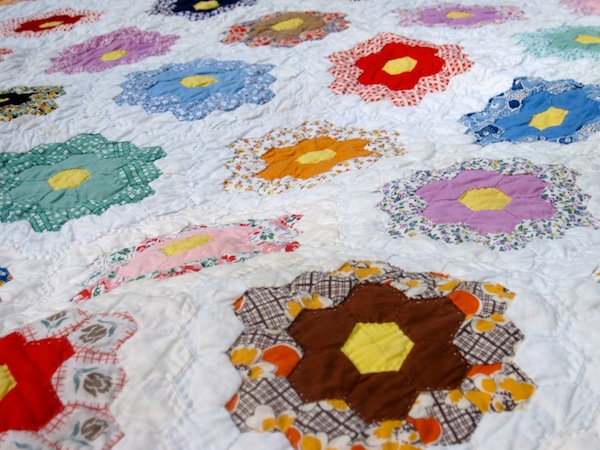 Photo via Canton Village Quilt Works
3. By hand or machine?
Finishing antique quilt tops can be done by hand or by machine. One of the most exciting and nerve-wracking parts of finishing an antique quilt is deciding how to quilt it.
One Bluprint member asked: “We have been given two Flower Garden tops hand pieced by my husband’s grandmother. Is there a particular quilt pattern that is good for Flower Garden?”
Since antique Flower Garden quilts are hand-pieced, a hand sewing pattern that echoes the flowers is a good choice. The quilt above, featured at Canton Village Quilt Works, is a good example of hand-stitched echo quilting. Bluprint instructor Andi Perejda’s course Hand Quilting: Heirloom Design & Technique will teach you all that you need to know about heirloom quilting by hand.
If you only have the time or desire to machine quilt your vintage flower garden top, don’t feel limited by the hexagonal piecing! Kati, who blogs at From the Blue Chair, quilted a modern Flower Garden with free-motion loops, and it looks stunning. If you are unsure of what quilting pattern to use on your antique quilt top, you can always add it to Bluprint’s Projects section and ask for suggestions from the community.
Share tips, start a discussion or ask one of our experts or other students a question.
No Responses to “Vintage Redemption: How to Finish an Antique Quilt”