

Covered zipper end tutorial
To make the zippered pouch, you’ll need:
- Two pieces of exterior fabric, 8 1/2″ by 6 1/2″
- One piece of fabric to make the zipper tabs, 2” x 4” (I used the same fabric as I did for the exterior)
- Two pieces of lining fabric, 8 1/2″ by 6 1/2″
- One 7” zipper
- Optional: interfacing (depending on the weight of your outer fabric, you might want to apply interfacing to give your pouch more structure; mine was pretty sturdy, so I skipped this step)
Directions:

Step 1:
Trim the ends of the zipper tape back to the metal stoppers on either end.
Step 2:
Fold the 2” by 4” piece of fabric in half lengthwise and press. Open it up and fold in one side to the center crease and press. Repeat for the other side. Fold again along the original center crease and press. Folded up, the piece should now measure 1/2” by 4”. Cut this in half so you have two tabs measuring 1/2” by 2”.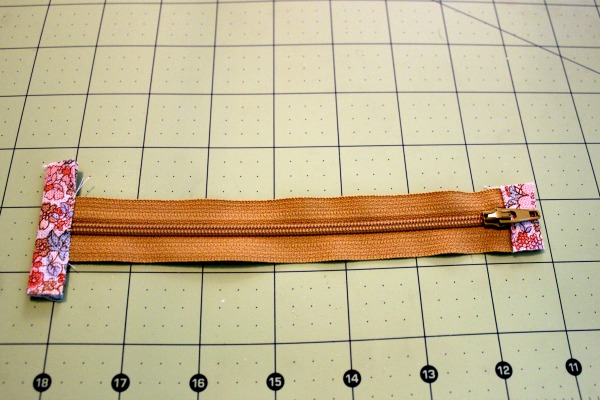
Step 3:
Open up one of the tabs and tuck the end of the zipper inside. Topstitch close to the zipper edge. For the zipper pull end, you’ll need to slightly unzip the zipper. Make sure the two sides of the zipper are as close together as possible when topstitching the tab on. Trim away any excess fabric on the raw edges of the zipper tab so that the tab is flush with the side of the zipper tape.
Step 4:
With one of your lining pieces right side up, center the zipper (also right side up) along the top edge. Place one piece of outer fabric right side down on top of the lining, with the zipper sandwiched in between.Step 5:
With your zipper foot attachment, sew along the top edge with a 1/4” seam allowance.
Step 6:
Press the lining and the outer fabric away from the zipper. Topstitch the lining and the outer fabric together by sewing along the edge of the zipper with a 1/8” seam allowance.Step 7:
Repeat Steps 4-6 with the other piece of lining and exterior fabric.
Step 8:
Unzip the zipper about 1 ½”. Pin the lining pieces, right sides together. Pin the outer pieces, right sides together. Starting with the lining side, sew with a 1/2” seam allowance. Don’t forget to leave around a 2” gap for turning in the lining. When you reach the zipper tabs, sew as close as you can next to them without sewing through them. If you pull back the seam allowances of the lining, you should be able to see where the zipper tabs are.Step 9:
Clip corners to reduce bulk and turn the pouch right side out through the gap left in the lining. Whip stitch the gap closed. Press.
It might go without saying, but the zipper tabs don’t need to match the exterior fabric of your garment or handbag. Use the covered zipper ends as an opportunity to add a bit of an accent. Scraps of leather or suede, or fabric in a contrasting color would work nicely, too.
Love zipper pouches? Check out Giftable Projects: Zippered Bags & Purse Organizer with Svetlana Sotak.
This is a great idea. I will be using this in the future.