
The Moxon twin-screw vise is useful for woodworking at all levels, from dabbler to expert.
There are many versions of it, but I will show you how to inexpensively and quickly make a highly functional vise without using special tools and with hardware available at your local store. In this series, I’ll also mention alternative methods, optional dedicated manufactured parts and, if you want to go deluxe, a complete proprietary version.
Follow along to learn how to build a Moxon vise:
Why you want one
Let’s start with some background to explain why you’ll want to make one. There are at least three benefits to this vise.
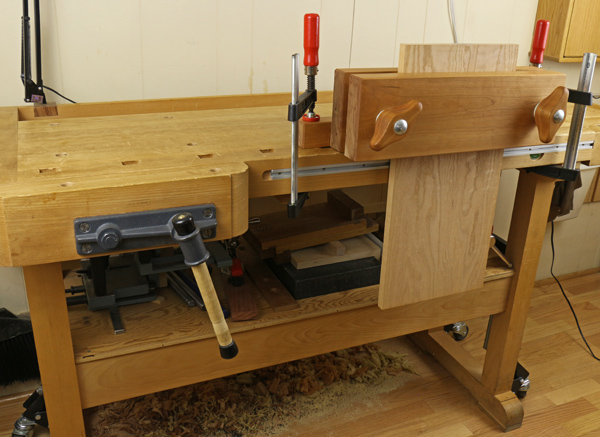
First, it raises the work piece about six inches above its usual position in a typical workbench vise. Compared to using the workbench’s face vise, a board clamped in the Moxon vise for sawing dovetails allows the woodworker to stand more comfortably when working. The height of most workbenches is fine for planing but not ideal for most people for the precise sawing required for dovetail joinery. Those extra inches can really matter during a long session at the bench.
Below, note the extra height provided by the Moxon vise compared to the workbench front vise.
Second, the Moxon can be made to your choice of width to accommodate wide boards that would be awkward or impossible to properly clamp in the typical workbench front vise. Joseph Moxon first described this vise as two to four feet long in Mechanix Exercises, the first English language book on woodworking. I built my vise with 14″ of width between the screws based on the projects I usually make. However, the vise is just as easily made with a 24″ width capacity and you might even want to make two — a handy 12″ and a 24″ vise.
Third, this vise is for every man – its best asset, in my opinion. I know that there are many woodworkers out there who work without the benefit of a real woodworking bench with high quality front and tail vises. Maybe you are using an old kitchen table, a flat door or piece of plywood sitting on a couple of sawhorses, or you just clear your desk and clamp on a cheap vise from the hardware store and go to work.
To these woodworkers, I say take heart, you can still make great things from wood. However, you do need an effective way to hold your work. The Moxon vise is easily made, portable and can be clamped onto just about any stable surface.
Getting to work
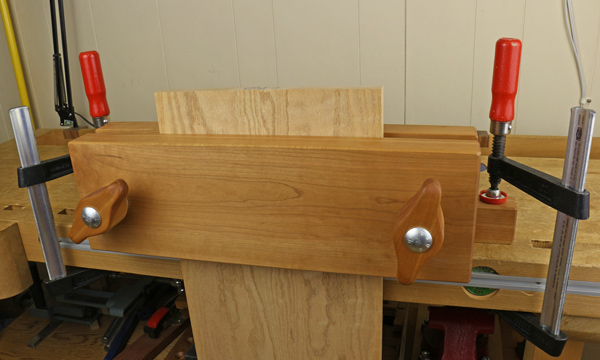
The vise needs to be beefy so start with 8/4 stock to prepare the two jaws. Quarter-sawn wood is ideal to avoid seasonal cupping, but flat-sawn wood will do. Joint one face of the stock and thickness it to 1 3/4″. Rip to 6″ width. Decide on the width capacity that you want and add 5″ to determine the length of the jaws. I used 19″ long jaws for mine.
Also, prepare a piece 1 3/4″ thick by 2″ wide that will be a brace attached behind the rear jaw. This can be the same length as the jaw or can extend 2 1/2″ longer at each side (total 5″) to make convenient placements for the clamps as shown in the opening photo.
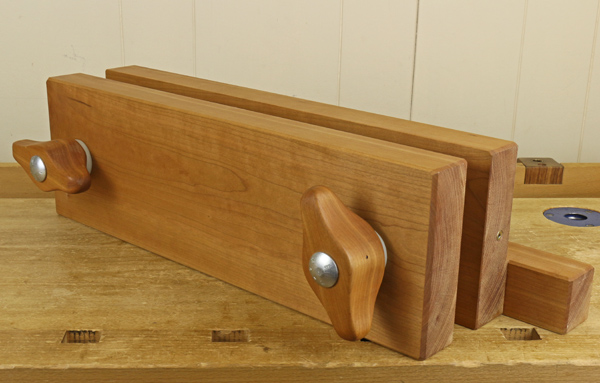
If you are using flat-sawn stock for the jaws, I recommend that you use a hand plane to create a slight concavity across the width of the inner faces and orient the growth rings in the same direction as in the photo above. This will help compensate for seasonal movement and prevent the work piece from being gripped not at the edges of the jaws but only at the interior, which would cause it to slip under lateral pressure.
In my next post, we’ll go through the details of drilling, specifying and working with the hardware, options for handles and assembly.
In the meantime, check out one of Bluprint’s many woodworking classes to keep improving your skills.
Why do you want to build your own vise?
Special Savings on Popular Woodworking Classes

Learn from the best instructors. Get up to 33% off classes you can watch anytime, anywhere, forever.Enroll Now to Save »
Share tips, start a discussion or ask one of our experts or other students a question.
No Responses to “How to Build a Moxon Vise: Part 1”