
One of the mysteries of weaving cloth, especially woolen fabric, is fulling.
Wool has a magical property that can take individual threads, sometimes woven very loosely, and once in the water transform them into a thick cloth with great insulation properties.
For wool fibers that will full (not all of types of wool will), wool fulling is an incremental process that can become rather extreme if carried on long enough. Learning how to monitor the process and stop when you reach the state of fulling you desire is something learned by doing, sort of like learning how to knead bread.
Wool fibers are sorted into two broad categories – woolen and worsted.
According to Watson’s Textile Design and Colour; Elementary Weaves and Figured Fabrics, Seventh Edition, by Z. Grosicki, woolen and worsted are defined this way:
- “A typical woolen yarn consists of short, fine wool, and contains all the varying lengths of the fibers, which are indiscriminately mixed together so that they lie across each other in all directions.”
- “A typical worsted yarn is made from long lustrous wool from which the short fibers are removed by combing, and all the processes tend to straighten the fibers.”
The difference in processing creates two yarns with very different characteristics. Woolen yarns are more lofty and a bit “spongy” with elasticity in comparison to worsted yarns, which are denser, smoother and generally have less elasticity and trapped air in them.
Woolen yarns are spun with the intention that they will be fulled during wet finishing while true worsted fabric is not fulled at all and only a few fibers classed as worsted will actually full.
Test the yarn for a project to make sure it will in fact feel full.
This is especially important now that so many “washable” wools are available in the market. Testing can be as easy as making a small butterfly or circle of yarn, wetting it out and rubbing vigorously between your hands.
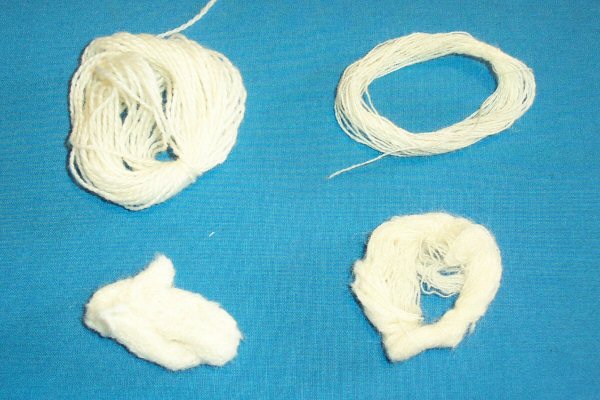
Two worsted yarns, before and after fulling.
In the photo above, the yarn on the left is a merino wool before (top) and after (below) fulling. The merino fulls readily. The other yarn on the right is an unidentified worsted yarn that really doesn’t want to do any fulling. It has not been treated, it is just one of the worsted yarns that doesn’t want to full.
About the wool fulling process
During wool fulling (the agitation part of the wet finishing process), the scales on the individual fibers open up and as the fibers are moved around, either by hand or machine, they begin to migrate and entangle with their neighbors. If fulled for long enough the fabric can become quite thick and dense.
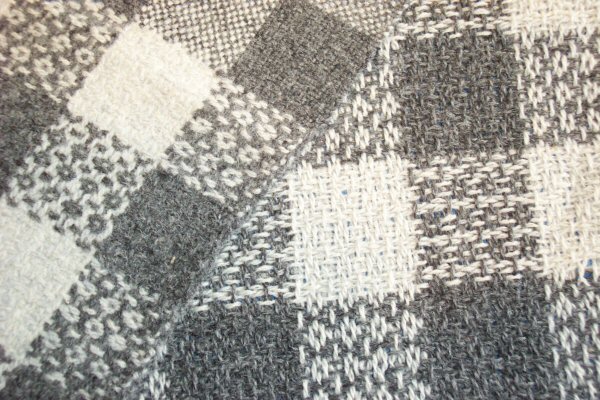
Two fabrics woven identically and fulled differently.
The two fabrics in the photo above were woven at the same time out of the same yarn in the same weave structure. They were, however, fulled differently. The fabric on the left (made into a round hat based on a medieval merchant’s hat) was fulled in a hammer mill for about 90 minutes. The cloth in the background is the same fabric, but after the initial fulling in the hammer mill was then fulled further in a front loading washing machine for 10 complete wash and rinse cycles. It is very thick, very dense and probably water resistant (although I haven’t actually tested it for that). It is also clear how much more the heavily fulled fabric has shrunk.
Current wisdom dictates that if you are going to do significant wool fulling the cloth must be very loosely constructed, whether you are weaving or knitting. This fabric, however, was actually woven quite densely. It was inspired by research into “vadmal” (similar to wool melton) that a Swedish friend had done.
One of the mysteries of fulling wool is that some wool can take a long time to get started but when it begins, the fulling process can go very quickly. If you are not familiar with the process it is wise to begin by hand, using cool water and monitor the cloth closely by running a fingernail under the threads to check for stability. As you become more experienced, you may find that you can start using the washing machine or the dryer (each piece of equipment will achieve slightly different results), or use hotter water, which tends to accelerate the wool fulling process.
When using a machine, never ever start the machine and walk away from it!
Monitor the process every 2 to 3 minutes until you start to see changes happening, then more frequently until the fulling has reached the desired final state.
Once you are comfortable with applying fulling to your cloth, you might like to experiment with some of the shrinkage differential effects that are possible when combining woolen yarn with yarn that doesn’t full.
In the photo below I used stripes of merino wool with stripes of soy protein fiber in order to get a seersucker effect.
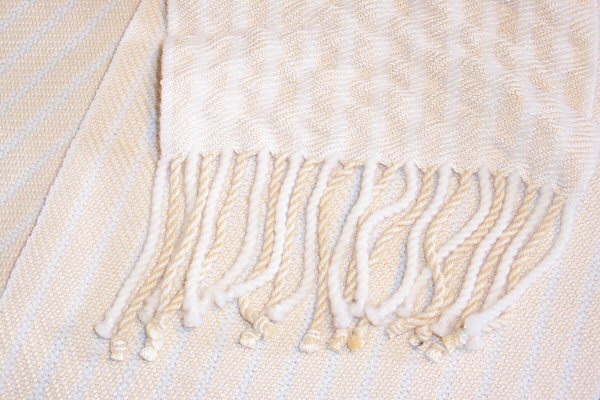
Two scarves showing the appearance before and after wet finishing and fulling.
[box type=”shadow”]Expand your understanding of the wools you work with in Bluprint’s FREE mini-class Know Your Wool, taught by author and wool expert Deborah Robson. You’ll explore wool markets and meet shepherds, vendors and sheep without ever leaving your home![/box]
Share tips, start a discussion or ask one of our experts or other students a question.
No Responses to “The Fulling Story: All About Fulling Wool”