
Copic markers have quickly become a favorite color medium choice among many card makers and crafters. Copics are high quality, refillable (which is a big bonus!), available in several styles and many colors. However, you don’t “need” numerous markers to achieve a blended/shaded image. In this Copic marker tutorial, ‘ll show you how to create shadow and depth with just one marker. But first, we’ll cover a few basics on how to use Copic markers.

Tips on how to use Copic markers
Paper and ink compatibility
A very important aspect of Copic coloring is finding a paper and ink combination that works. There are quite a few compatible papers and inks available, and many are marketed as “Copic compatible,” which eliminates the work of testing. Even so, I want to demonstrate the process so you can see what happens when the process doesn’t work.
To test paper, use a compatible ink pen to draw a shape on card stock. Using a Copic marker, color up to the edge of the drawn line, applying a good amount of ink. If the ink feathers across the drawn line, the paper is not a good choice.
To test ink, stamp an image onto your paper choice. Using the Colorless Blender, apply a good bit of solution over the image. Examine the stamped lines as the solution dries.
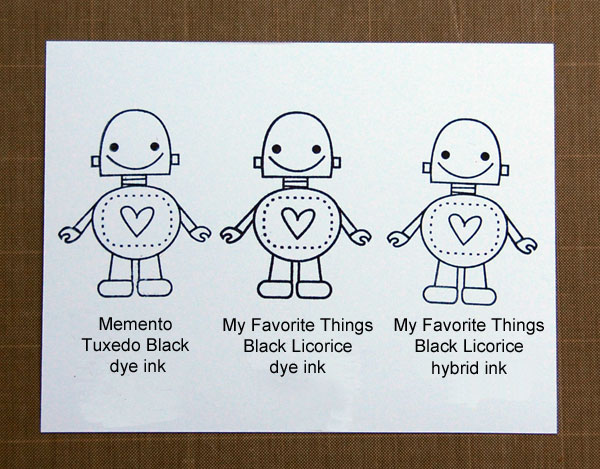
I’ve stamped an image onto X-Press It Blending Card using three different inks, then applied solution over the belly of each robot.

The first and third images have retained crisp stamped lines. However, the lines on the second image have spread and blurred, so that particular ink would not be a good choice. Note that the first and second images are both dye inks, so it’s important to test your inks before you begin. Achieving favorable results with one dye ink does not guarantee that all dye inks are compatible.
Basic coloring techniques
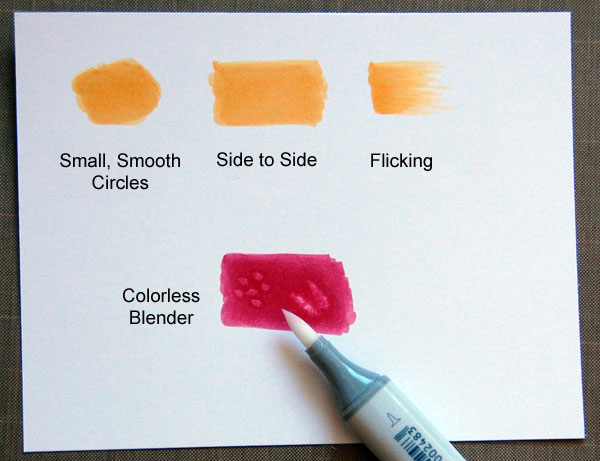
For a continuously smooth look, ink may be applied using smooth circular motions. As you move along the image applying color, be certain to overlap previously colored areas for smooth, even coverage. It can be difficult to achieve an evenly colored area using side-to-side motions. You can see on the sample above that the sides are darker as there is a higher concentration of ink in those areas while the center has a bit of a lined appearance.
Flicking can be used to add color, shadow or texture. The marker tip is flicked quickly across the paper, applying ink in one quick stroke. To begin, the marker should not rest on the paper or a blot of ink will appear at the beginning of each stroke. As soon as the marker is placed at the starting point (usually at the edge of an inked image or shape), the marker is quickly pulled across the area and lifted toward the end of each stroke. In the sample above, notice that there is a concentration of color at the beginning of the stroke with a “faded out” appearance toward the end.
The Colorless Blender, which is more of a color “mover” than “blender,” is an important addition to your Copic marker collection. It has no color and is made up entirely of alcohol solution. In the sample above, after holding the Blender in place, a lighter color develops as the color is pushed away from the marker. The Colorless Blender has many uses, some of which include adding texture, lightening color, creating faded backgrounds or fixing mistakes. If you happen to color a bit outside of a line, use the tip of the Colorless Blender to “push” the ink back toward the stamped line. (Note that some colors are easier to correct than others.)
Copic marker tutorial
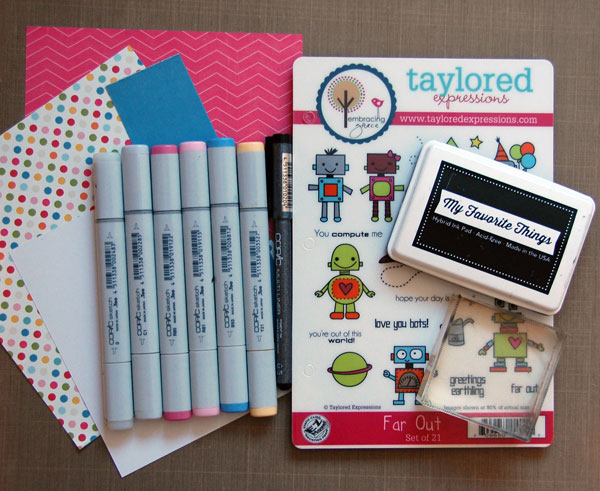
Supplies you’ll need:
- Copic markers (I used B93, C1, R81, R85 and Y21)
- Copic Colorless Blender
- Black Copic 0.5 Multiliner
- Compatible card stock (I used X-Press It Blending Card)
- Compatible ink (I used My Favorite Things Black Licorice hybrid ink)
- Stamps (I used Far Out by Taylored Expressions)
- Acrylic block or stamp press
- Patterned paper (if desired)
How to add color and shadow using one marker

Step 1:
Using Y21 and small circular motions, color female robot’s head, body, stripes on legs and feet.

Step 2:
Using small flicking motions and Y21 marker, begin to add shadow along edges of image. I applied a higher concentration of color in the cheek area.

Step 3:
Using R85, add color to bow, ears, arms and stripes on legs. Use small flicking motions to add shadow to bow, along bottom edges of arms and inside edges of leg stripes. Color belly using R81.

Step 4:
Repeat process on male robot using B93, C1 and Y21.

Step 5:
Apply Colorless Blender solution around base of images. This will help to blend ground color application, leaving edges light.

Step 6:
Apply C1 over Blender Solution. Once dry, apply higher concentration of C1 around base of images and between images. Blender solution can be applied around the edges again for further lightening.

Step 7:
Stamp hearts above images, coloring with R81 and lightly outlining left side of each heart with R85. Continue to add shading to images if desired, adding layers of each color to add dimension. Once coloring is complete, I like to use a black Copic Multiliner to darken eyes and/or fix any small stamped line areas that may not have stamped solidly.

And there you have it — a quick tutorial on how to use Copic markers!
Ready to learn more?
Get the most from your stamps and create colorful handmade cards with the online class Vibrant Stamping: Creative Color Techniques. Sign up today to learn fresh techniques, get professional tips and enjoy an entire lesson on coloring with Copic markers!
What makes online Craftsy classes great?

Learn for life! With lifetime access to your classes, you can watch lessons at your preferred pace and easily revisit your favorite concepts with just a click.

Kick up your feet! Enjoy classes anytime from the convenience of your home or even on-the-go with our mobile apps.

Get personalized guidance! Ask your instructor questions to receive all the answers and feedback you need to succeed.

Love it! There’s no risk in trying with our 100% money back guarantee.
Share tips, start a discussion or ask one of our experts or other students a question.
No Responses to “Quick Copic Marker Tutorial: Basic Coloring and Shading”