
A printed book in general, and a children’s book in particular, contains a unique feature that is often ignored by readers, and sometimes employed to great effect by the illustrator or book designer. Endpapers have been around since the creation of hardcover books, and besides being decorative, they serve the critical purpose of attaching the block of pages to the cover of the book.

In the 1700s and 1800s, there was a long tradition of using marbled papers for endpapers. Another popular tradition is a pictorial endpaper, with an illustration culled from the book’s contents, or created especially for that purpose. Maps are a special kind of pictorial endpaper, and fantasy or sci-fi authors often include them to help describe the worlds they create. Here is one of Pooh’s 100-Acre Wood.
When used well, endpapers can introduce the mood of a book, or they can act as a kind of inside joke that you won’t get until you read the story inside. The jungly tumble of leaves and color prepare us for the land of the Wild Things in Maurice Sendak’s Where the Wild Things Are. Jon Klassen’s frequent collaborator, author Mac Barnett, pointed out that the endpapers in This Is Not My Hat are a pleasing decorative pattern at the start of the book, and the scene of a grisly murder by the end. And in Klassen’s I Want My Hat Back, the bear is missing his hat in the front endpapers, but has recovered it by the back endpapers. Mo Willems always includes his famous pigeon in the pattern at the end of his books.
Bob Staake’s endpapers are usually bright geometric patterns filled with the book’s characters. Staake and his collaborator Kristen Held have written The Art of the End, which celebrates the art of endpapers.
Patterned endpapers are probably the most common form of endpapers. My mother is a quilter, and I grew up surrounded by textures and patterns on the fabrics she used in her work. When I first tried to make my own repeating patterns, I discovered that it was easy to attempt, and challenging to master—my favorite kind of tangled puzzle to solve.
Let’s explore making our own book endpaper.
I first tried creating a pattern by hand, using ink and paper, after reading Julia Rothman’s wonderful tutorial on Design*Sponge. After some experience with the technique, I’ve learned the critical steps are to make sure your paper has 90-degree angles at the corners, and that you take time to fill up the center of the paper as much as possible before cutting and rearranging the paper.
In the books I’ve illustrated, I end up drawing my patterns digitally. I’ve done a simpler geometric pattern, and far more complicated ones. I love tinkering with the patters so much that I’m considering something M.C. Escher-esque for my next book, which will be full of monkeys. For this exercise, I’ll keep it a little simpler (but still, lots of monkeys!)
Step 1: Draw in the middle
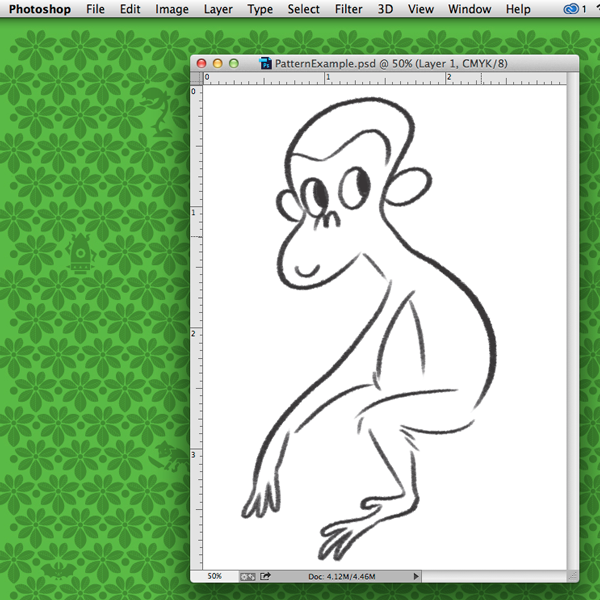
Much like in Julia Rothman’s paper and ink tutorial, you want to begin by drawing in the center of your document. Unlike that tutorial, we are going to draw directly into Photoshop. Start with an empty layer. To make later steps simpler, do not draw directly onto the background layer.
I draw with a Wacom Cintiq, but any drawing tablet, or even a mouse or trackpad, will be enough to experiment with the technique. The important step to making a seamless repeating pattern is to not draw all the way to the edge. If you do, the mark will show where the edges of your pattern were made, and it will take away from the magic of the repeat.
Step 2: Offset
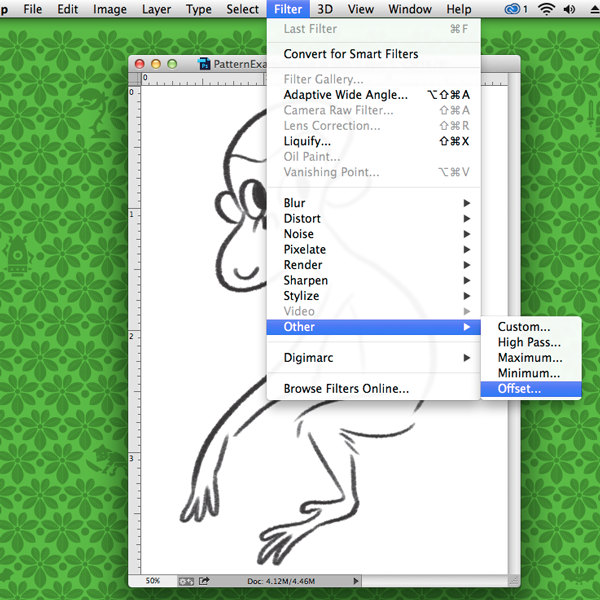
With Rothman’s tutorial, the next step is to cut your paper into quarters and swap things around until you have a new center space to fill up. We are going to use the digital equivalent with Photoshop’s “Offset” filter, found under Filter > Other > Offset.
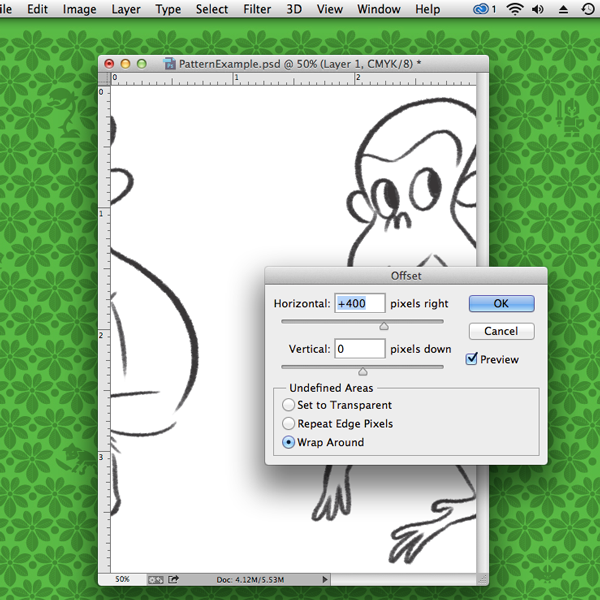
Once you get the offset dialog box, make sure “Preview” is checked, and that “Wrap Around” is selected for the “Undefined Areas.” This is essentially like moving the drawing over, except that anything that goes off the edge of the document simply shows up again on the other side.
In my example here, I’ve chosen to move the drawing only horizontally. You can also move it vertically at the same time. For my pattern, I wanted to create a horizontal repeat, and then offset the next row to create a brick-like repeat, as you will see in the later steps.
Step 3: Draw in the middle (again)
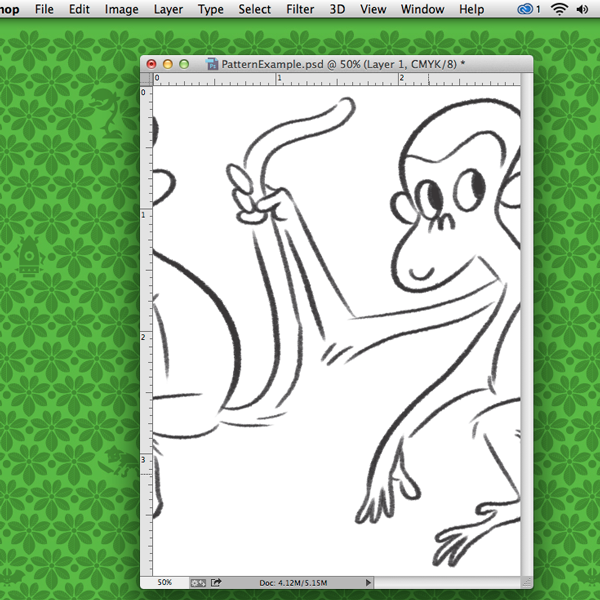
Now that things are rearranged a bit, I have space to fill in the overlapping details. I fill in the open space with more of my drawing, and in this example, I’ve made the monkey on the right grab the tail of the monkey on the left.
Step 4: Fill in the details
After I have drawn the repeating part of my pattern, I am ready to color it and add details. Until now, I have been drawing all on one layer for the lines, but I added a new layer for the color underneath.
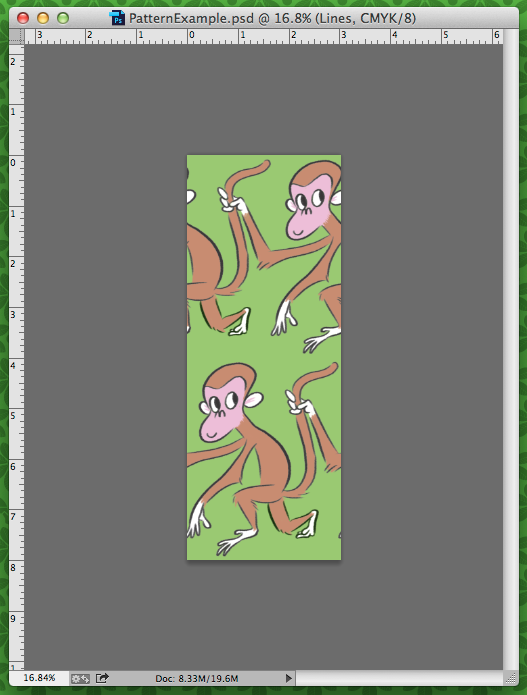
I’ve skipped ahead here a bit, and I have doubled the height of my canvas by going to Image > Canvas Size and then copied my pattern to another row. Then I offset (Filter > Other > Offset, like before) that copy of the pattern to make the overall pattern less strict and rigid. It is a bunch of monkeys, after all (I’m showing my restraint by not drawing a lot of bananas, too.).
If you squint a bit and pull your face away, you can sort of imagine what this will look like when it repeats all over the place. Fortunately, you don’t have to imagine it thanks to Photoshop again.
Step 5: Tile it
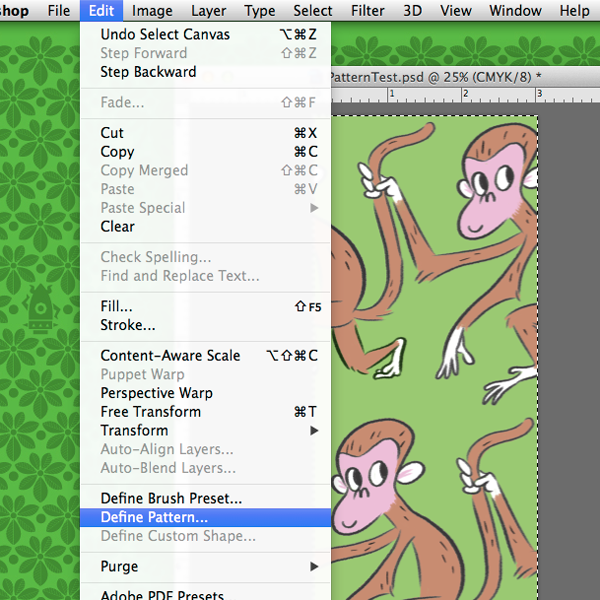
For this next step, I saved my working file with a new name, because I’m going to flatten the file and lose all my layer separations. By saving to a new file, I can repair any mistakes I find more easily, without having to re-engineer my pattern. I select everything (Select > All), and then go to define this selection as a pattern under Edit > Define Pattern. Now my drawing is a repeatable tile inside of Photoshop.
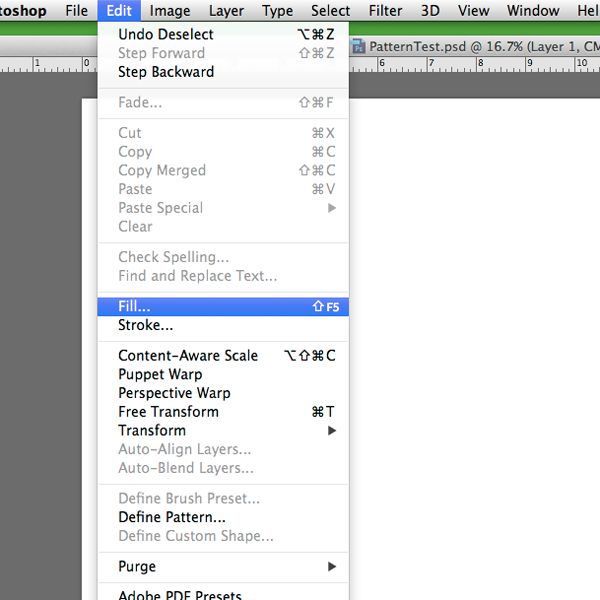
Next, I create a new canvas, several times larger than before, so my pattern can fill it up. Then I go to Edit > Fill to test out the pattern.
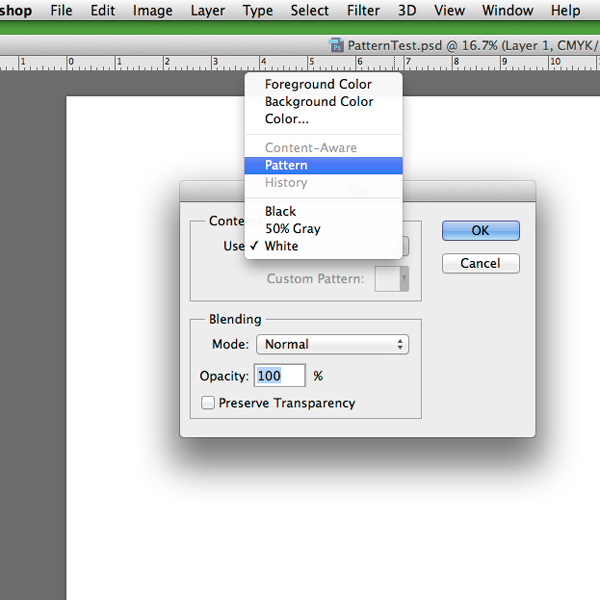
In the dialog box that appears, next to “Use:” select “Pattern” from the drop-down menu.
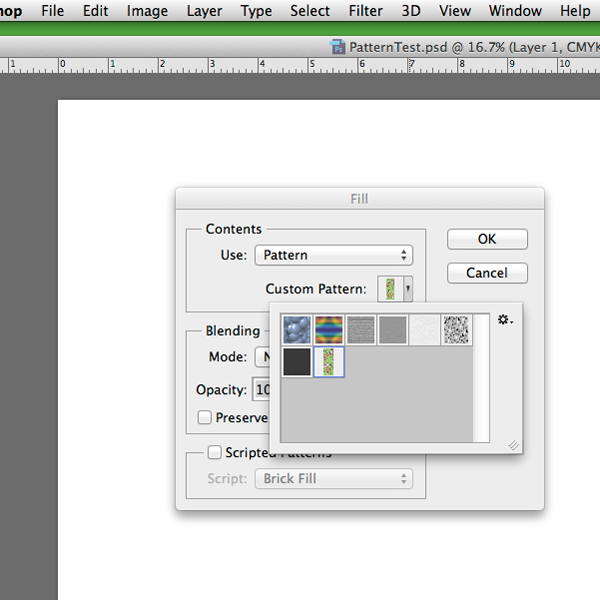
Then I can choose which pattern I want to use from the now-available “Custom Pattern:” menu. My monkey pattern is the newest one, added at the bottom of the pattern swatches.
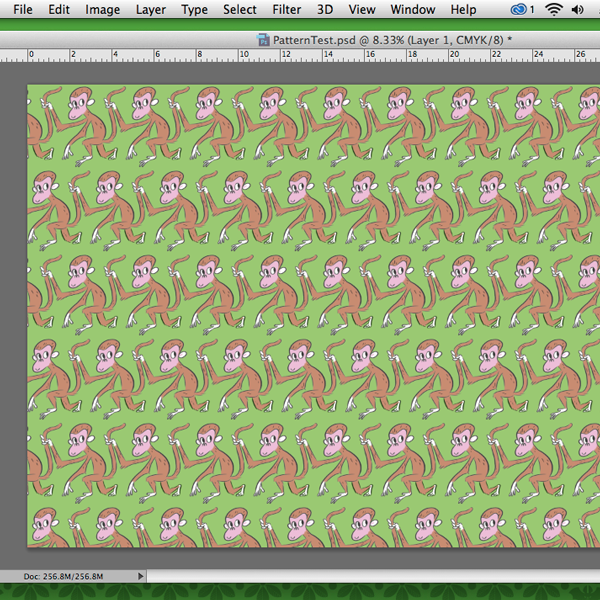
After I click “OK”, my daisy-chain of monkeys is filling up the document! I have used variations of this technique for all of the endpapers I’ve drawn, but I’ve tinkered with the technique to create patterns for other uses such as wrapping paper, and perhaps I will soon be able to add a fat quarter or two to my mother’s fabric supply, too!

Share tips, start a discussion or ask one of our experts or other students a question.
No Responses to “Book Endpaper: What You Never Knew You Wanted to Make”