
Autofocus is a wonderful thing in photography, and like most of the technology on your DSLR, it does exactly what you want about three-quarters of the time without any other input. You press the shutter, the camera finds the subject, and in a split second grabs focus on the subject and takes the shot. Sometimes the autofocus system does not get it right, and in those cases, it’s good to know how the system works so that you can make corrections quickly and not miss your shot.
Many cameras have these 9 AF points
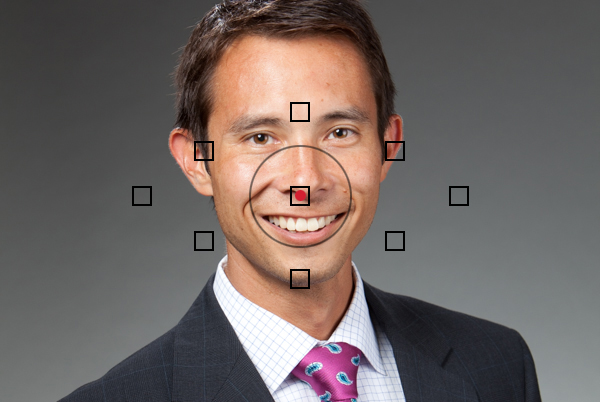
What are AF points?
When you look through the viewfinder of your camera you will typically see a number of squares or rectangles in a pattern. Each of these are AF points. Some cameras have 9 AF points, some have 11, some have 45 or 51, and by the time you read this, some cameras will probably have 900 AF points.
Each camera is able to use its AF points to calculate how far away your subject is from the camera and therefore at what distance to focus. At least one AF point must be pointed at your subject for this distance to be properly calculated. Common sense tells us that more AF points means a greater chance of your subject being on one of your AF points.
How does it work?
A DSLR will generally either use contrast detection or phase detection, or a hybrid of both. In very simple terms, contrast detection is looking for the maximum amount of contrast to determine focus. When something looks blurry, you don’t see contrast between the edges of tones. Phase detection is looking for equal amounts of light entering either side of the lens, based on the fact that any point in focus should illuminate both sides equally. If you are interested in learning more about the science of it, check out the post “How Autofocus Often Works” on LensRentals.
The important thing to remember is that if you need contrast or equal amounts of light, either way, you need light. Autofocus does not work well in the dark and it does not work well on solid blocks of the same tone. It needs some texture or mix of tones to work at all. Try autofocusing on a clean blank wall or a clear blue sky. You will notice the AF system struggling to find a point on which to focus.
What to do when it doesn’t work.
In general, you will find your autofocus not working when there is either not enough light or not enough contrast between the parts of your frame.
If there is not enough light, you can provide some light by opening a shade, turning on a light, or using flashes. Or you can move your subject to somewhere with better light.
If there is not enough contrast, you can move your frame such that one of the autofocus points is over a more contrasted part of the image.
Or, if nothing else works, switch over to manual focus and use the best focus sensor you have: your eye.
Get the most from your AF system.
Instead of relying on all of my autofocus points to do the focusing work for me, I like to use just one point at a time for most of my photos. I have found that I can work quickly and more accurately by setting the camera to the center AF point. I will place my subject in the center of the frame, press the shutter down halfway to lock the focus, and then recompose the frame how I want it. Most of the time, this works very well. I can run into issues if I’m using a very shallow depth of field because the focus can change upon recomposing. But 9 times out of 10 my subject stays sharp. You can also use this method with a back focusing button or by using any one of the other AF points.
Share tips, start a discussion or ask one of our experts or other students a question.
No Responses to “Photography Friday: Understanding Autofocus Points”