
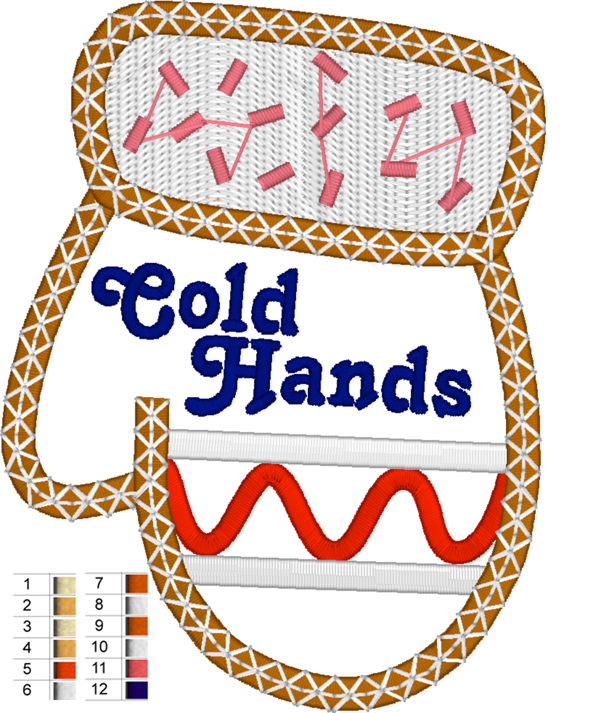
I have never been much of a winter fan so that is probably why I have always appreciated the “cold hands, warm heart” idiom. Here is an easy machine embroidery mitten project you can create in the hoop.

Photos via Debbie Henry
These freestanding appliqué Christmas ornaments are so cute you can leave them up all winter!

The Christmas Cookie appliqué collection by Sew Inspired by Bonnie is so versatile. You may remember this tutorial PDF of my freestanding appliqué technique that was featured in Marjorie Busby’s Bluprint blog Machine Embroidery Ideas: Cookies and Patches. With a few simple adaptations, the mitten design in this set can be made into an adorable decoration.
Get the Christmas Cookie designs here.
This project requires running color stops out of order and rotating a design file. If you need a refresher on manipulating design files and jumping through design sequences, check out these Bluprint classes: Elements of Design Editing and Embroidery Software Essentials.
Let’s create a mitten ornament!
The basics:
- Use good quality wool felt.
- Because the appliqué will be fully reversible, use the same color thread in the bobbin as that with which you are stitching.
- Loosen top thread tension to compensate for the thickness of the felt.
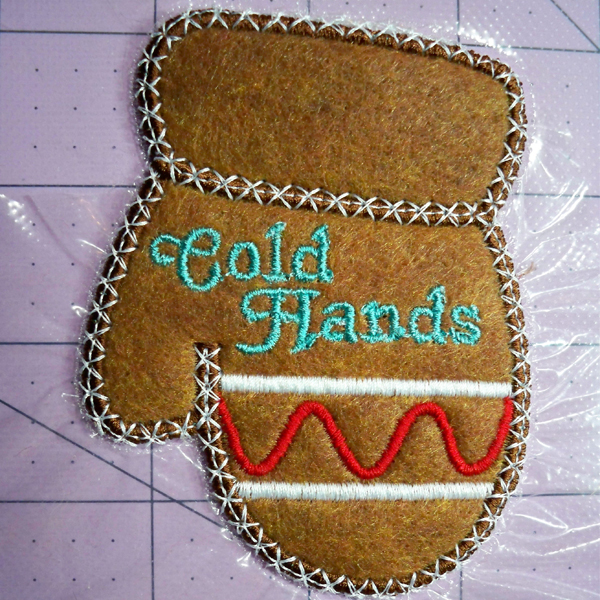
Cold Hands mitten
- Hoop your stabilizer. In the original tutorial, I used water-soluble stabilizer. I now prefer to use heat-away stabilizer because it tears away cleanly without any rinsing, but either one will work.
- Rotate the mitten design 180 degrees so the thumb points to the left as you are looking at it.
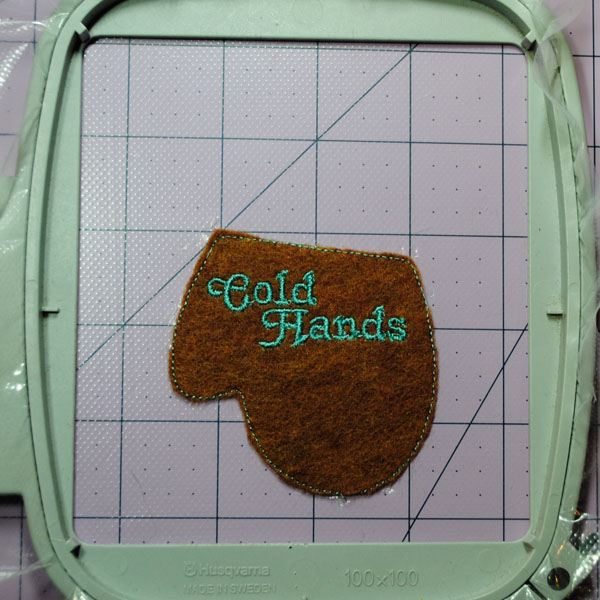
- Stitch the first color stop, a placement stitch for the hand of the mitten. Remove the hoop from the machine. Spray the back of a piece of felt with temporary spray adhesive and finger-press it in place in the hoop. Reattach the hoop and run the second color stop, the tack-down stitch. Remove the hoop and carefully clip away excess felt close to the tack-down stitching.
- Reattach the hoop and run the “Cold Hands” text file. You can download it here for free!
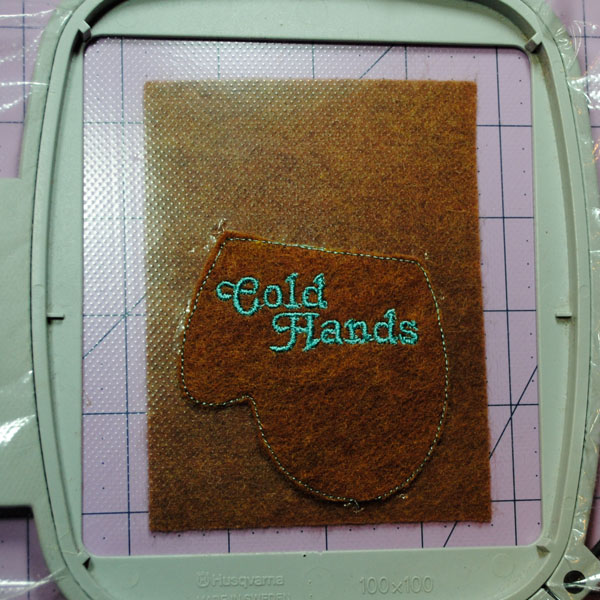
- Take the hoop off of the machine, spray another piece of felt with temporary spray adhesive and finger-press it on the back of the design. Reattach the hoop and run the first tack-down stitch again (color stop 2).
- Remove the hoop. Carefully trim the back of the mitten close to the tack-down stitching. The back of the “Cold Hands” wording is now nicely hidden.
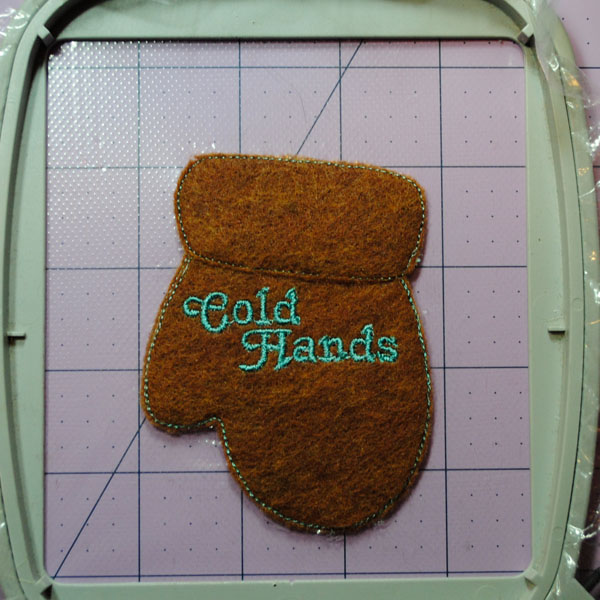
- Reattach the hoop and continue stitching the cuff. After the cuff placement stitch (color stop 3), remove the hoop, use temporary spray adhesive on two pieces of felt and finger press them in place on the front and back of the stabilizer.

- Reattach the hoop and run the cuff tack-down stitch (color stop 4) and it attaches the front and back cuff pieces at the same time.
- Remove the hoop from the machine and trim the excess felt from the cuffs.
 Cut a piece of stabilizer slightly larger than the mitten and spray it with temporary adhesive. Finger-press it to the back of the hoop. This will help support the applique satin stitches which tend to perforate, separating the design from the stabilizer.
- Continue with the rest of the stitching sequence, being sure to change the bobbin thread to match the embroidery thread. Skip color stops 10 and 11, which add stitching inside the cuff area.

- When stitching is complete, remove the piece from the hoop and carefully tear away the stabilizer.

- Tear the stabilizer from the back. It looks almost as good as the front!
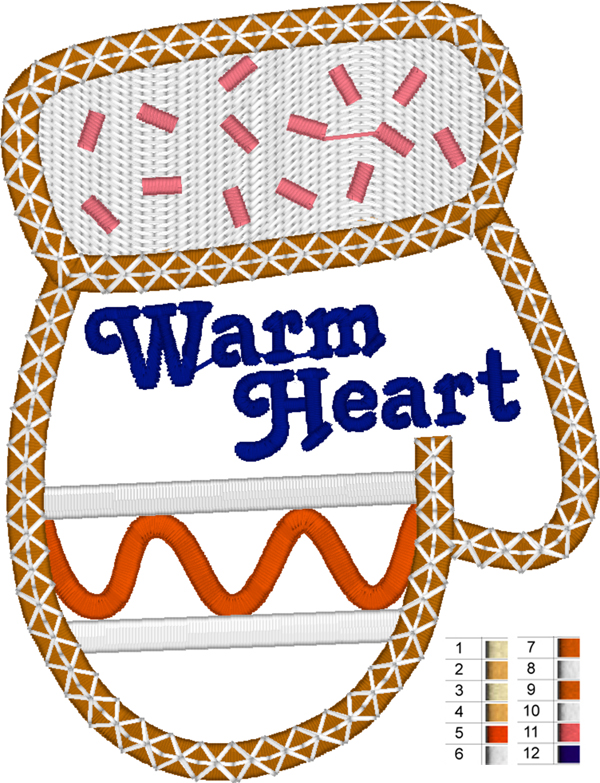
Warm Heart mitten
- Hoop your stabilizer.
- Rotate the mitten design 180 degrees, then flip the design horizontally so the thumb points to the right as you are looking at it.
- Stitch the first color stop, a placement stitch for the hand of the mitten. Remove the hoop from the machine. Spray the back of a piece of felt with temporary spray adhesive and finger-press it in place in the hoop. Reattach the hoop and run the second color stop, the tack-down stitch. Remove the hoop and carefully clip away excess felt close to the tack-down stitching.
- Reattach the hoop and run the “Warm Heart” text file. You can download it here for free!
- Continue with steps 5 through 13 above.
Assembling the mittens
- Attach decorative buttons to the cuffs.
- Using four miniature clothes pins, pin each cuff to a six-inch wire hanger.
- Display and enjoy!

I was sew excited to see SewEnspiredByBonnie on Craftsy, but the link isn't working and now I am questioning the working relationship. I would love to stitch these mittens. The link works for the wording on the design, but not for the mitten design - not even to purchase :(