
Pen and ink drawing is a popular medium of choice for artists with patience. It requires considerable planning and long hours of execution to create a beautiful artwork. Nevertheless, its unique properties make it fun to tap into because you can make a range of drawings, from realistic renderings to more stylized and abstract compositions. Pen and ink can also be combined with watercolors, watercolor pencils, ink washes and colored pencils for additional effects. For complete, in-depth guidance on pen and ink drawing, watch Pen & Ink Essentials on Craftsy.
Learn basic pen and ink techniques so you can draw confidently!
Tools
While in art school, my classmates an I learned to draw with inked quills of various thicknesses, but I’ve discovered that it’s not necessary to buy quills and ink to learn pen and ink drawing. You can play with a ballpoint point, an ultra-fine-point felt-tip marker, fiber-tip pens or pens made specifically for artists. Unlike the quills that can spill unwanted ink on your drawing, technical pens give the artist precision and control. Using ink pens, you can make drawings look like realist engravings or work in a loose and sketchy, or the pointillist style.
Pen recommendations
The Koh-I-Noor Rapidograph Pens are versatile drawing pens with a range of point sizes that use waterproof ink in several colors. They aren’t cheap, but they’re a good investment, as you won’t have to fight with them as you work.
A good alternative to such pens is the Faber-Castell PITT Artist Pen. They also come in various sizes and nibs and have waterproof India ink inside the high-quality nibs. The drawing above was completed using the XS black PITT pen.
India inks vary in quality, which affects the drying time, permanence, opacity, and adhesion to the drawing paper. Buy the permanent black India ink and stay away from the dye-based colored inks that fade eventually.
Paper
Paper quality matters, too. The heavier the drawing paper, the better it is for pen and ink, especially if you combine it with water media. Try illustration boards, bristol boards, bristol paper, mixed media and watercolor papers.
Pen and ink techniques to know
1. Avoid mistakes.
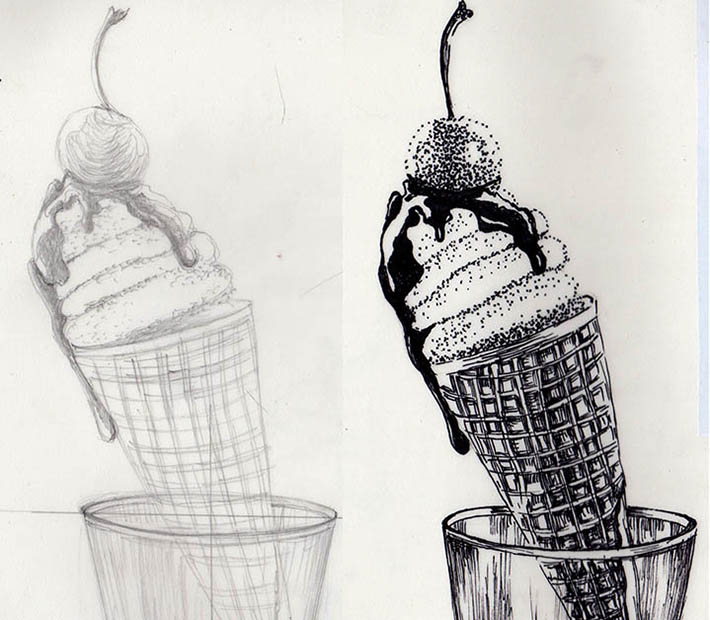
When you draw in ink, you know that you can’t really fix mistakes, which can be a bit frightening. To avoid possible frustration, I draw everything in graphite first and then repeat the process and the chosen strokes using the pen and ink, as shown in this Sharpie sketch of an ice cream cone above.
Small mistakes can be fixed with a liquid paper, but to minimize the risk of mistakes, practice your strokes on some scrap paper before committing to working on a “masterpiece.”
2. Create texture with pen strokes.
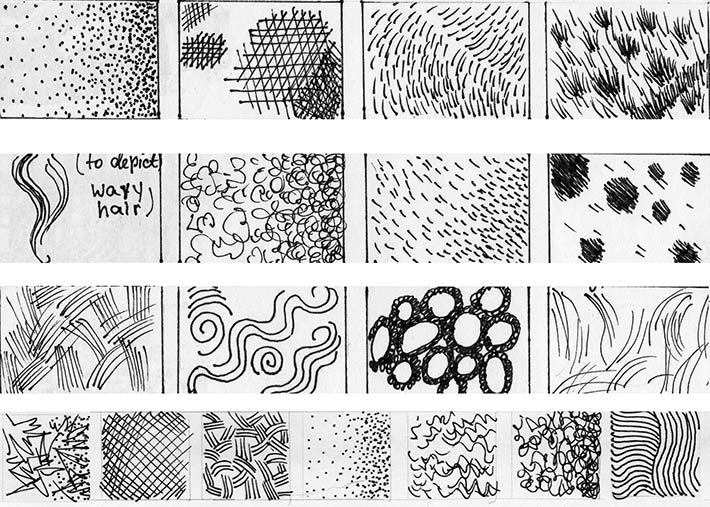
Pen and ink is all about texture and coming up with a unique stroke to describe a subject. Below, you can see a variety of strokes done with an ultra-fine-point marker to depict a variety of textures, including the animal fur, wood, landscapes, etc. Most common are contour lines that follow the curves of your subject. Hatching, crosshatching, and scribbled lines are common, too.
3. Use stroke direction to depict your subject.
Usually, pen and ink drawings consist of a combination of line structures, but sometimes the artist chooses to use a single stroke to describe everything. In this case, only the values, direction and length of the stroke differs. What’s important in pen and ink drawing is to have the correct direction of all strokes, describing the object and the right choice of texture to imitate the surface. So look at your object and think what stroke you’d like to use to describe it. Then consider the direction of your strokes: Up and down? Sideways? In a circle? Below are examples of the strokes that vary in direction, strength, and density.
4. Create contrast by layering strokes.
No matter what medium you use, it’s important to pay attention to composition, contrast, and value. In pen and ink, values are build by layering the black strokes one another. The highlights or the lightest areas must stay free of any mark-making. Resist filling in the lights, as any marking instantly leads to loss of contrast.
5. Try mixing pen and ink with other media.
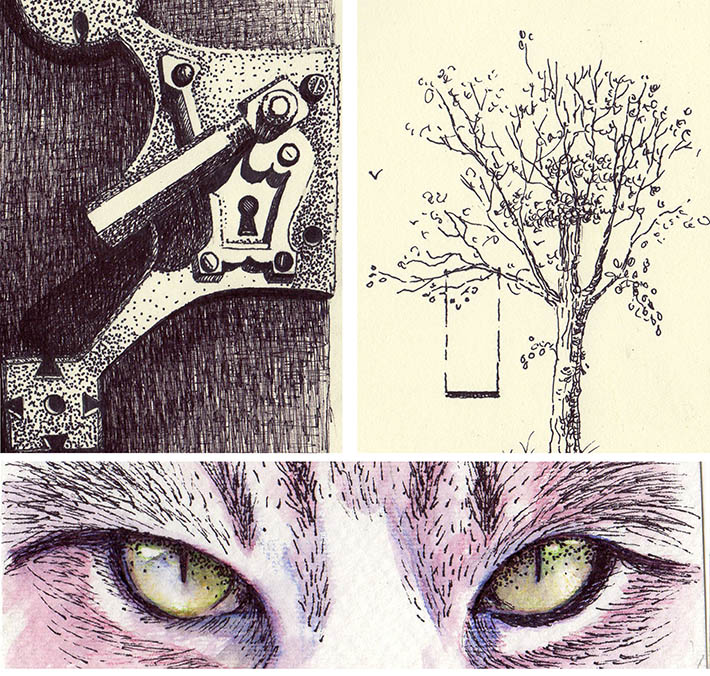
In the sketch of cat’s eyes above, I used watercolor pencils first and then applied pen and ink over the color. Pen mixes well with countless mediums, especially acrylics and watercolor paints. Even when mixing media, you can stick to the rules and techniques described above.
Share tips, start a discussion or ask one of our experts or other students a question.
No Responses to “Learn These 5 Basic Pen & Ink Techniques”