
With fall and winter holidays approaching, it’s fun to start thinking about making personalized gifts. Last year, I used my embroidery machine to make Christmas ornaments and gift tags using pre-cut shapes.
Machine embroidered gift tags are a quick and easy project.
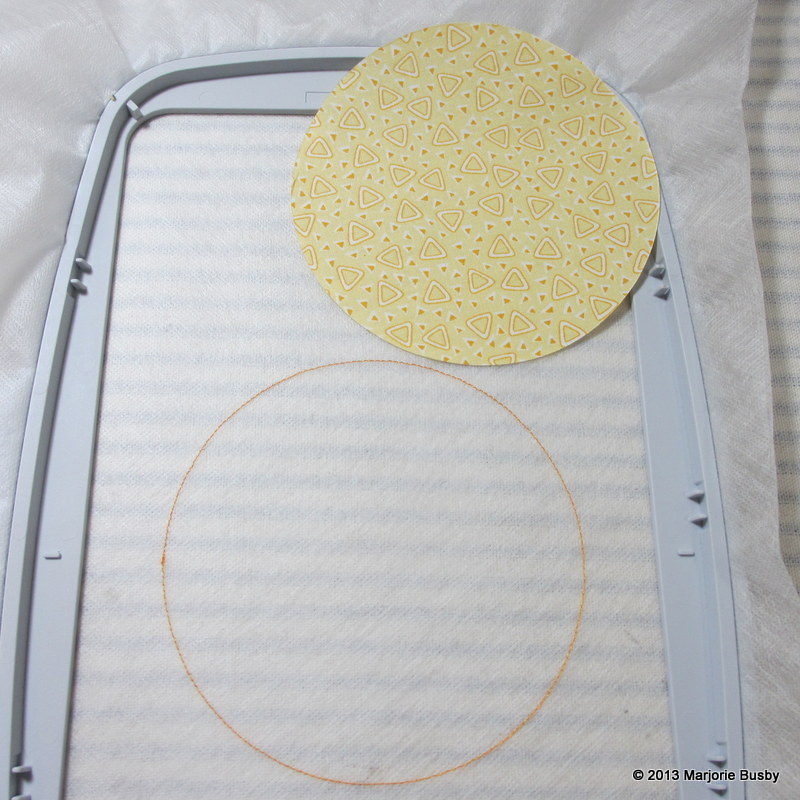
The above photo shows some of the gift tags I made with die-cut circle shapes using the AccuQuilt GO! die-cutting machine. You can make these for any season or celebration, and customize them to your liking with novelty fabrics. The design is stitched on the front, and the back is left blank so you can write a message to the recipient using a thin tip permanent or fabric marker.
Supplies Needed:
- Wash-away stabilizer
- Die-cut circle shapes for a 3″ circle (I used the AccuQuilt GO! and die #55012)
- Die-cut circle shapes cut from medium weight fusible craft interfacing
- Water soluble craft glue (Elmer’s School Glue purple glue stick works great for this)
- Thread
- Bobbins wound with the same thread you will use for the finishing satin stitch
- 1/8″-1/4″ satin or decorative ribbon
- Transparent tape
- Embroidery machine
- Designs for gift tags
Steps for making the gift tag:
Step 1:
Stitch the placement line (the first color of the design) and use a water soluble craft glue to attach the shape just inside the stitching lines.
Step 2:
Complete decorative stitches by using a tack down stitch to hold the shape in place.
Note: Each design is different so you will have to follow the directions for each design.
Step 3:
Add ribbon to the back by placing it exactly at the top of the shape. To hold the ribbon in place, use one strip of transparent tape just above the top of the circle and another strip of tape at the edge of the hoop to ensure the tails of the ribbon cannot get caught in the stitching.
Step 4:
Mount the hoop onto the machine. Complete the tack down stitches first to hold the shape on the back in place. Then, complete the satin stitches. Be sure that you have a matching thread in the bobbin for the satin stitches.
Some tips:
Choosing a wash-away stabilizer
There are many wash-away stabilizers on the market. They generally come in three varieties: a paper type wash-away/tear-away stabilizer, an opaque/clear solid stabilizer (feels like plastic wrap), and a mesh wash-away stabilizer. The latter is what I used for this project. It is definitely my preference for all future projects where I need a clean finish on the edge. It dissolves very much like the opaque/clear stabilizers, but the mesh is more like a fabric and holds up better with denser stitches.
Cutting circle shapes
The die-cutting process uses a roller to create pressure between the mat and the foam-embedded blade. This means that the fabric may stretch slightly as it goes through the roller, potentially causing minor distortion of the shape. To prevent this distortion, use a layer of paper between the foam and the blade when cutting. Old catalogs, magazines and scrap paper can be repurposed for die cutting.
Another means to help prevent distortion is to be sure that the lengthwise grain of the fabric matches the lengthwise edge of the cutting die. The lengthwise grain is less stretchy than the crosswise grain, so by feeding the less stretchy grain through the roller, you will get less distortion.
Fusing interfacing to circle shapes
You can fuse the medium weight craft interfacing to the circle shapes before cutting, thus eliminating the need to use paper or the lengthwise grain of fabric.
Another method for fusing the interfacing is to cut the fabric and interfacing circle shapes separately and fuse them one by one with the iron.
Gluing fabric shapes to wash-away stabilizer.
The integrity of a wash-away stabilizer may be compromised by a moist adhesive. It did not affect the Avalon Plus by Madeira that I used. However, to be safe, the best way to glue the shape to the stabilizer is to apply the glue to the interfacing on the fabric shape and not to the stabilizer itself. You will need to press the shape firmly with your fingers so that it adheres until you have completed the tack down stitches.
When attaching the shape to the back, place it carefully inside the stitching lines, turn it to the right side so that you don’t loosen the stabilizer in the hoop. Then, press firmly with your fingers to make certain it will stay in place until you have completed the tack down stitches. The glue does not have to dry before stitching.
I’ve never had a problem with glue sticking to the needle or the thread, so once you feel the shape is securely glued into place, go ahead and begin your stitching.
Although I made machine embroidered gift tags last year, there were new discoveries with this project. One of the most important was the discovery of a new stabilizer. What kind of wash-away stabilizer do you use in machine embroidery in-the-hoop projects? I also discovered what a nice structure is created by using the craft fusible interfacing.
Share tips, start a discussion or ask one of our experts or other students a question.
No Responses to “Machine Embroidered Gift Tags”