
One of the great advantages of hand-knitted clothing is that we can customize the garment to make it fit the way a store-bought item only fits in the movies. One of the areas of a garment most in need of customization is the bust area. Garment patterns generally come in small, medium, and large. So what’s a short, well-endowed gal to do? Add bust darts, of course! Even for a smaller-chested woman, it’s still a good idea to add darts in the bust to make your fit better. Why make a sweater with a flat front when we all have some curves?
You can adjust the bust of any garment pattern by adding in custom darts. There are two basic styles of darts: short row darts and vertical darts.
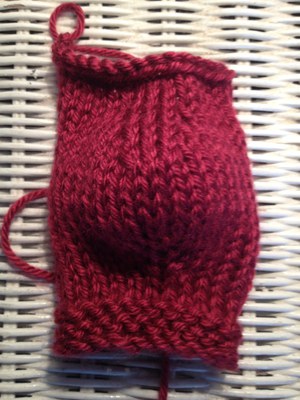
Short Row Darts
Short row darts are exactly what they sound like. If you’ve made a pair of socks or shaped a sweater collar, you should be familiar with short row shaping. Starting at the armhole side of your garment, you can work short rows to create that extra room you need in the bust area. There are formulas you can follow based on a comparison between measurements at different points of your body. Or you can take a slightly more generalized approach and add 1 inch of short rows per cup size (1 inch for A cup, 2 for B cup, etc.)
Your short rows aren’t changing the side seams. They’re just adding volume in the chest area of the garment.
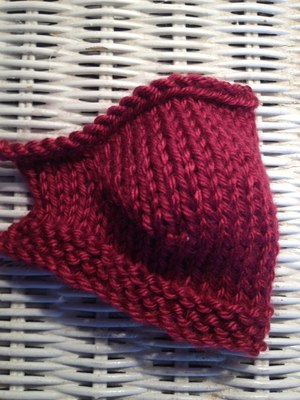
Vertical Darts
Vertical darts use increases or decreases at the same spot in each row to change the size of the bust area. The visual effect will look most like a traditional dart you would see on a sewn dress. We’re used to creating gradual increases and decreases to shape sleeves and to adjust the waistline. In those areas, you might work an increase or decrease every 4 rows or so. In the bust area, we don’t have room for gradual increases. The increases have to come every row.
You want vertical darts to fit over the center, high point of each breast, so measure your chest to decide where to insert the darts. Find the stitch that is the centerpoint and work your increases and decreases on either side of that center stitch. You will first work the increases, then knit an inch or so even, and then work the corresponding decreases to create a cup. Be sure to use the proper slant of increases and decreases to avoid leaving holes in your fabric.
Which kind of dart you insert might come down to the yarn and pattern you’re working with. You might find that adding short rows with a self-striping yarn creates an unfortunate pattern so vertical darts are preferable.
Where you start working your darts will depend on whether you are knitting top-down or bottom-up. You want the bottom edge of your dart to be roughly 1 inch below the beginning of the armhole.
There may be some trial and error as you get used to adding darts to a sweater pattern, but once you find the right fit, you’ll be sorry you weren’t always using darts. If you’re ready to make yourself the perfect, fitted sweater, but want a little additional help, learn more with Amy Herzog in Knit to Flatter.
Share tips, start a discussion or ask one of our experts or other students a question.
No Responses to “Knitting Darts To Create The Perfect Fit”