
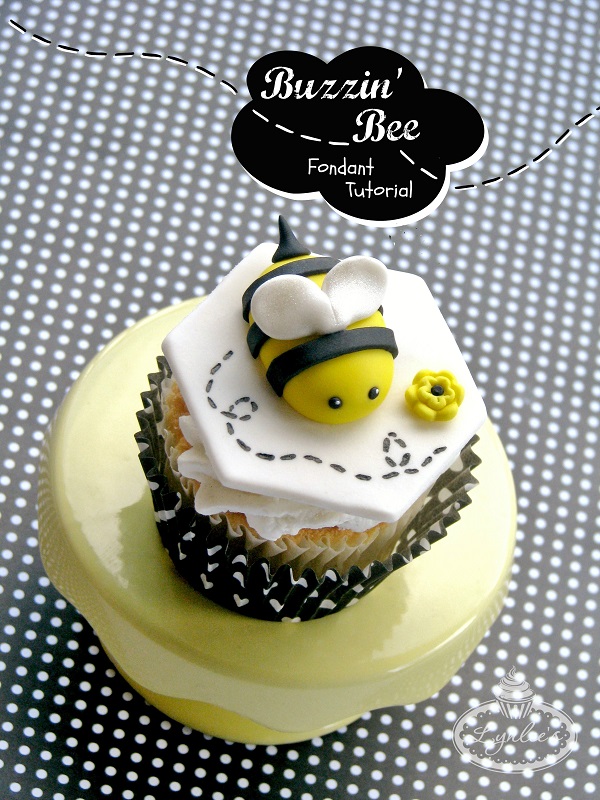
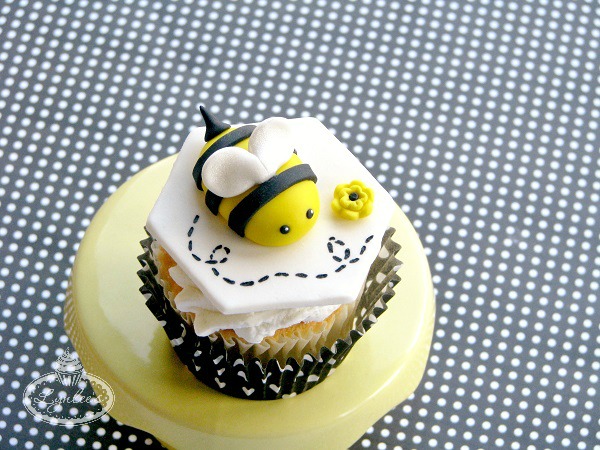
Spring is in the air, the flowers are blooming and the bees are a-buzzin’! Learn how to make a fondant bumble bee to top your cupcakes in honor of the approaching first day of spring!
Brighten up your spring cakes and cupcakes with this fondant tutorial.
Materials:
- Yellow, black and white fondant
- Water/edible glue and brush
- Fondant rolling pin with 1/8″ and 1/16″ guide rings
- Round decorating tips #3 and #12
- Precision knife
- Miniature oval cutter
- Large hexagon cutter
- Miniature flower cutters (2 sizes)
- Rolling pastry cutter
- Small modeling stick
- White shimmer dust
- Black edible pen
- White soft gel paste and toothpick
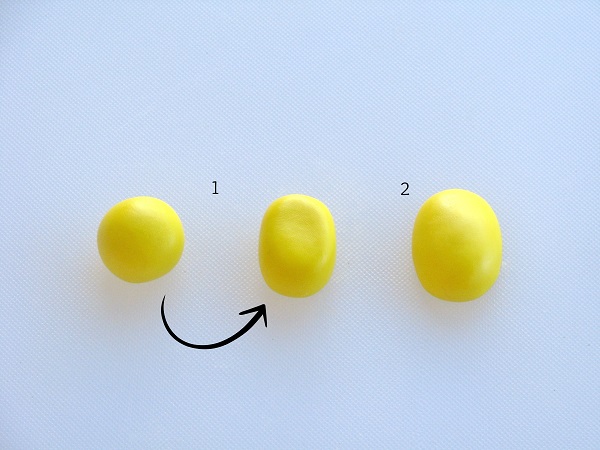
Step 1:
Roll yellow fondant into a ball (approximately 3/4″), then begin to shape it into an oval.
Step 2:
Round out the edges of the oval by smoothing the fondant with your fingers while on your work surface. Add vegetable shortening as necessary. As you round it out, the bottom will flatten to lay nicely on your bottom topper, forming the bee’s body.
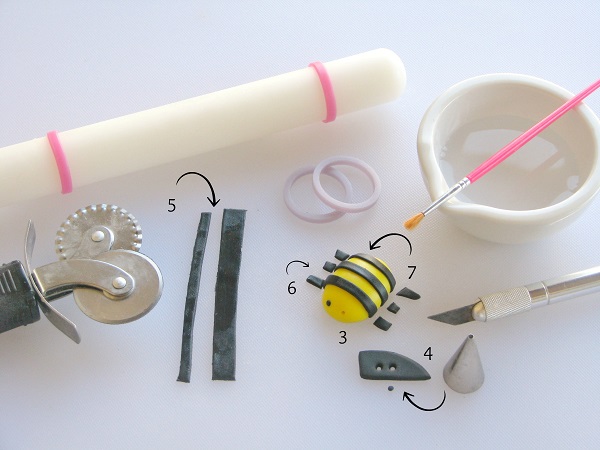
Step 3:
Use the small modeling stick to make two indentations on the bee’s body to create the eyes.
Step 4:
Roll out black fondant 1/8″ thick with the rolling pin and guide rings. Use round decorating tip #3 to cut two circles. Roll the circles into little balls, then glue them where you made indentations for the eyes.
Step 5:
Roll out black fondant 1/16″ thick with the rolling pin and guide rings. With the rolling pastry cutter, cut a strip of the black fondant (approximately 1/4″ wide).
Step 6:
Place the black strip over the center of the bee’s body. Trim the excess and glue it in place.
Step 7:
Repeat the above step to create two more stripes on the bee’s body.
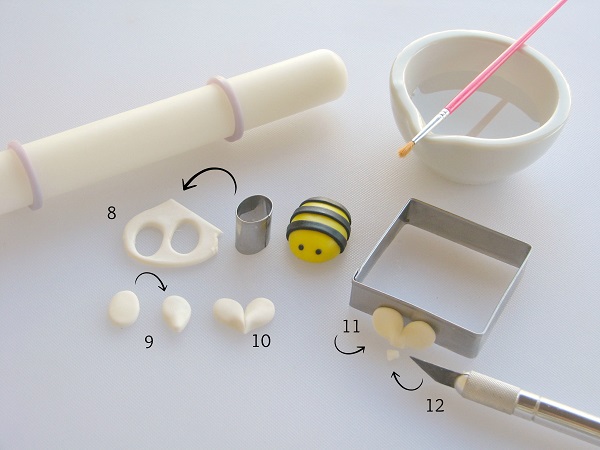
Step 8:
Roll out white fondant 1/8″ thick with the rolling pin and guide rings. Cut out two ovals with the miniature cutter.
Step 9:
Pinch one end of each white fondant oval to create a teardrop shape.
Step 10:
Add some water or glue to the two pointed ends of the ovals and pinch them together, while gluing them to create the wings.
Step 11:
With the pointed tip lying on your work surface, lift up the rounded wings with the length of your finger and shape it to sit up a bit. Lean it against a flat surface to allow it to dry to maintain its shape.
Step 12:
Use the precision knife to trim the pointed end enough that the wings will fit between two stripes on the bee’s body.
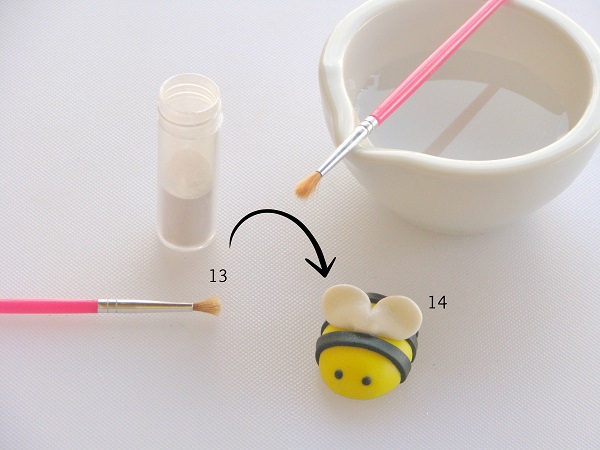
Step 13:
When the wings are sufficiently dry, dip a small brush into white shimmer dust and brush it over their entirety.
Step 14:
Dip your brush in water/edible glue and attach the bottom of the wings to the bee (preferably between two black stripes).
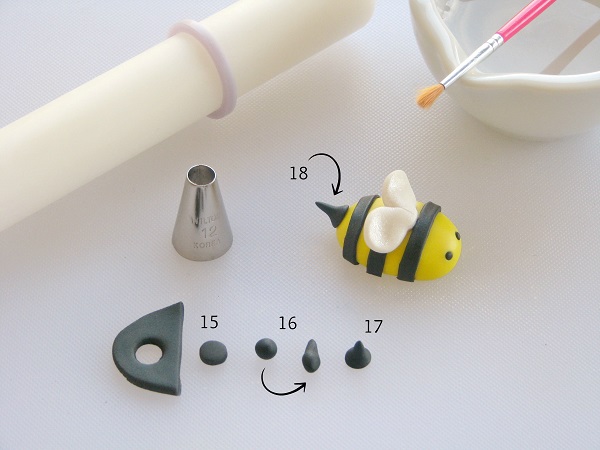
Step 15:
Roll out black fondant 1/8″ with the rolling pin and guide rings. Using round decorating tip #12, punch out a circle.
Step 16:
Roll the black circle into a ball, then begin to pinch one end.
Step 17:
Flatten out the larger end while continuing to pinch the opposite end into a pointed tip to form the bee’s stinger.
Step 18:
Dip your brush in water/edible glue and attach the stinger to the bee’s bottom.
Step 19:
Dip the toothpick in white soft gel paste and make little dots in the bee’s eyes.
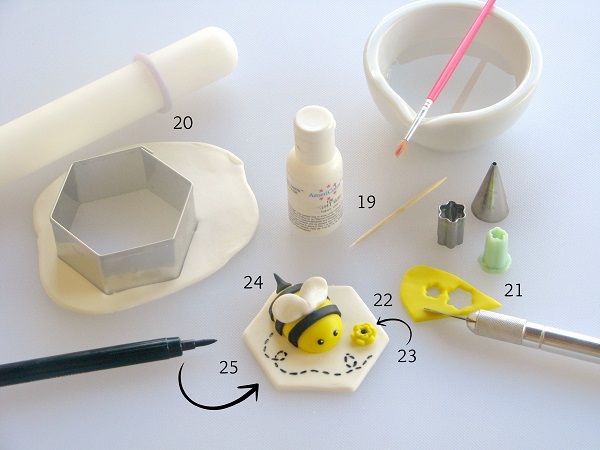
Step 20:
Roll out white fondant 1/8″ thick with the rolling pin and guide rings. Use the large hexagon cutter to punch out a hexagon shape from the white fondant.
Step 21:
Roll out yellow fondant 1/8″ thick with the rolling pin and guide rings. With the miniature flower cutters, punch out a couple flowers in different sizes.
Step 22:
Glue the smaller flower in the center of the larger one and either use your fingers to push up the petals or place them on a foam block and use a small ball tool to press into the center.
Step 23:
Roll black fondant 1/8″ with the rolling pin and guide rings and use round decorating tip #3 to punch out a small circle. Roll it into a ball, then glue it to the center of the flower.
Step 24:
Place the bee and flower over the hexagon topper in the desired location and glue it in place.
Step 25:
Use the black edible marker to draw a dotted path and allow to dry thoroughly.
Tip: The drier the fondant is on the hexagon topper, the easier it is to write with the marker. You can go ahead and write/draw right away, but make sure not to press too heavily as the moisture from the ink will sink into the fondant.
Get celebrity cake decorator Marina Sousa’s secrets for using fondant to create jaw-dropping cakes in her highly rated Craftsy class Advanced Fondant Techniques. You’ll learn to decorate cakes using stencils, embossing, appliqué, and also discover how to create exquisite fondant embellishments, like pearls, ribbons, roses and bows!
Share tips, start a discussion or ask one of our experts or other students a question.
No Responses to “This Fondant Bumble Bee Tutorial Is All the Buzz!”