
Getting the fit just right is by far the most challenging aspect of sewing clothing. Let’s not mince words here: Fitting is hard. Every effort should be made to adjust patterns to address figure issues well before the first pattern piece is cut. That process begins by first selecting the right pattern size. If you are in between sizes, learn to use the finished garment measurements that appear on the back of the pattern envelope to help you zero into the right size. But, the “finished garment measurement”, or FGM, can help in other ways towards getting you to the right fitting garment.
Learn how to use the FMG to create better fitting garments!
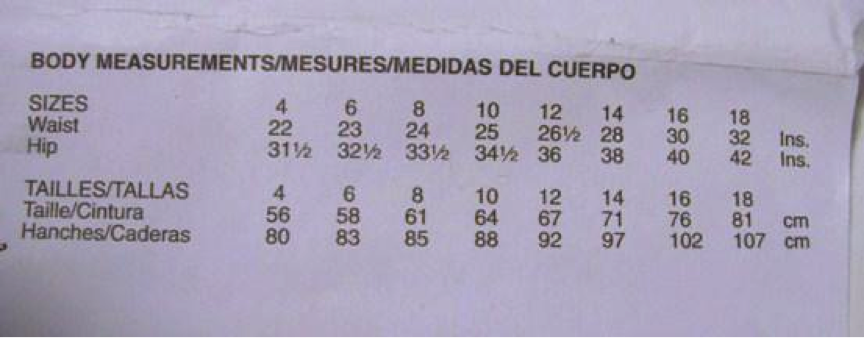
Finished garment measurements (note that on some patterns they are referred to as just “garment measurements”) are the dimensions of the finished garment typically referenced at the bustline, waist and hip. They represent the sum of the body measurements by size at each point, plus ease, both wearable and design ease. In essence, the FGM gives you a realistic idea of how the garment will fit once completed at and around those three points.
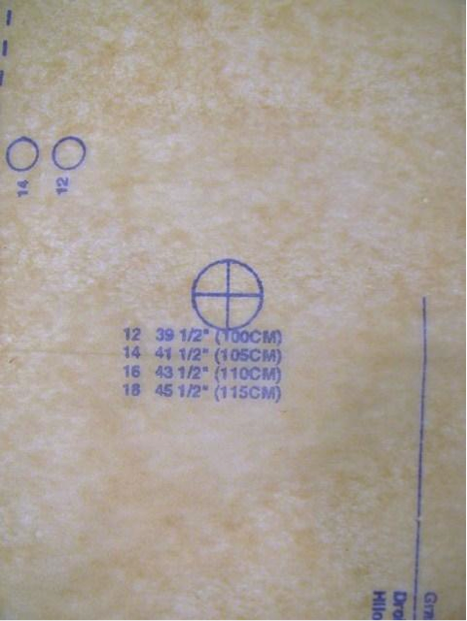
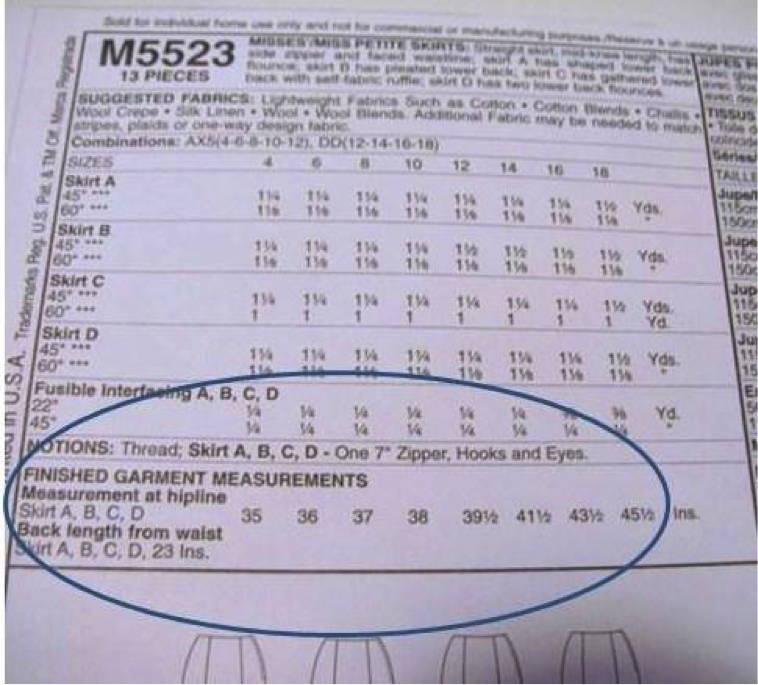
Finished garment measurements for most commercial patterns appear on the back of the envelope at the bottom. Not all pattern envelopes show them, but they are always on every bodice, bottom or sleeve pattern piece. A circle with a cross inside it is the symbol to look for on the pattern pieces near each body point. Below the symbol are the finished measurements listed by pattern size. In this example, the FGM is for the hipline.
[one_third_last]
[/one_third_last]
How to use FMG: an example skirt
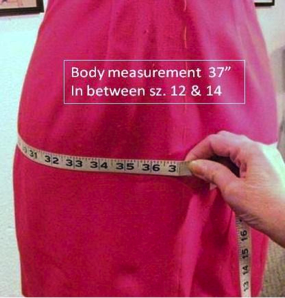
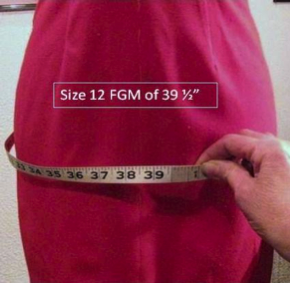
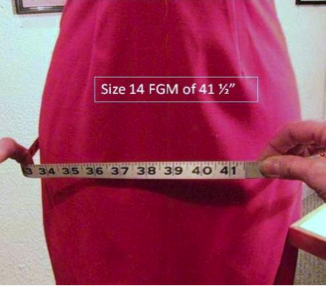
These measurements are very useful in selecting the appropriate pattern size, especially if you are between sizes at any of the three major body points. To illustrate how this works, let’s pretend your hip measurement is 37”. That falls in between a size 12 and 14 for the example pattern. To determine which of the two sizes would work best, begin by finding the FGM for the smaller of the two sizes. In this case, that’s 39 ½”, or 3 ½” of ease added to the body measurement.
Now, wrap a measuring tape around your hips to that FGM (39 ½” for size 12). See how that measurement feels and looks. Is it too snug, too big or just right? Now, do the same with the larger FGM (41 ½” for the size 14). Whichever feels or looks best is the pattern size you would select.
FGMs are also very helpful in determining how much to add, or subtract, when adjusting patterns to your measurements. Let’s use this same skirt example to illustrate this point. The amount of ease factored into the design of this pattern is 3 ½” at the hipline. So it should equal a FGM of 40 ½” for a body measurement of 37” plus the ease. This means 1” needs to be added to the circumference at the hipline for the size 12 skirt. Based on the design and number of seams in the skirt, simply divide or distribute that 1” among each seam to achieve the adjusted FGM.
By understanding how to use the finished garment measurements, you can limit the amount of adjustments you have to make later and create a better fitting garment.
[box type=”shadow”]
Learn the fundamental tailoring skills you need with custom clothier Angela Wolf in her Bluprint classes Tailoring Ready-to-Wear. Then, advance your sewing skills in her follow-up class, Ready-to-Wear Tailoring: Beyond the Basics, and master the art of the perfect fit!
[/box]
Share tips, start a discussion or ask one of our experts or other students a question.
No Responses to “Between Sizes? Use Finished Garment Measurements for a Perfect Fit!”