
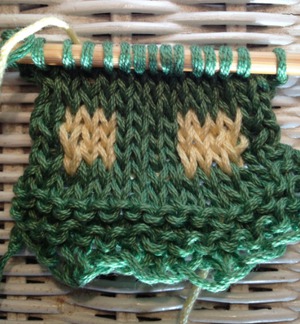
The term Fair Isle knitting generally refers to multi-color stranded knitting. The term comes from the name of an island off the coast of Scotland where a specific type of stranded knitting originated. Traditional Fair Isle knitting creates elaborate patterns through the use of only a few colors, and in true Fair Isle knitting, never more than two colors per row.
Let’s go through a brief tutorial to get you started with Fair Isle knitting.
Traditional Fair Isle knitting is most often done in the round, from socks to sweaters, though you’ll find lots of patterns worked flat.
Fair Isle knitting patterns are heavily-reliant on charts. The charts are a visual representation of the pattern, helping a knitter to see when to switch from the main color (mc) to the contrast color (cc) and when to switch back. Since most Fair Isle knitting is done in stockinette stitch, pattern charts rarely indicate the type of stitch to be used because it is understood. In the round, all stitches are stockinette and when knitting flat, you alternate knit rows and purl rows.
Fair Isle charts can be intimidating when you first look at them. It seems natural to start at the top and read the chart from left to right, but that’s not correct. Instead, you start at the bottom and work your way up. When knitting flat, read the bottom row from right to left, then the next row from left to right, zigzagging back and forth. When knitting in the round, though, every row starts at the same side of the work, so read every row starting at the right. (A lot of Fair Isle patterns are completely symmetrical, though, so some can be hard to mess up if you start reading them wrong.)
Once you understand the chart, you can begin knitting; just as soon as you figure out holding the yarn, that is. Most Fair Isle experts recommend holding one strand of the yarn in your right hand and the other in the left hand. This way, both yarns are ready to go when it is their turn to be worked. This can be easier for Continental knitters to pick up as they’re used to involving the left hand in the yarn hold.
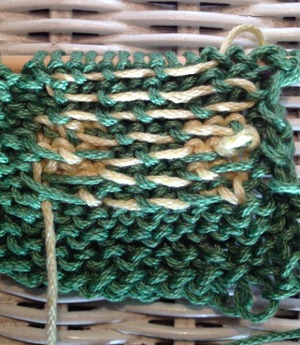
While you’re knitting, you will notice that the wrong side of your knitting is clearly identifiable.
It can look quite messy, as whichever color is skipped for a few stitches “floats” across the wrong side, leaving a long strand. (This is where the term stranded knitting comes from.) Those floats can cause problems if they’re not “caught” to your work occasionally. You don’t want any float to go more than about two to three stitches without securing it to the fabric. To do this, you wrap the yarn you’re not currently working, around the yarn you are working. If you’re working on double-point needles in the round, you’ll also want to catch your floating yarn each time you switch needles. Wrapping your yarns like this means they will tangle up, so every now and again, you’ll want to stop and unwind the two balls.
Now that you’ve read through this quick Fair Isle tutorial, you’re ready to get started. Check out this hat and Fair Isle mittens you can create. For further tips, you’ll enjoy the online Bluprint class The Fair Isle Vest with Mary Jane Mucklestone.
Share tips, start a discussion or ask one of our experts or other students a question.
No Responses to “Enjoy a Fair Isle Tutorial”