
The skeletal structure of the human body is the very foundation of figure drawing. Becoming familiar with and increasingly knowledgeable on this important system will allow you to achieve accuracy and correct proportions when drawing bodies from life, photographs and even coming up with poses from your imagination with no reference!
You can find more information about human anatomy for the artist by doing an online search or visiting your local library, but for quick reference, I’ve rounded up my top tips for drawing the human skeleton here.
Tips to drawing the human skeleton:
1. Divide the body into units

The body maintains a certain set of proportions that can be simplified by dividing its length into halves and quarters. Additionally, there is a general rule which states that the average person is 7 1/2 heads tall. Of course, this varies, but it is a very helpful guideline to follow when you are distributing the space between the halves and quarters we have defined.
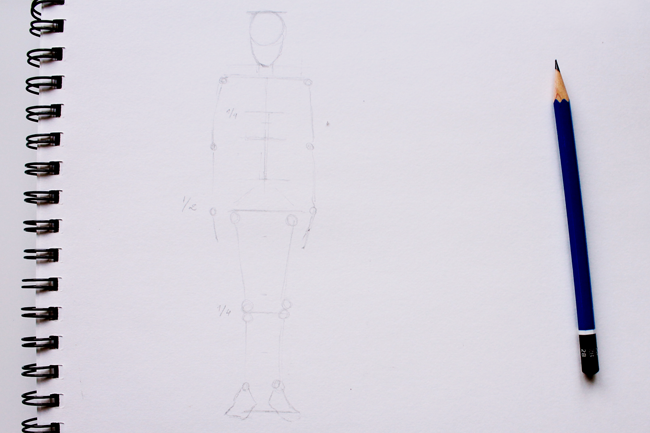
2. Use a wireframe to define basics
Before we start outlining real shapes and actual bones, it is preferable to draw a simple wireframe to sketch the length of all of the body’s components, such as the torso, legs and arms. The important thing here is to focus solely on proportions. Don’t worry about shaping anything just yet.
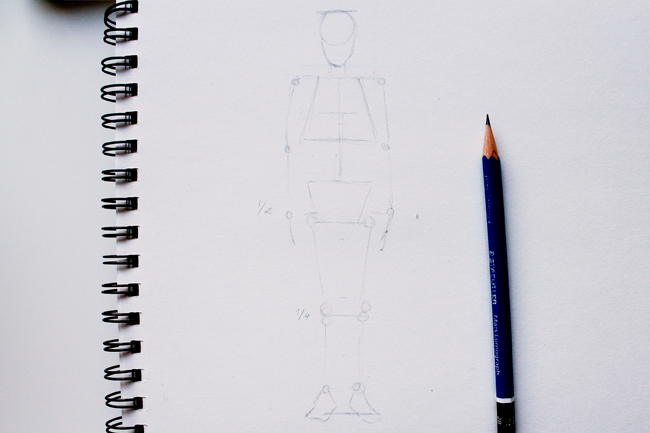
3. Use trapezoids to locate main structures
Once you have nailed the basic proportions through the wireframe, you want to define the two larger and major shapes of skeleton: the ribcage and pelvis. Represent these by drawing two trapezoids in their place.
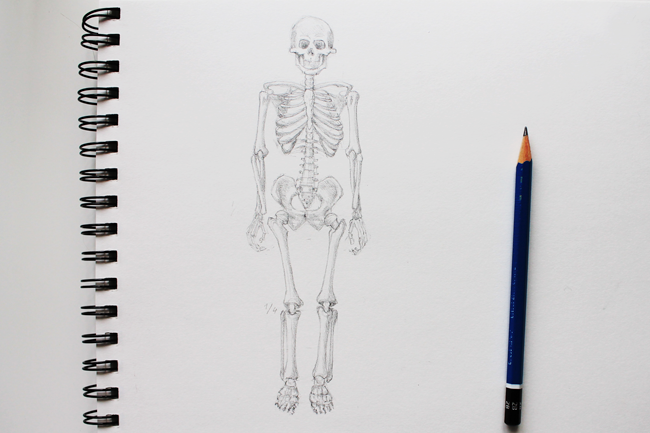
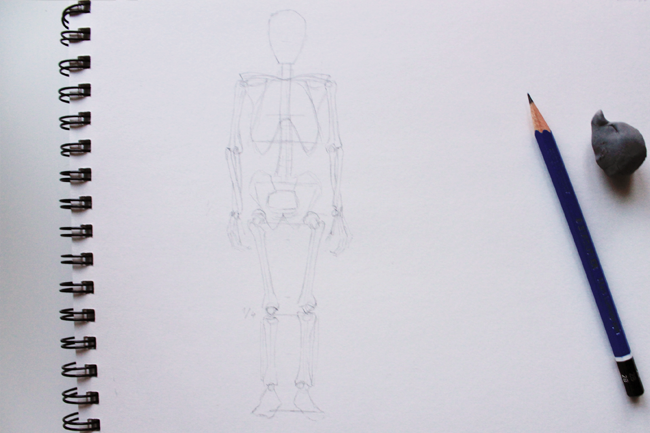
4. Identity the bones
It’s not absolutely necessary to know all the names of all the bones, but it is beneficial to know the main ones and especially to know their shapes and their particular directions. For example, the femur is usually slanted diagonally from the hip, and inward as it reaches the knee.
5. Check the proportions
Use these pointers to corroborate all the proportions and make sure that you are not distorting the body. This practice is especially useful when drawing from the imagination instead of a live figure or photograph.
Some relationships to consider:
- Upper leg is longer than lower leg.
- Upper arm is longer than lower arm.
- The spine begins thin and as a direct extension of the neck. It gradually becomes thicker as it reaches the pelvis, as it is the most weight-bearing part of this section.
- The pelvis is located half-way up the figure.
- If you are drawing relaxed hands, they will typically reach halfway down the femur.
- The navel can be found halfway between the center of the ribcage and the bottom of the pelvis.
Remembering these relationships and how each element interacts with the rest of the body as a whole will allow you to master proportions, draw bodies from your imagination and come up with poses.
Share tips, start a discussion or ask one of our experts or other students a question.
No Responses to “5 Tips for Drawing the Human Skeleton”